Forms embedding user guide
Better <support@better.care>
- Legal Notice
-
The information provided herein is »AS IS«. The information contained in this document is subject to change without notice. Better, d.o.o. (hereinafter: Better) gives no warranty of any kind with regard to this material, including, but not limited to, the implied warranties of merchantability and fitness for a particular purpose. Better shall not be liable for any errors contained herein, or for incidental or consequential damages in connection with the furnishing, performance or use of this material.
(c) Better - Reproduction, adaptation or translation without a prior written permission is prohibited, except as allowed under the copyright laws.
- Conventions
-
This document uses the following symbolic conventions:
Courier textCourier text indicates filenames and their contents, computer input and output, program code, etc. For example: “To see the status of server, type
ps -ef | grep java.”Italicized text
Italic text indicates document titles, parameters, emphasized text and replaceable text.
bold text
Bold text indicates emphasized text.
<angle brackets>
Angle brackets indicate generic variable names that must be substituted by real values or strings.
- We welcome your comments
-
Your feedback on the information in this guide is important to us. Please send your comments about this guide to make it even clearer and more accurate.
- Browser support
-
Our products work with all the latest major browser releases and do not require any special additions, extensions or previous setup. We discourage using Internet Explorer at all.
We do support:
-
Edge 17+,
-
Chrome 60+,
-
Firefox 56+,
-
Safari 11+,
-
Opera 50+.
-
- About
-
Forms created with Better Platform low-code tool EHR Studio are the best way to provide a user interface with minimum effort and maximum reliability for the data collection process and collected data presentation.
The forms are based on previously defined data model, designed with drag-and-drop approach, based on how openEHR implements data related operations and specifically tailored for healthcare use-cases.
Glossary
- platform, repository
-
Better Platform
- API
-
EHR Server integration REST API
- EHR
- EHR ID
-
Single EHR unique identifier
- CDR
-
Clinical Data Repository - a medical database system designed to provide a realtime summary of a patient’s condition
- Sandbox
-
Better Platform testing environment, located at https://sandbox.better.care
Requirements
There are three actors in the architecture involving the Better Forms being embedded in a 3rd party web application:
-
the application you are developing, also referred to as a hosting application, since it hosts the form
-
Better Platforms' EHR Server, representing the CDR and serves the form definition, also known as form description
-
form-renderer library, provided by Better
Workflow
Forms are designed using the Form Builder tool, which is available within the Better Studio low-code environment. Whenever a form is updated, its definition is stored on the repository, marked as an individual version. Repository can host and serve multiple versions of the same form, if different clients require that.
When a hosting application wants to embed an existing form into its content, the following things need to be configured:
-
Hosting page of the web app needs to be loaded,
-
form-renderer library needs to be loaded,
-
form-renderer configuration needs to be provided, in order to load all necessary resources and render the form,
-
form needs to be initialised with contextual information in order to function as expected.
Hosting web app
Hosting web app can be programmed in any programming environment, language or framework, i.e. Angular, React, Vue, pure html and similar. All of them support inclusion of vanilla javascript files, which are needed for form-renderer to work.
Form renderer
Form renderer is a library that consumes the form description provided by the repository and renders a form within the web page DOM structure. The content is injected directly in the DOM structure, no IFRAMEs are used or similar.
Originally it is programmed in Angular, but we also have a compiled WebComponent based .js library you typically include in your hosting app. Better can provide access to the repository that hosts both, angular modules and/or WebComponent based .js library.
See Form Renderer - Installation documentation for details.
Components
For our use-case let’s assume we are working with the WebComponent based .js library, which consists of a single file, usually named form-renderer.js.
The installation bundle consists of the following files as well:
-
a bunch of font files
-
styles.csscontaining the default form element styles -
optional
styles-theme.cssfile, where you can include your style customisations and create a form-renderer theme
The .js file can be placed wherever you need it, whereas font files need to be in the same location as the .css files.
For our case let’s assume the following structure was established:
/web-app/index.html
   +--- /form_renderer/
   |             +--- form-renderer.js
   |             +--- styles.css
   |             +--- styles-theme.css
   |             +--- font_file1.woff
   |             +--- font_file2.woff
   |             +--- ....
   +--- app.js
   +--- ....
Form-renderer theme
Form-renderer default styles are based on a Material library.
See Form-renderer themes documentation section for details.
Embedding the form in the web app
In order for form-renderer to work, you need to include two items in your target web page at the HTML <head> level:
-
form-renderer library
-
default form styles
Including the form-renderer resources
<head>
  <!-- ... other items ... -->
  <script src="form_renderer/form-renderer.js"></script>
  <link rel="stylesheet" type="text/css" href="form_renderer/styles.css" media="screen"/>
  <!-- ... other items ... -->
</head>
Activating the form renderer
After the web page which will host the form is completely loaded, form-renderer inspects the DOM for any element named form-renderer. This will serve as a placeholder - form injection point.
<html>
  <head>
    <title>Form-renderer demo</title>
    <script src="form_renderer/form-renderer.js"></script>
    <link rel="stylesheet" type="text/css" href="form_renderer/styles.css" media="screen" />
  </head>

  <body>
    <form-renderer id="myForm" />
  </body>
<html>
But before that can happen, we need to provide the following information to the form-renderer:
-
what is the repository URL,
-
provide the credentials to access the repository,
-
information on which form description to load from the repository,
-
form configuration parameters,
-
any external information from the hosting app, that needs to be passed to the form.
|
If you need to execute other activities, provide information necessary for form initialisation or similar actions, that need the rendition of the form to be deferred, do not use the |
Form-renderer configuration
Create a series of configuration objects and attach them to the element <form-renderer />.
Do this just after the web page has finished rendering in the browser, wrap it into a listener and place in the <head> part of the web page.
<script type="text/javascript">
  window.addEventListener('DOMContentLoaded', (event) => {
    // setup the FormRenderer
    var form = document.getElementById("myForm")

    // form-renderer initialisation goes here
  })
</script>
See Form-renderer configuration documentation section for details.
Repository API URL
Provide the repository URL, pointing to the REST API.
If the repository responds at the address https://<HOST> then the proper configuration parameter is:
form.resourceUrl = 'https://<HOST>/rest/v1'Repository credentials
There are two types of credentials available:
-
basic authentication for direct repository access,
-
OAuth2 token based access.
See Form-renderer credentials configuration documentation section for details.
Basic authentication
You need to provide a username / password pair, that is configured via repository dashboard or administrative API.
Add the following configuration to the form-renderer:
    form.credentials = {
      username: '<USERNAME>',
      password: '<PASSWORD>'
    }
Of course we usually do not want to have credentials in the clear-text within the source! Please, act responsibly!
| User needs to have assigned at least the role ROLE_READ to load the form. |
| We strongly recommend using basic authentication access ONLY for development environments which are not open to public, do not contain real-life data or expose any personal information! |
Token based authentication
In production environment we usually use token based authentication. The authentication flow is executed before we got to the web page in question, and the token is already available to the hosting web app.
You need to explicitly pass the token to the form-renderer the following way. Form-renderer cannot extract the token from the web page or http request itself!
    form.credentials = {
      authType: 'oauth2',
      token: '<TOKEN>'
    }
See Extracting the token from a http request on how to obtain a token for testing.
Form information
Let’s tell the form-renderer which form to load.
Value for name is required, version is optional.
| If no version is specified, the latest form version will be served. |
    form.formMetadata = {
      name: 'Demo form',
      version: '1.0.0'
    }
Form rendition parameters
Form-renderer can be configured to present the form in different ways.
Let’s configure the language the form is displayed in and the country code, where the EHR is located. Use a 2 letter ISO-3166 notation.
Make sure to provide at least these two parameters.
    form.context = {
      language: 'en',
      territory: 'SI',
    }
See Form-renderer rendition parameters documentation section for details.
Pass contextual information to the form
Some data usually needs to be passed to the form, sort of injected into the form, to work correctly. We handle this kind of information injection by using the form variables.
See Form-renderer - externally defined variables documentation section for details.
Basic information that needs to be passed to the form is usually the patient identifier. Exploring any existing form or creating a new one, opening the variables list, you will see it contains at least the ehrId variable.
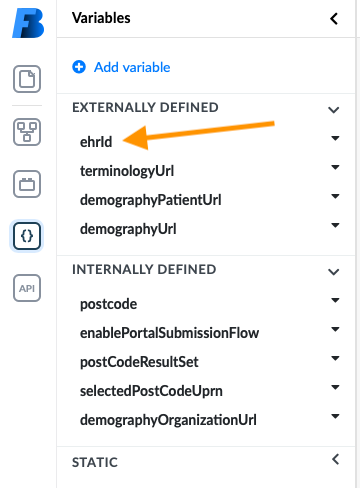
Web app flow probably already offered a patient list to the user, that selected a single patient, ehrId was obtained from the demographic/administrative data and now needs to be passed to the form.
  form.formEnvironment = {
      variables: [
      {
          name: 'ehrId',
          value: '22502f45-898f-4664-b9ca-10b8144c5f42'
      }
    ]
  }
ehrId is usually a random UUID value.
|
Any other variable value that needs to be passed to the form must match the internally defined type (number, string, array, object, boolean).
Fully initialised form-renderer
We got to the point where our source looks like this:
<html>
  <head>
    <title>Form-renderer demo</title>
    <script src="form_renderer/form-renderer.js"></script>
    <link rel="stylesheet" type="text/css" href="form_renderer/styles.css" media="screen" />

    <script type="text/javascript">
      window.addEventListener('DOMContentLoaded', (event) => {
        // setup the FormRenderer
        var form = document.getElementById("myForm")

        // form-renderer initialisation goes here
        form.resourceUrl = '<HOST>/rest/v1'
        form.credentials = {
          authType: 'oauth2',
          token: '<TOKEN>'
        }
        form.formMetadata = {
          name: '<FORM_NAME>',
          version: '<FORM_VERSION>' // optional
        }
        form.context = {
          language: 'en',
          territory: 'SI',
        }
        form.formEnvironment = {
          variables: [
            {
                name: 'ehrId',
                value: '<EHR_ID_VALUE>'
            }
          ]
        }
      })
    </script>
  </head>

  <body>
    <form-renderer id="myForm"></form-renderer>
  </body>
<html>
Provide the missing values and open the html file in your browser and it should display a form!
| placeholder | description | example value based on Sandbox |
|---|---|---|
HOST |
Provide the URL part that points to the CDR. Final URL ( |
|
TOKEN |
JWT formatted access token, issued by the Identity Provider. |
|
FORM_NAME |
Pass the form name as a string. |
'Vital Signs Lite' or any other form name. |
FORM_VERSION |
Form version is optional - if none is passed, the latest form version will be used. You can pass an empty string or completely omit the |
'1.0.5' |
EHR_ID_VALUE |
This is the patients EHR identifier within the CDR. It is generated automatically ba the CDR when a new EHR is created. Usually it is stored in a demographic/administrative server. See Extract patients ehrId. |
'22502f45-898f-4664-b9ca-10b8144c5f42' |
Storing the form data
You can trigger sending the form data to the CDR in two different ways:
-
an action within the form (internal trigger),
-
an action from the hosting web app (external trigger).
Triggering data submission from the form itself
Using the dependencies
We want to trigger sending of the data to the CDR, typically when the user presses the button.
-
Drop a generic button onto a form, change the label and style and open the dependencies editor.
-
Add a dependency on the button, triggering the
Formsave compositionaction.
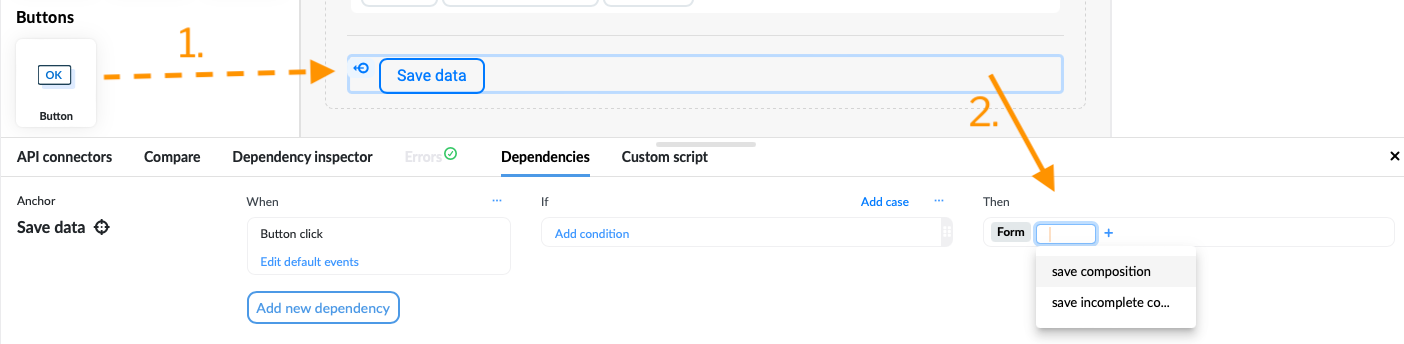
Once the user presses the button, the validation is automatically performed and if there are no errors, data is sent to CDR.
|
When using dependencies or script-api capabilities from within the form to trigger data submission to the CDR, only the base code defined here is needed. |
Using the script-api capabilities
You can trigger the data submission with an script-api function as well:
  // validate the data and send if data is valid
  api.saveComposition(true)
See Form-renderer - script-api documentation section with function definition for more details.
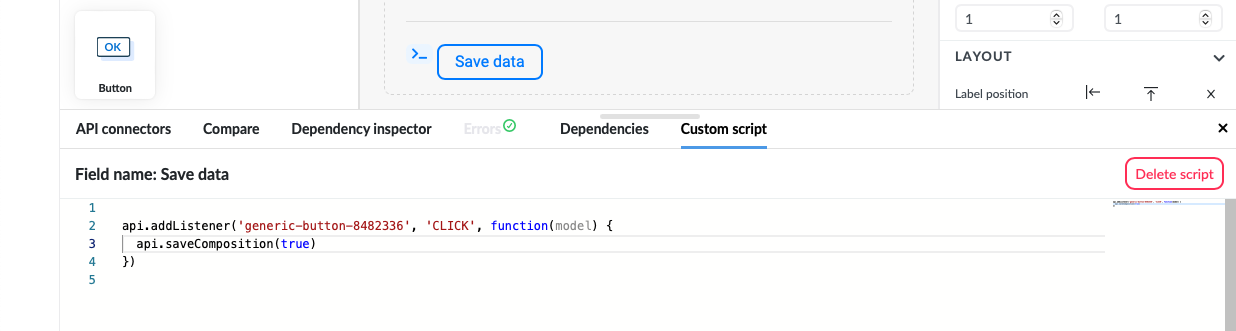
  api.addListener('generic-button-8482336', 'CLICK', function(model) {
    api.saveComposition(true).then(function(response){
      alert('Composition created, id = ' + response.uid)
    }).catch(function(error){
      console.log(error)
    })
  })
Triggering data submission from the hosting web app
Once the form is embedded in the hosting web app, you can access all the form content and form functionalities from the hosting web app as well, using the same script-api functions.
First, let’s create the trigger - a button, residing outside of the form, just below the form injection point:
  <body>
    <form-renderer id="myForm"></form-renderer>
    <!-- add the save button to the web app -->
    <button id="save_button">Save data</button>
  </body>
Then, let’s add the following code to our web app example:
  function triggerSaveData() {
    // validate the form
    var validation = form.validate(true)
    if (validation.valid) {
      sendCompositionToCDR()
    } else {
      alert('There are validation errors!')
      console.error(validation.errorMessages)
    }
  }

  // separate function, to handle the async promise
  async function sendCompositionToCDR() {
    // execute script-api function and get response - 'false' for validation, as it was already performed
    var response = await form.getScriptApi().saveComposition(false);
    if (!response.success) {
      alert('Uh oh! Something went wrong. Check logs.')
      console.error(response.error)
    } else {
      // a form can generate one or more compositions, depending on whether it is based on multiple templates
      var ids = ''
      if (response.commitData) {
        response.commitData.forEach((commit => {
          ids +== commit.id + ','
        }))
      } else {
        ids = response.uid;
      }
      alert('Compositions created: ' + ids)
    }
  }
  // bind clicking of the "save data" button to the execution of 'triggerSaveData' function
  document.getElementById('save_button').onclick = triggerSaveData
See Form-renderer - interaction documentation section for more details.
Listening for the saveComposition() function response
In case the form data submission is triggered internally, there is a form based event that is triggered each time the form script-api receives a response from the CDR.
  form.addEventListener('onCompositionSaved', function(eventData) {
    var response = eventData.detail
    var ids = ''
    if (response.commitData) {
      response.commitData.forEach((commit => {
        ids +== commit.id + ','
      }))
    } else {
      ids = response.uid;
    }
    alert('Compositions created: ' + ids)
});|
The event |
See Form-renderer interaction documentation section for more details.
Accessing the form data
If at any time you need to access the whole composition data from the web app side, you can access it by accessing the form.composition property:
console.log(form.composition)|
Composition structure available at |
To access a specific field only, use the script-api functions getFieldValue() and related:
  var api = form.getScriptApi()
  var systolicField = api.getFormValue('vital_signs/blood_pressure/any_event/systolic')
  console.log(systolicField.magnitude)
See Form-renderer script-api documentation section for more details.
Support
Prefilling the form from an existing composition
Forms can be prefilled with data from a specific composition, based on the template the form uses as well.
To prefill the form, assign the compositionId form property to a specific value when configuring the form-renderer:
form.compositonId = '707417ec-b186-4090-b411-34bc7398530c::andraz_kozelj_better_care::1'Once the form is rendered, form-renderer will automatically fetch the specified composition and populate the form with its data.
|
Switch the form into presentation mode for data overview, by modifying the Form rendition parameters, namely the See Form-renderer rendition parameters documentation section for details. |
Deferring the form rendition
If it is necessary to perform other tasks, that need to be executed before you are able to provide information/data needed for form-renderer configuration (usually asynchronous), you need to defer the form rendition till after those information are available.
|
Form-renderer waits for the After that, form-renderer also constantly monitors the web page DOM, if any new |
In such cases your web page app should initially not contain any <form-renderer /> elements:
  <body>
    <div id="form-placeholder"></div>
  </body>
When ready, configure the form-renderer as explained above and inject the <form-renderer /> element into the <div id='form-placeholder' /> element already on the web page.
          // create a form-renderer element within the DOM
          var form = document.createElement('form-renderer');
          // configure the form-renderer
          form.formMetadata = { }
          form.resourceUrl = ''
          form.credentials = { }
          form.context = { }
          form.formEnvironment = { }
          // inject the form-renderer element into web page DOM
          document.getElementById('form-placeholder').appendChild(form)
At this point form-renderer will detect this new element and do its job rendering the form.
Extracting the token from a http request
A token is needed if you would like to test your integration with Better Platform CDR, using the oauth2 credentials.
Tokens are used in a single sign-on (SSO) environment, issued by your Identity Provider and used in communication with the servers and services used. They are injected in the headers of requests sent to the servers. See How bearer token work for more details.
Tokens have a short validity time, so it is necessary to refresh or recreate them from time to time.
For testing purposes, you can develop a form in our Better Platform Sandbox environment and try loading it from the Sandbox CDR.
Steps needed to extract a valid token on Sandbox environment:
1. Login to Better Platform Sandbox page
Go to address https://sandbox.better.care
2. Provide the Sandbox credentials
In the login form enter the Sandbox username and password provided by Better. If you do not have an account yet, register at the address https://www.better.care/try-sandbox, free of charge.
3. Open the browser inspector tool
-
How to do it in Safari - enable developer tools, open inspector
-
How to do it in Chrome
-
How to do it in Firefox
Make sure you switch to the Network panel.
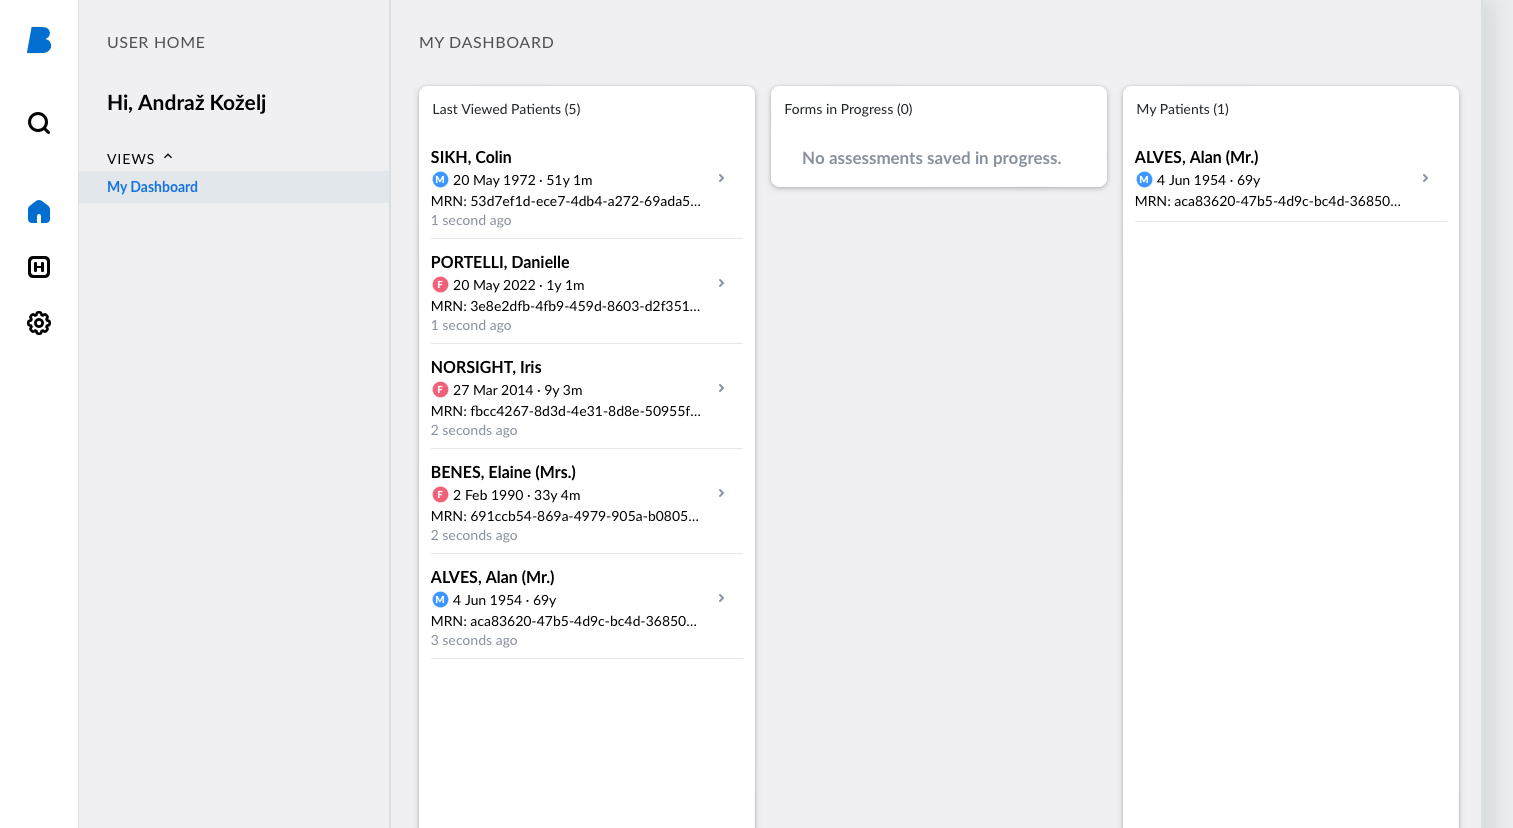
4. Actually login in the Sandbox
Press enter on the login form or press the Submit button. Make sure you are actually logged into the Sandbox environment, seeing content similar to this:
5. Extract the token
In the left part of the Network panel within the browser inspector there is a list of resources accessed from the Sandbox environment.
-
Click on one of them (avoid images, fonts and similar, since they are accessed without the protection of the token authentication). In our case we chose a file lockout.json.
-
Click on the Headers tab, to inspect the request content.
-
Find the Request section and look for a header named Authorization.
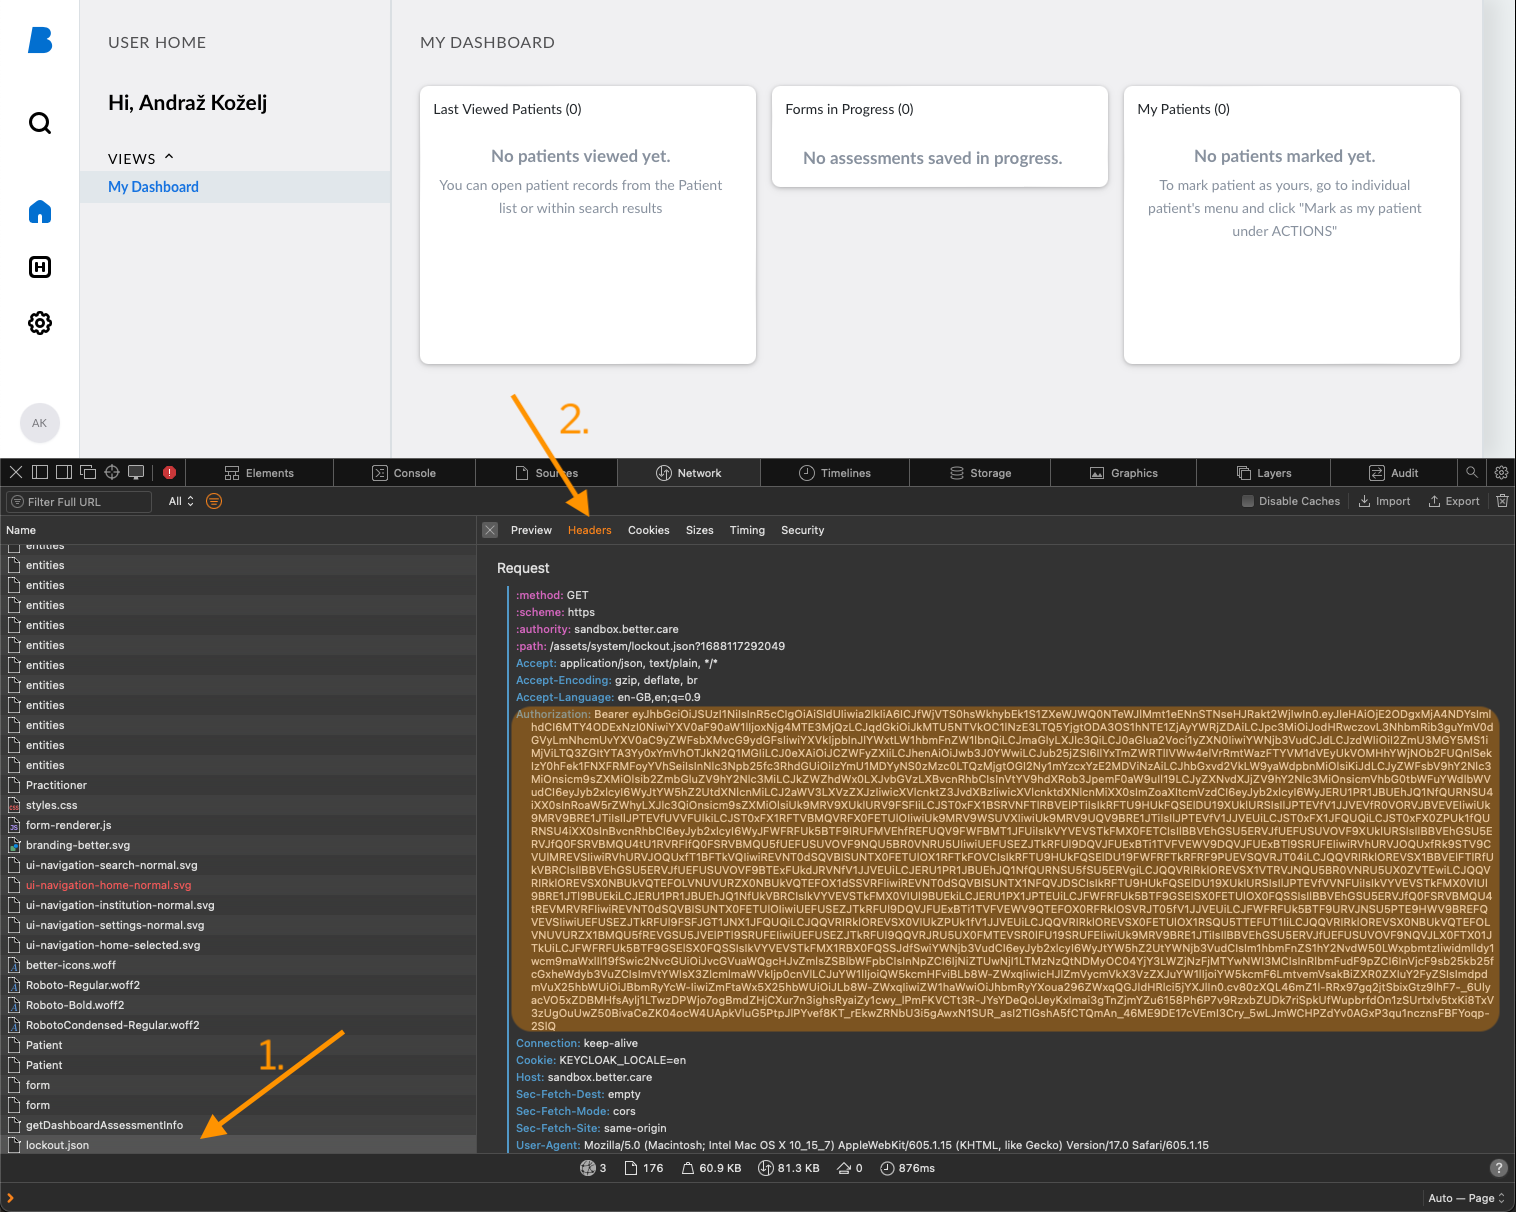
The content we need starts with the string Bearer, but we need the part that follows the space.
In our case it starts with characters eyJhbGciOiJSUz/1… and ends with …3qu1ncznsFBFYoqp-2SIQ.
This is the token to use in form-renderer configuration.
Sandbox access data
When initialising the form-renderer, use the following values:
| placeholder | example value based on Sandbox |
|---|---|
HOST |
|
FORM_NAME |
'Vital Signs Lite' or any other form name listed within Form Builder |
EHR_ID_VALUE |
Select one of the Sandbox patients and extract the |
Extract patients ehrId
Each EHR record within the CDR has a unique identifier, called the ehrId. When an EHR is created, this information is returned from the CDR API. Usually the step that follows is to store this information somewhere else, together with other patient related data - usually on the Demographic data server or Master Patient Index.
In order to test the forms stored on Sandbox environment, you would need to extract the ehrId value for a specific patient. This information is not available within the demographic data, because we are linking the patients with their EHRs using a concept we call external identifier or subjectId. This value is stored directly within the EHR and can be retrieved with an AQL query.
A patients MRN number is the (random) identifier within the Sandbox, acting as an external identifier for the EHR.
To pair both identifiers, follow the next steps:
-
Login into the Better Platform Sandbox
-
Click on the "H" icon within the Portal sidebar
-
Click on the EHR Studio link in the sidebar
-
Click the AQL Builder tool icon
-
Click the "+" in the tab-bar, to create a fresh tab.
At this point, copy the following query into the editor and run the query:
SELECT e/ehr_id/value AS ehrId,
       e/ehr_status/subject/external_ref/id/value AS MRN_number
FROM EHR e
WHERE e/ehr_status/subject/external_ref/namespace = 'MRN'
In order to match a patient with its ehrId, run the above AQL query.
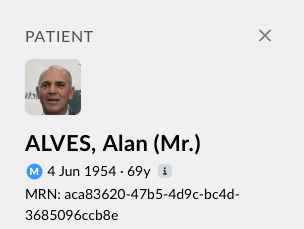
Our patient Alan ALVES has a MRN of aca83620-47b5-4d9c-bc4d-3685096ccb8e.
Find a matching MRN in the query output:
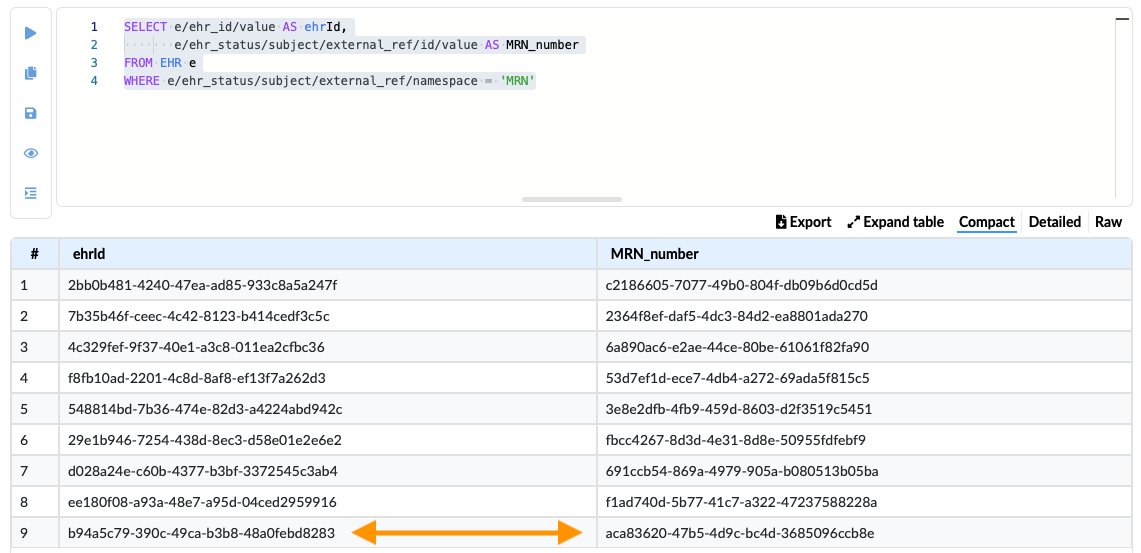
We learn that the ehrId for Alan ALVES is b94a5c79-390c-49ca-b38-48a0febd8283.