Frequently Asked Questions (FAQ)
Table of Contents
- Table of Contents
- Data
- How do I format the date from a datasource?
- Can I let the user select one of the past measurements from a list?
- Can I validate an email and only allow users to save the composition if it is in a valid format?
- Using mustache notation in Rich text/HTML
- Using 'CONCAT' to combine text
- Creating terminology API connectors (Terminology Adapters)
- Productivity
- How do I copy a form or summary from one project to another?
- How do I update a composition instead of creating a new one?
- How do I set multiple values as a default value to a Coded text or Ordinal field?
- How to make API calls to IP addresses using the correct protocols and solve mixed content errors?
- How do I know if a multiplicity of a container was added or removed?
- How do I set different values in a multiplicity container via script?
- Can multiple users work simultaneously on the same form?
- Labels on forms that were copied from different project
- Expression assistant
- Using 'debounce' to optimize listeners on form elements and variables
- Using form version numbers to convey the significance of changes
- Why do I only see settings and membership on a project?
- Design
Data
How do I format the date from a datasource?
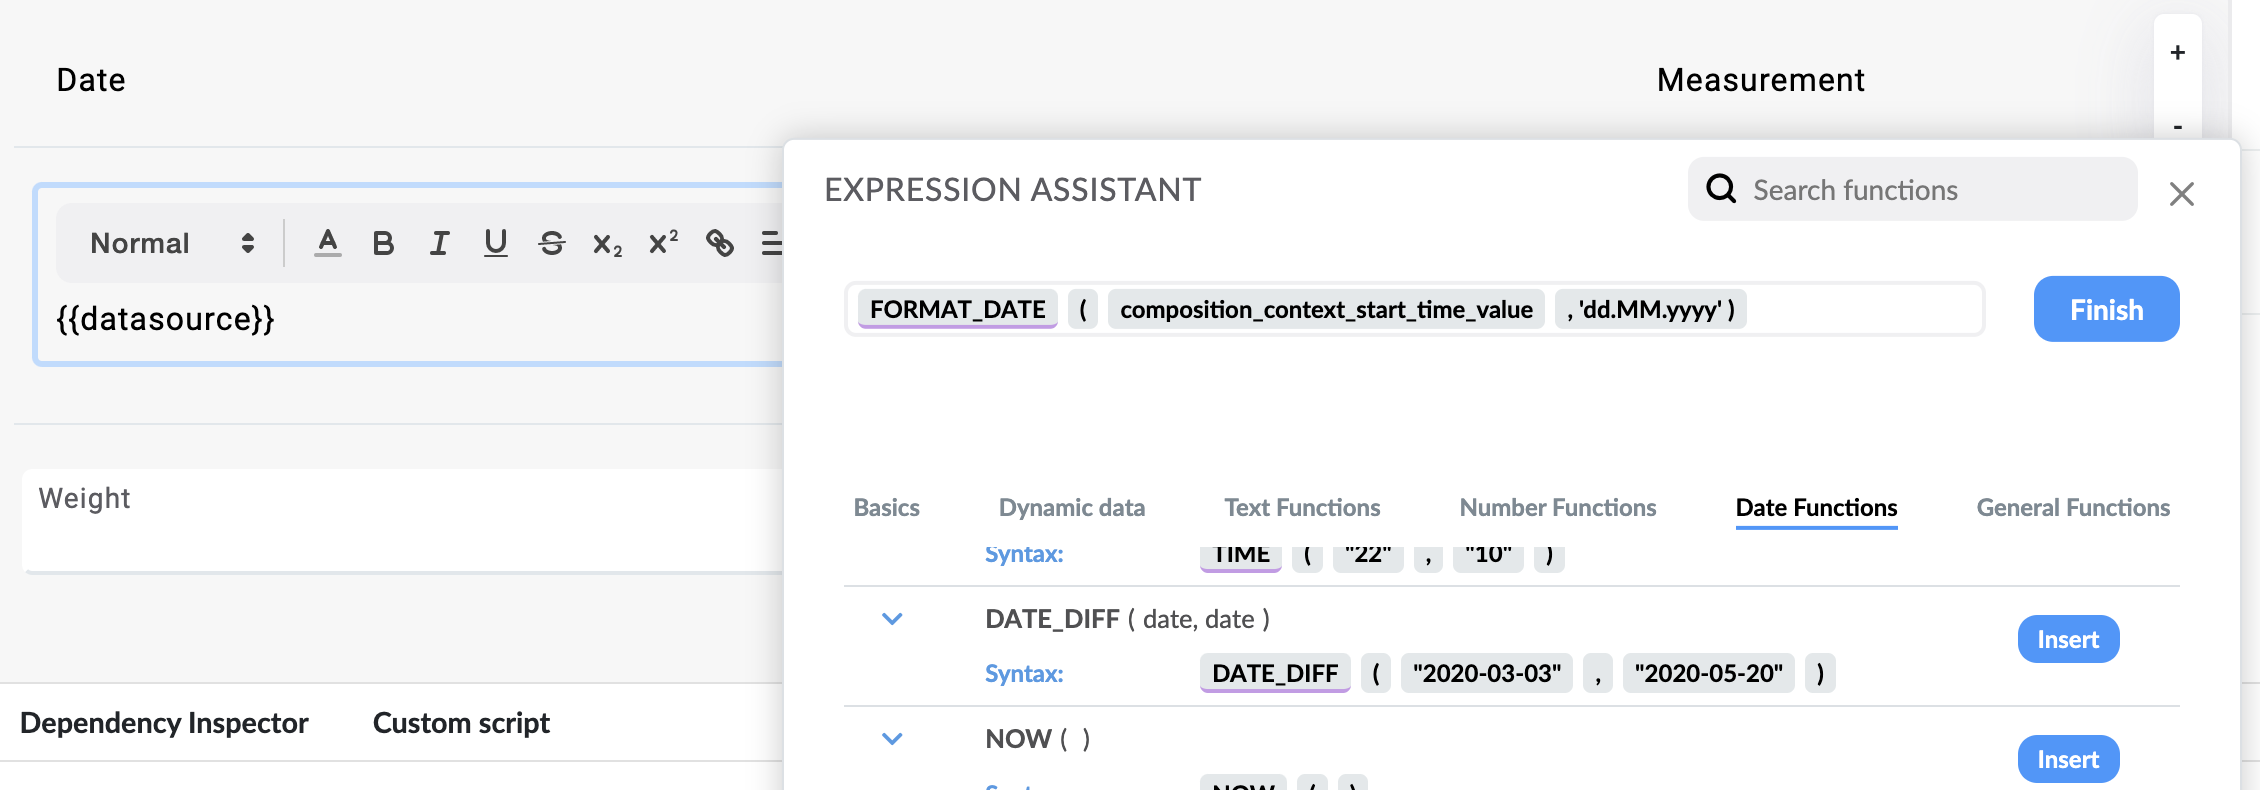
You can use the FORMAT_DATE function that is in the expression assistant. When binding a date value to a rich text field for example, use the expression assistant to add the FORMAT_DATE function, in the brackets add the date from the datasource and after the comma in single quotation marks enter the desired format. The format needs to be compliant to the documentation of the date-fns library - Date formats
Can I let the user select one of the past measurements from a list?
Sure, in this example we will use a AQL vriable to query the last 5 weight results from the selected patient, show them in a column list and let the user select one to fill it into the template field.
Let's start with the AQL variable. On the left go to the variables panel, click "Add variable" and select a variable name. For the source, select "AQL" and in the AQL value, click on the "+" sign to add a query. You will be redirected to the AQL builder, when you can build the query. Find the desired template and specific field from the left panel. In this example we also want to add the information about when this data was recorded. We can find this information in the "Predefined objects" panel under Composition and composition -> start time -> value. Once we have these two fields, we can also limit them to the selected ehrId. We do this by adding the following line in the bottom before the last line when we set the LIMIT:
WHERE e/ehr_id/value = :ehrId
This will limit the results to the value of out external variable ehrId.
Below is an example of the AQL query which returns the last five weights and when they were recorded for a specific template and EHR ID:
SELECT m/data[at0002]/events[at0003]/data[at0001]/items[at0004]/value AS weight,
       c/context/start_time/value AS composition_context_start_time_value
FROM EHR e
CONTAINS COMPOSITION c[openEHR-EHR-COMPOSITION.encounter.v2]
CONTAINS OBSERVATION m[openEHR-EHR-OBSERVATION.body_weight.v1]
WHERE e/ehr_id/value = :ehrId
OFFSET 0 LIMIT 5
Now to initialize this properly within the form builder, we need to add a test value to the ehrId external variable. Preferably one that has some composition data to it.
After we have this, let's put a weight field from the template to the form and add a column list to it as well. Set the column list datasource to the AQL variable we created. In the first row lets display the date. We can format it using FORMAT_DATE. On the second let's concat the weight magnitude and weight units. Here we will also put in a hidden numeric field. Set this field to the weight magnitude and hide it, we will be using it later.
Now let's create a new dependency that will use the weight magnitude from the hidden field and set it to the template weight field, when the row is clicked. It should look something like this:
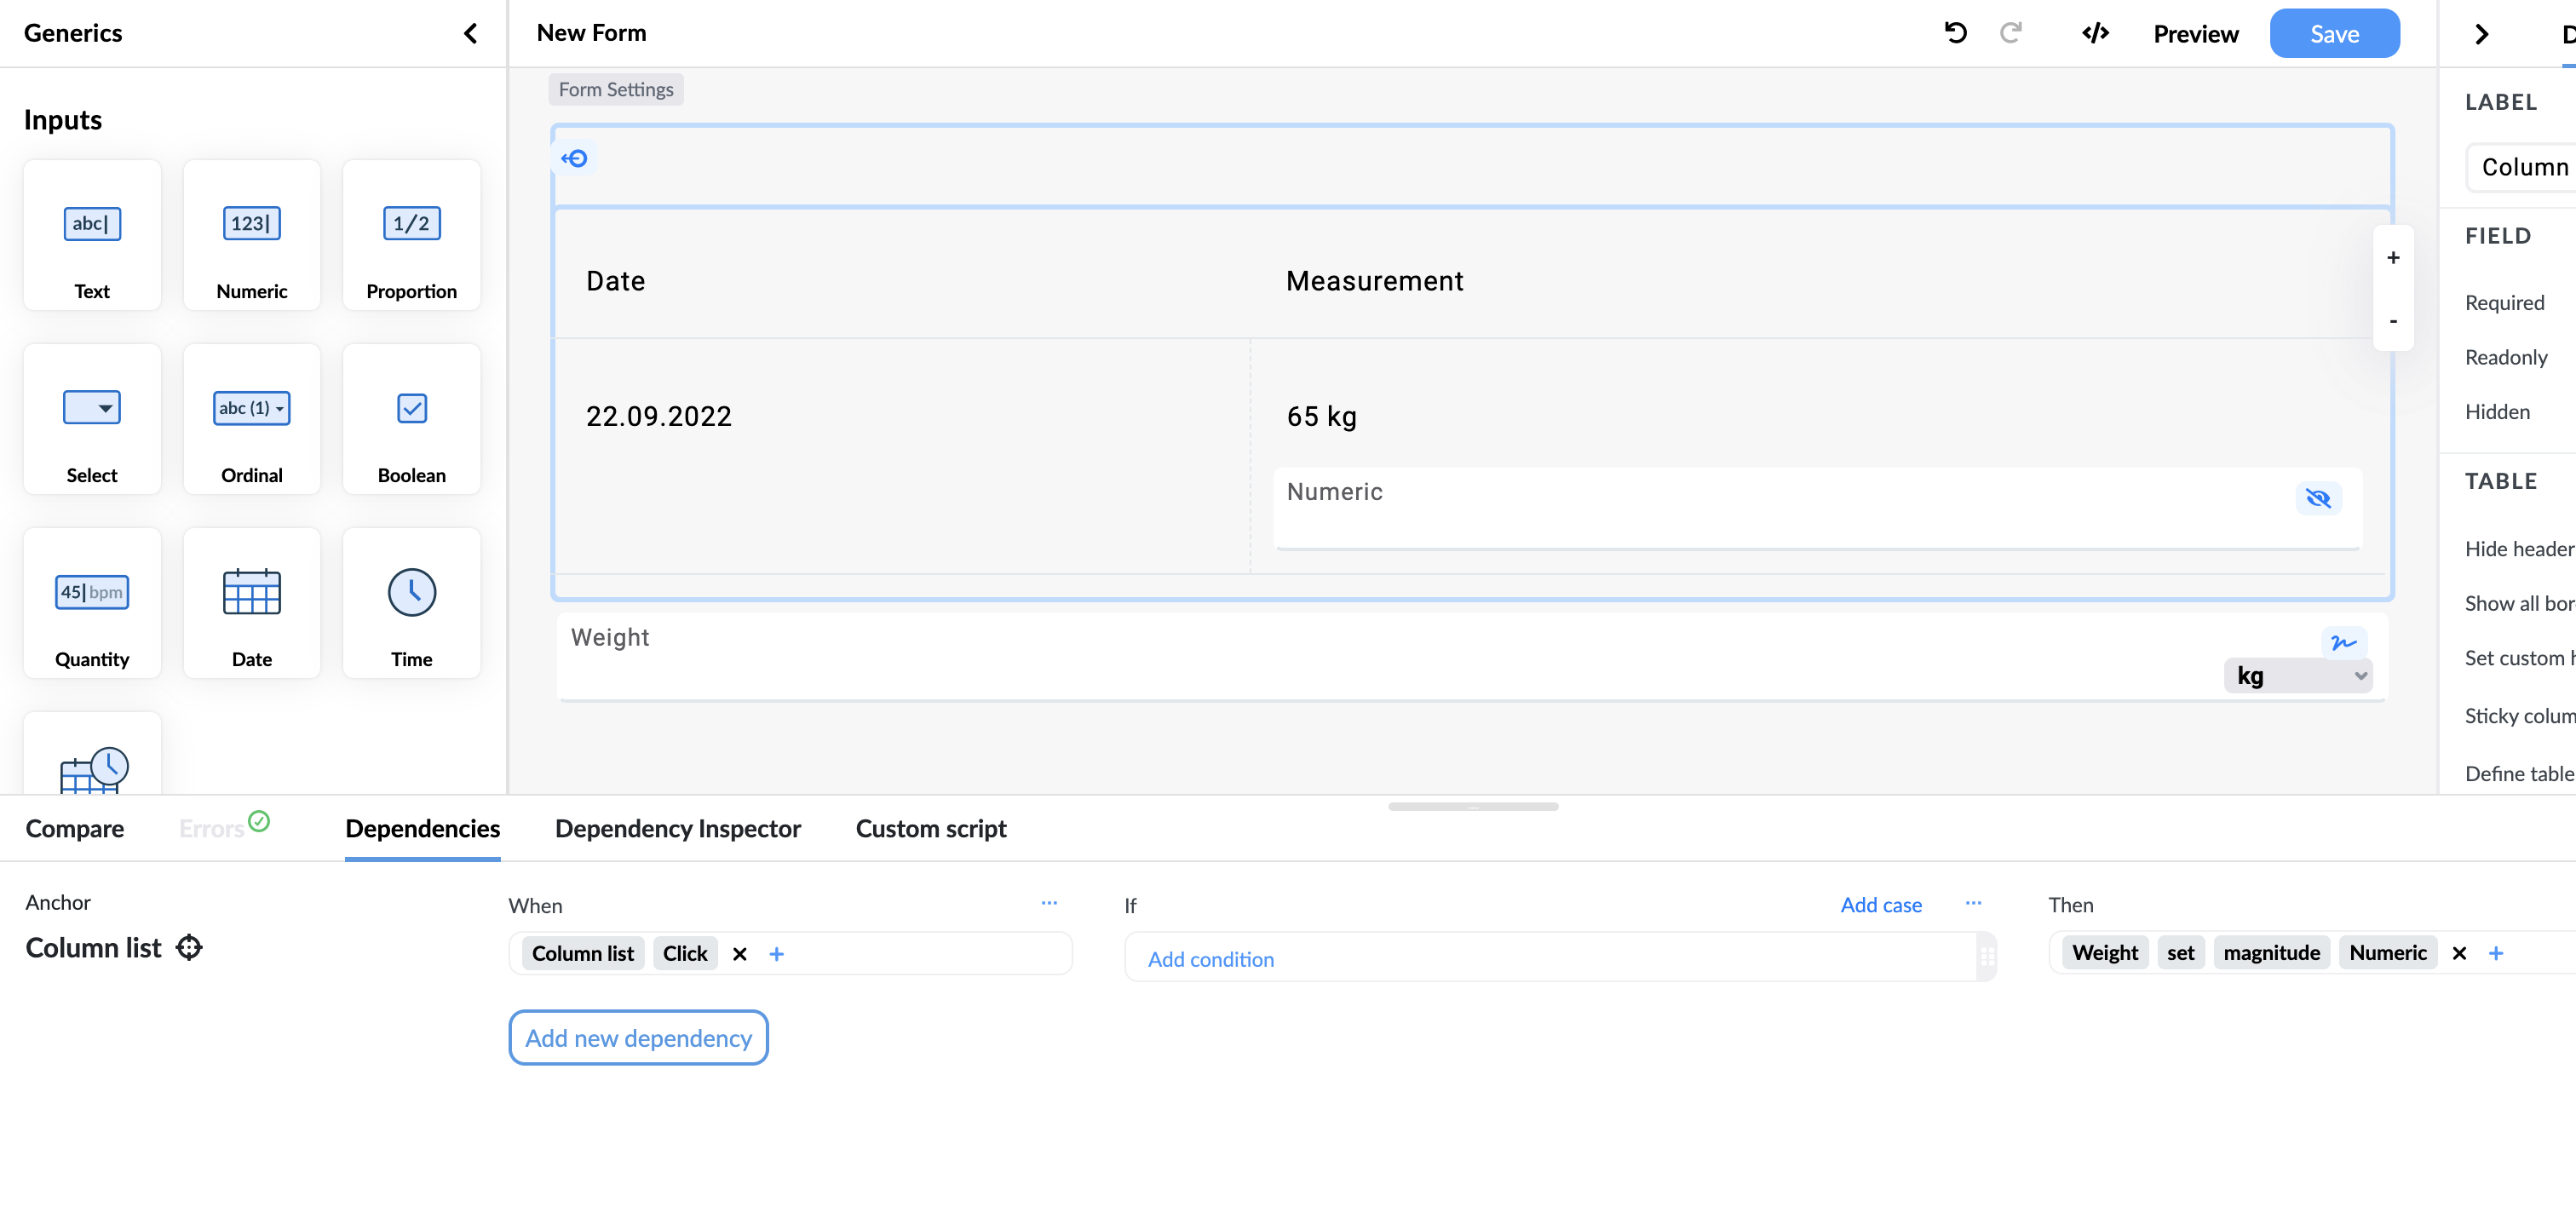
When we go to preview, the user can simply click a row of the column list and the weight will automatically be set with that value.

See the video example here:
Can I validate an email and only allow users to save the composition if it is in a valid format?
Yes you can, after you added your text field, go to the property panel on the right-hand side and search in the "Content" tab for the "Field validation" section. Here you can choose from one of the predefined patterns and select "Email" (if you want you can also provide your own pattern that needs to follow the regEx standard). You can also set your own error message if the pattern is not valid and if you have a multilingual form you can set the translations here too.
Using mustache notation in Rich text/HTML
Users can dynamically create content by writing it as a template with a so-called moustache notation, using a specific syntax which will render based on variables values. You can use it on rich text and HTML fields. This syntax uses tags. Tag is indicated by the opening delimiter {{ and the closing delimiter }}. Content between the {{ }} delimiters may or may not contain a tag symbol at the beginning following by a tag key that represents a variable name. For example, {{#person}} is a tag with a tag symbol # and a tag key person. There are several types of tags available.
Example of using moustache notation with APIs:
Using 'CONCAT' to combine text
The best practice when you need to combine text, for example from different sources, is to use the CONCAT function from the expression assistant. The CONCAT function can accept any number of arguments separated by a comma. See example below on how to use it in the expression assistant when combining different sources:
Creating terminology API connectors (Terminology Adapters)
Medical terminology refers to the words and language used specifically in the medical and health fields. It is important to use the correct terminology when communicating with other medical professionals and patients. The terminology adapter is an API connector that allows you to retrieve terminology from a terminology server and use it in your form.
Each project in your contains an external variable called terminologyUrl. This variable is used to define the URL of the terminology server, for example https://portal-demo.better.care/terminology-adapter/rest/terminology/codesystem/{codeSystem}/entities.
Notice how the url contains a placeholder {codeSystem}. This placeholder is used to define the code system that you want to retrieve from the terminology server.
To create a terminology adapter, follow the instructions in the video below:
Summary of the steps shown in the video:
Create a terminology adapter
- set the url of the terminology server in the
terminologyUrlvariable - create a new API connector and name it
Terminology adapter - set the Base URL to the
terminologyUrlvariable - add an API call and name it
get terminology - set the test value to any value that you know will return a terminology from the terminology server. For example
Allergens - start the test call. Test call will retrieve the terminology from the terminology server and display it in the response body. This enables the API to learn the structure of the terminology and create a schema for it
- save the API connector
Use the terminology adapter
- add a generic Select input field to the form
- set its data source to the
Terminology adapter - get terminologyAPI connector call - choose a code system from the list of terminology code systems. Studio automatically detects that you are using a terminology adapter, and will retrieve a list of all available terminologies
Productivity
How do I copy a form or summary from one project to another?
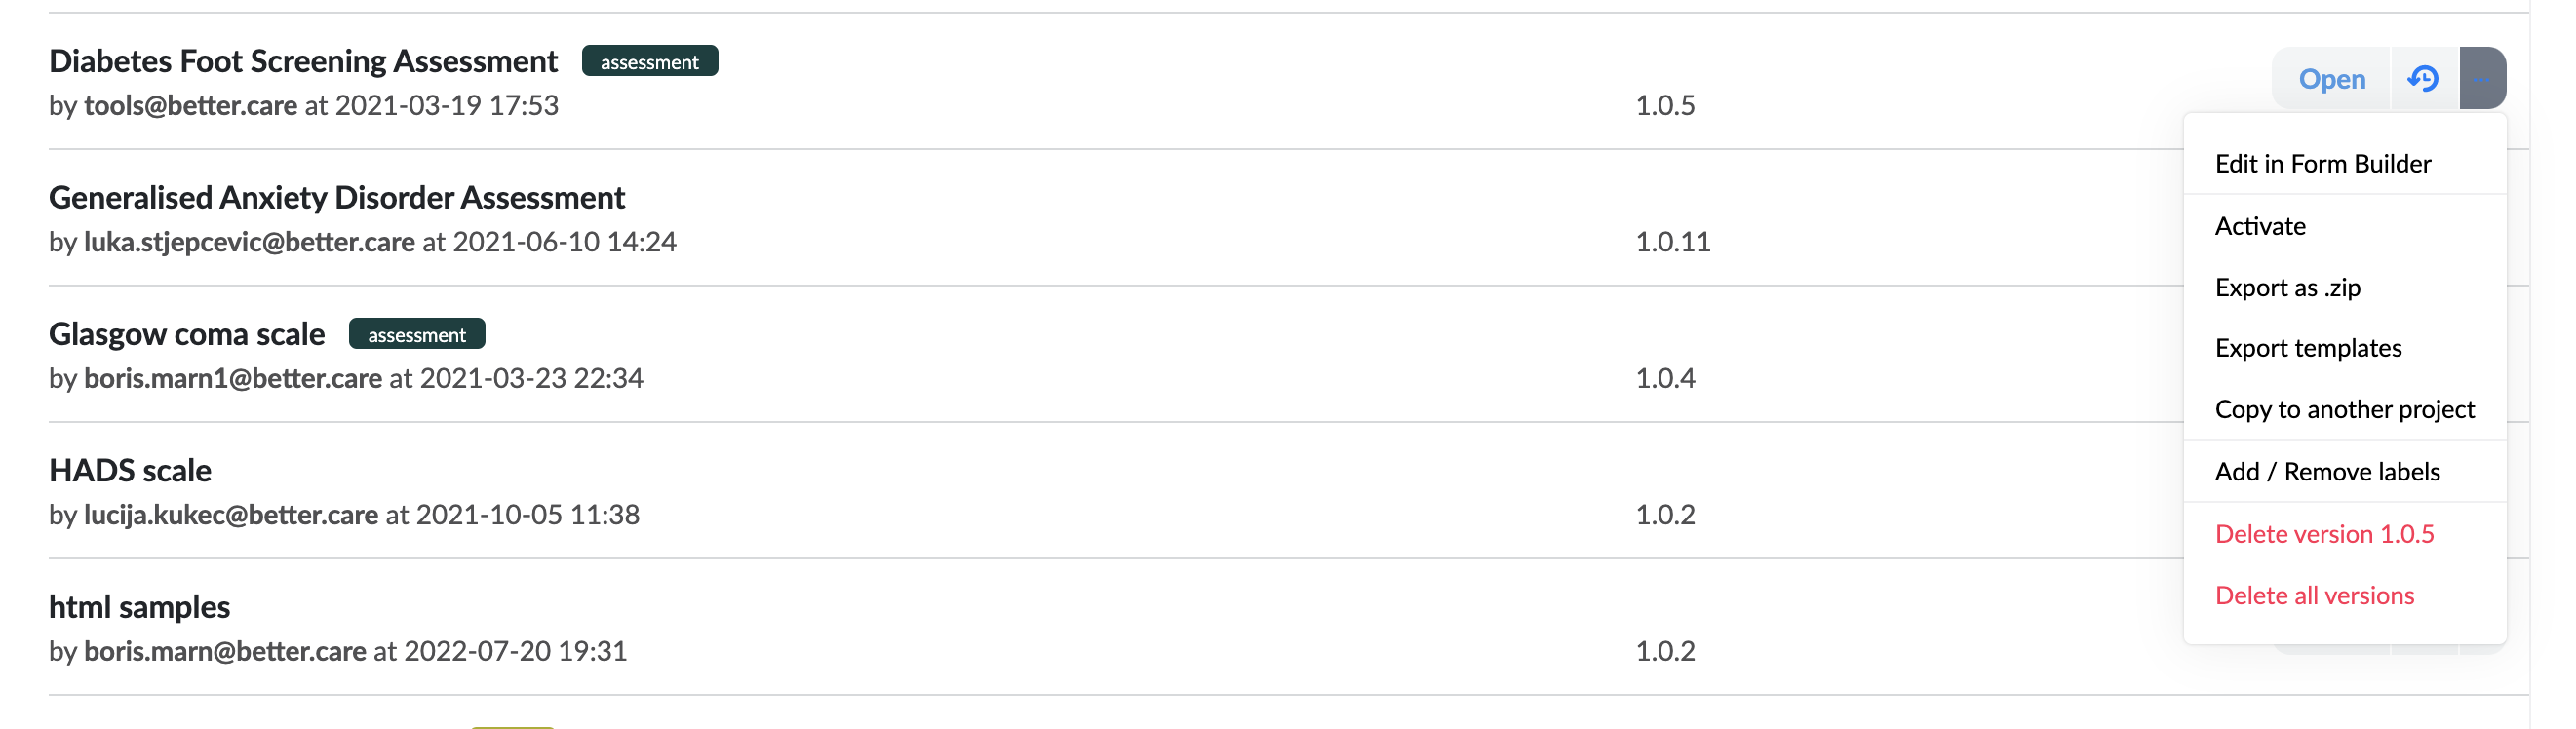
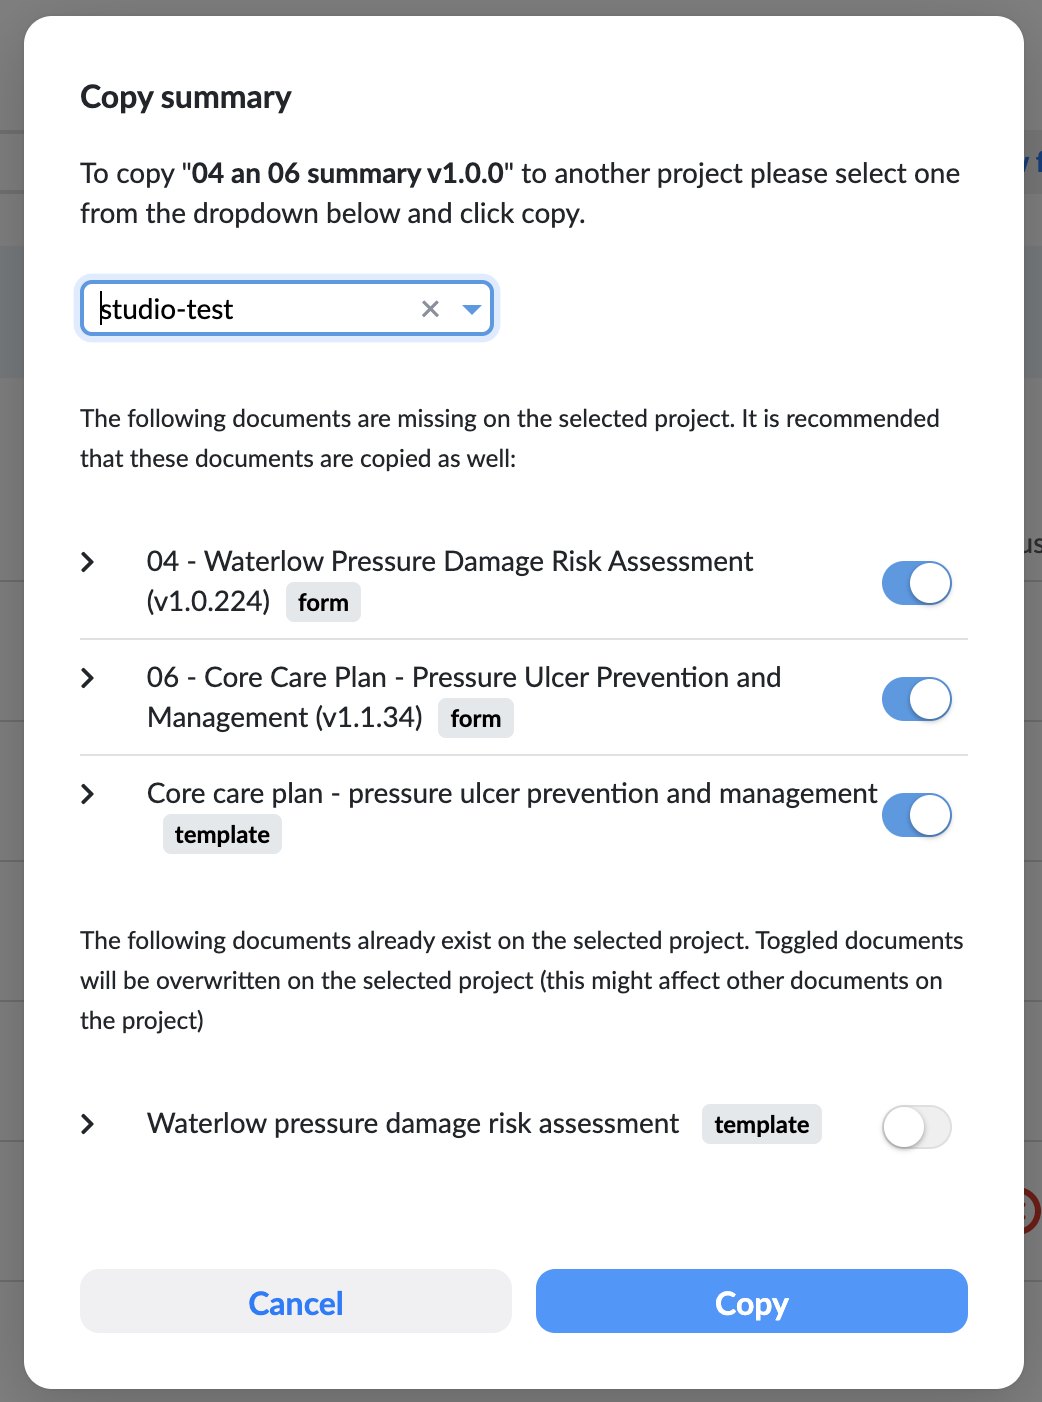
To copy a form or summary to another project, you can simply use the menu button of the form in the select screen and click on "Copy to another project" button.
A modal window will pop up asking you to select a project where you want to copy the form to. After you select the project you will be notified about the missing resources that are needed for the form to work on the destination project. If the project you have selected does not have the template(s) used on the form you will be asked if you also want to copy the templates. In this case this option will be defaulted to "yes" since the form is not valid without them. If the project you have selected does already have the template(s) you will be asked if you want to override them with the ones from the form. The default for this will be "no", but you can opt to override the templates on that project. This is because many times templates have changed, and they might not be the same on the current project than on the target project.
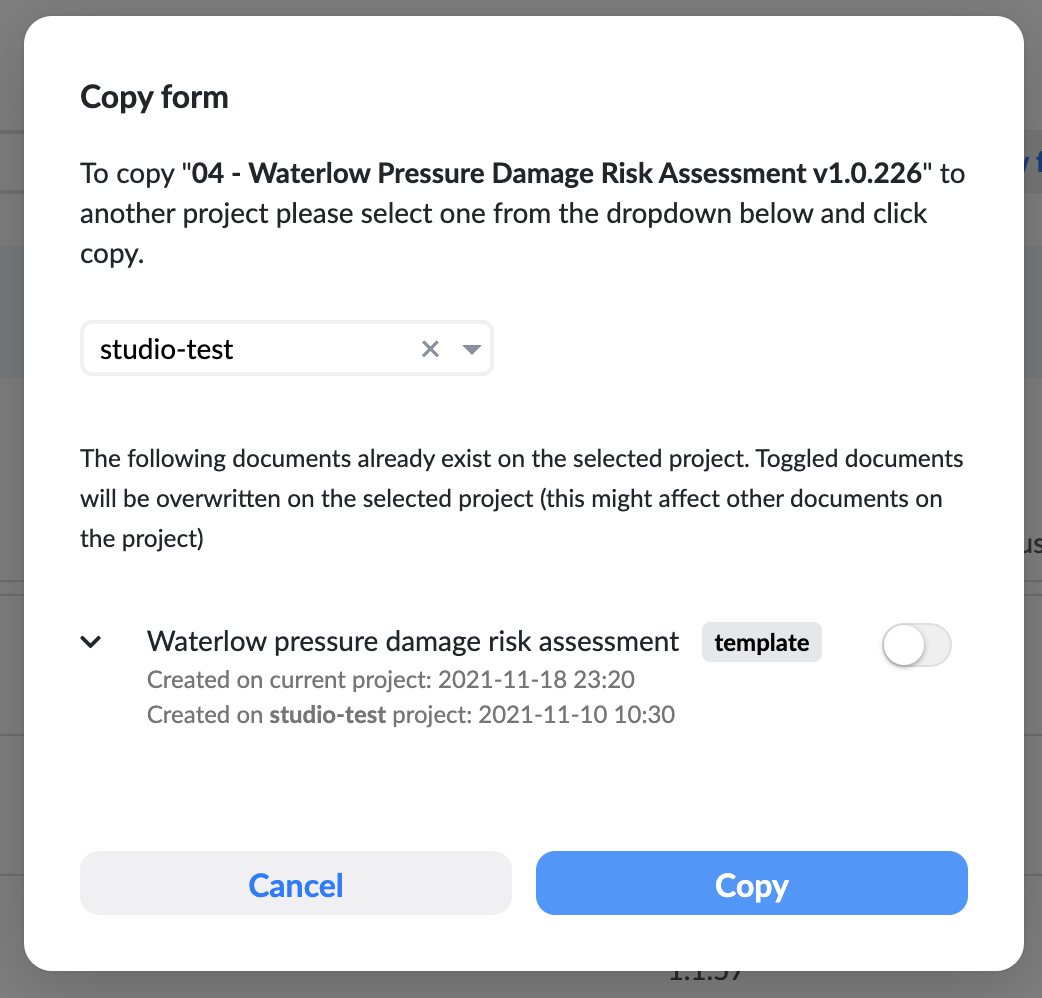
Similarly, when copying a summary you will be prompted if you want to copy the forms and templates used, if the target project does not have them. If the templates or forms exist, you will also have the option to view the information about who and when it was created on that project.
How do I update a composition instead of creating a new one?
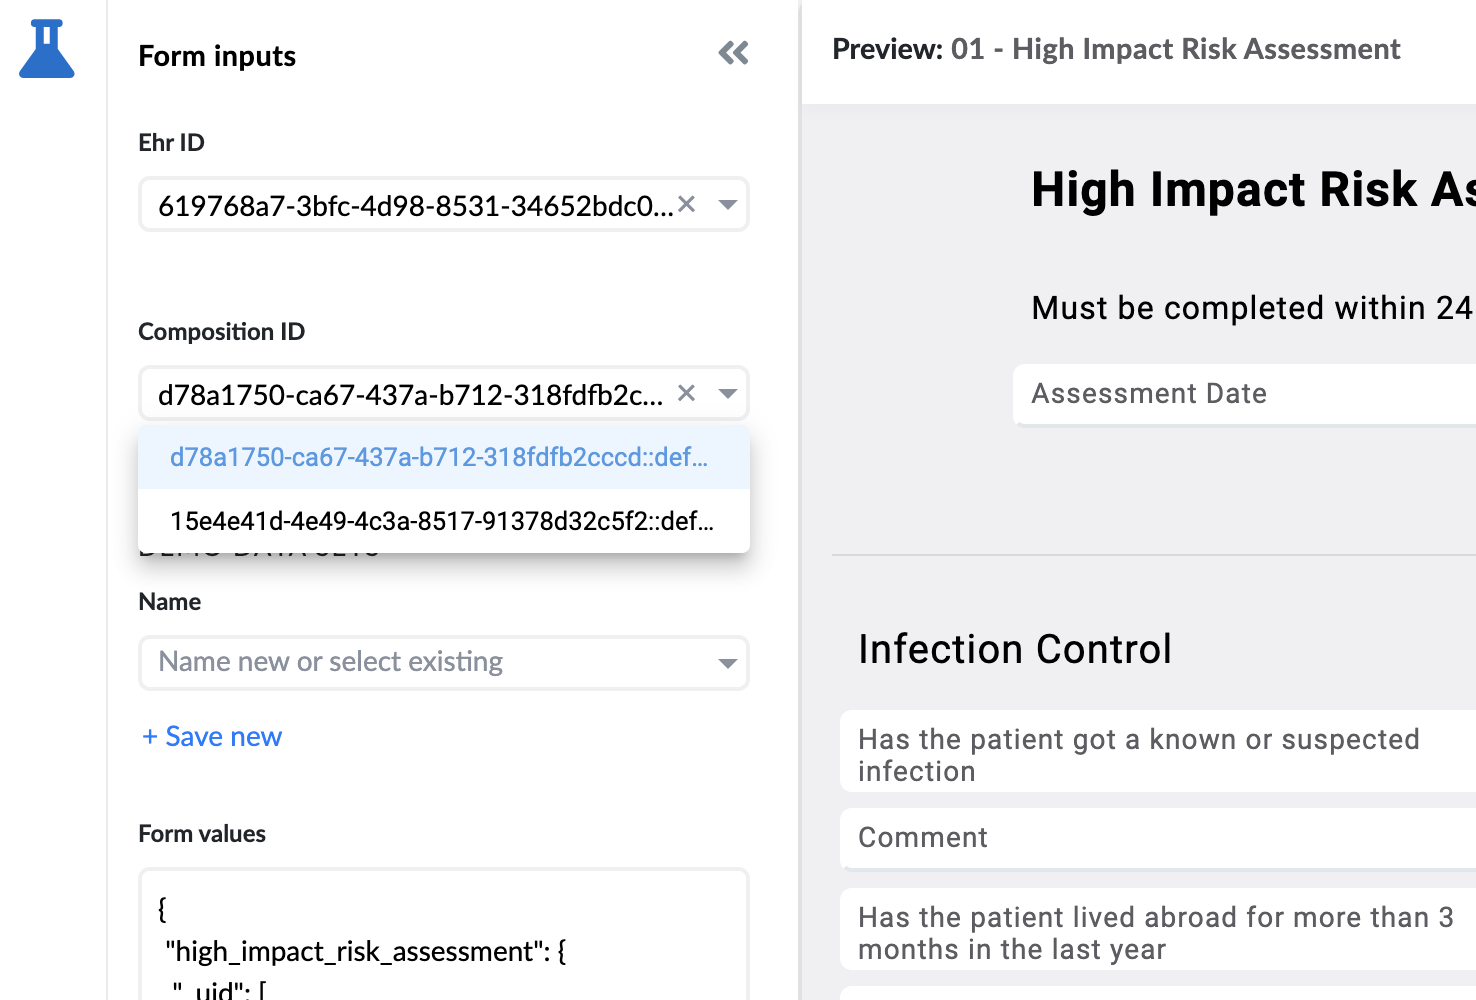
To update a composition you need to have a compositionId which you want to update. In the Studio you can do that on preview or the playground simply by selecting a compositionId from the dropdown on the left.
If you are building your own application using the form renderer, you need to provide it by setting the "compositionId" variable.
const environment = {
  variables: [
    {
      name: 'ehrId',
      value: '000-92ac-4bf6-bfed-f0d4b9f6'
    }
  ]
};
const compositionId = 'f8805e7e-0000-1111-222c-74ca6b0a53e9::test::1';

fr.formEnvironment = environment;
fr.compositionId = compositionId;
The same will also be achieved if you are using the "auto prefill" functionality, since this also sets the form with a composition. After you have your compositionId set and the form is prefilled, you simply use the "Save composition" button in your preview / playground, or if you want button with a dependency on it that saves the composition. Saving like this will automatically update the composition instead of creating a new one.
How do I set multiple values as a default value to a Coded text or Ordinal field?
Setting more than one default value to a field that uses selection values, either coded text or ordinal or even text with options, is a bit different thant setting a simple single value, but not hard at all.
First you need to make sure that the fields multiplicity allows this, you can find the multiplicity settings in the property panel under the Design tab.
Once you are sure that you have the correct field and multiplicity settings go to the default value input in the property panel under the Design tab. When you click inside the DEFAULT VALUE input, you will get some options, scroll down until you find Function and click it. Now you will see a list of functions that can be used in the expression assistant. Find the one that says LIST and click it. Be sure to select the function from the dropdown of available functions (or from the expression assistant), because just writing LIST() will not work the same way.
The function LIST will be added to the input, and you will be positioned inside the brackets to add your values, you can use the dropdown to select the values you want, just make sure to separate them with a comma.
How to make API calls to IP addresses using the correct protocols and solve mixed content errors?
Sometimes your server environments do not have host names, and you have to provide the IP address of the server to make API calls. This is not a problem, you can use the IP address in the base URL field of the API connector. Just make sure that you follow these guidelines:
- The IP address must be a valid IP address, try pasting it into the browser to see if it is correct
- The IP address must be prefixed with the correct protocol, either
http://orhttps:// - If your platform uses
https://protocol then your API calls cannot usehttp://, otherwise you will get a mixed content error. It is always recommended to usehttps://protocol for secure connections, but if you must usehttp://then you can turn off the mixed content error in your browser settings. Just google 'how to turn off mixed content error in [your browser]' and you will find the instructions.
How do I know if a multiplicity of a container was added or removed?
If you need to know the number of multiplicity containers and have it updated whenever a user adds or removes a container you can use the EVENT_CHILDREN_UPDATED event type (you can find a full list of event types here.
This will fire everytime the children of a container are updated. However since this cannot be applied on the multiplicity container itself it needs to listen to the parent of that container so you will get the changes of its children.
In the example below we will use a script that will fire everytime the children of the container Symptom/Sign are changed. This will get us back the model of this container and we can simply check the length of the array of the child model to see how many multiplicity containers of the container called Symptoms there are. We then write that number in a generic numeric field that we can show on the form.
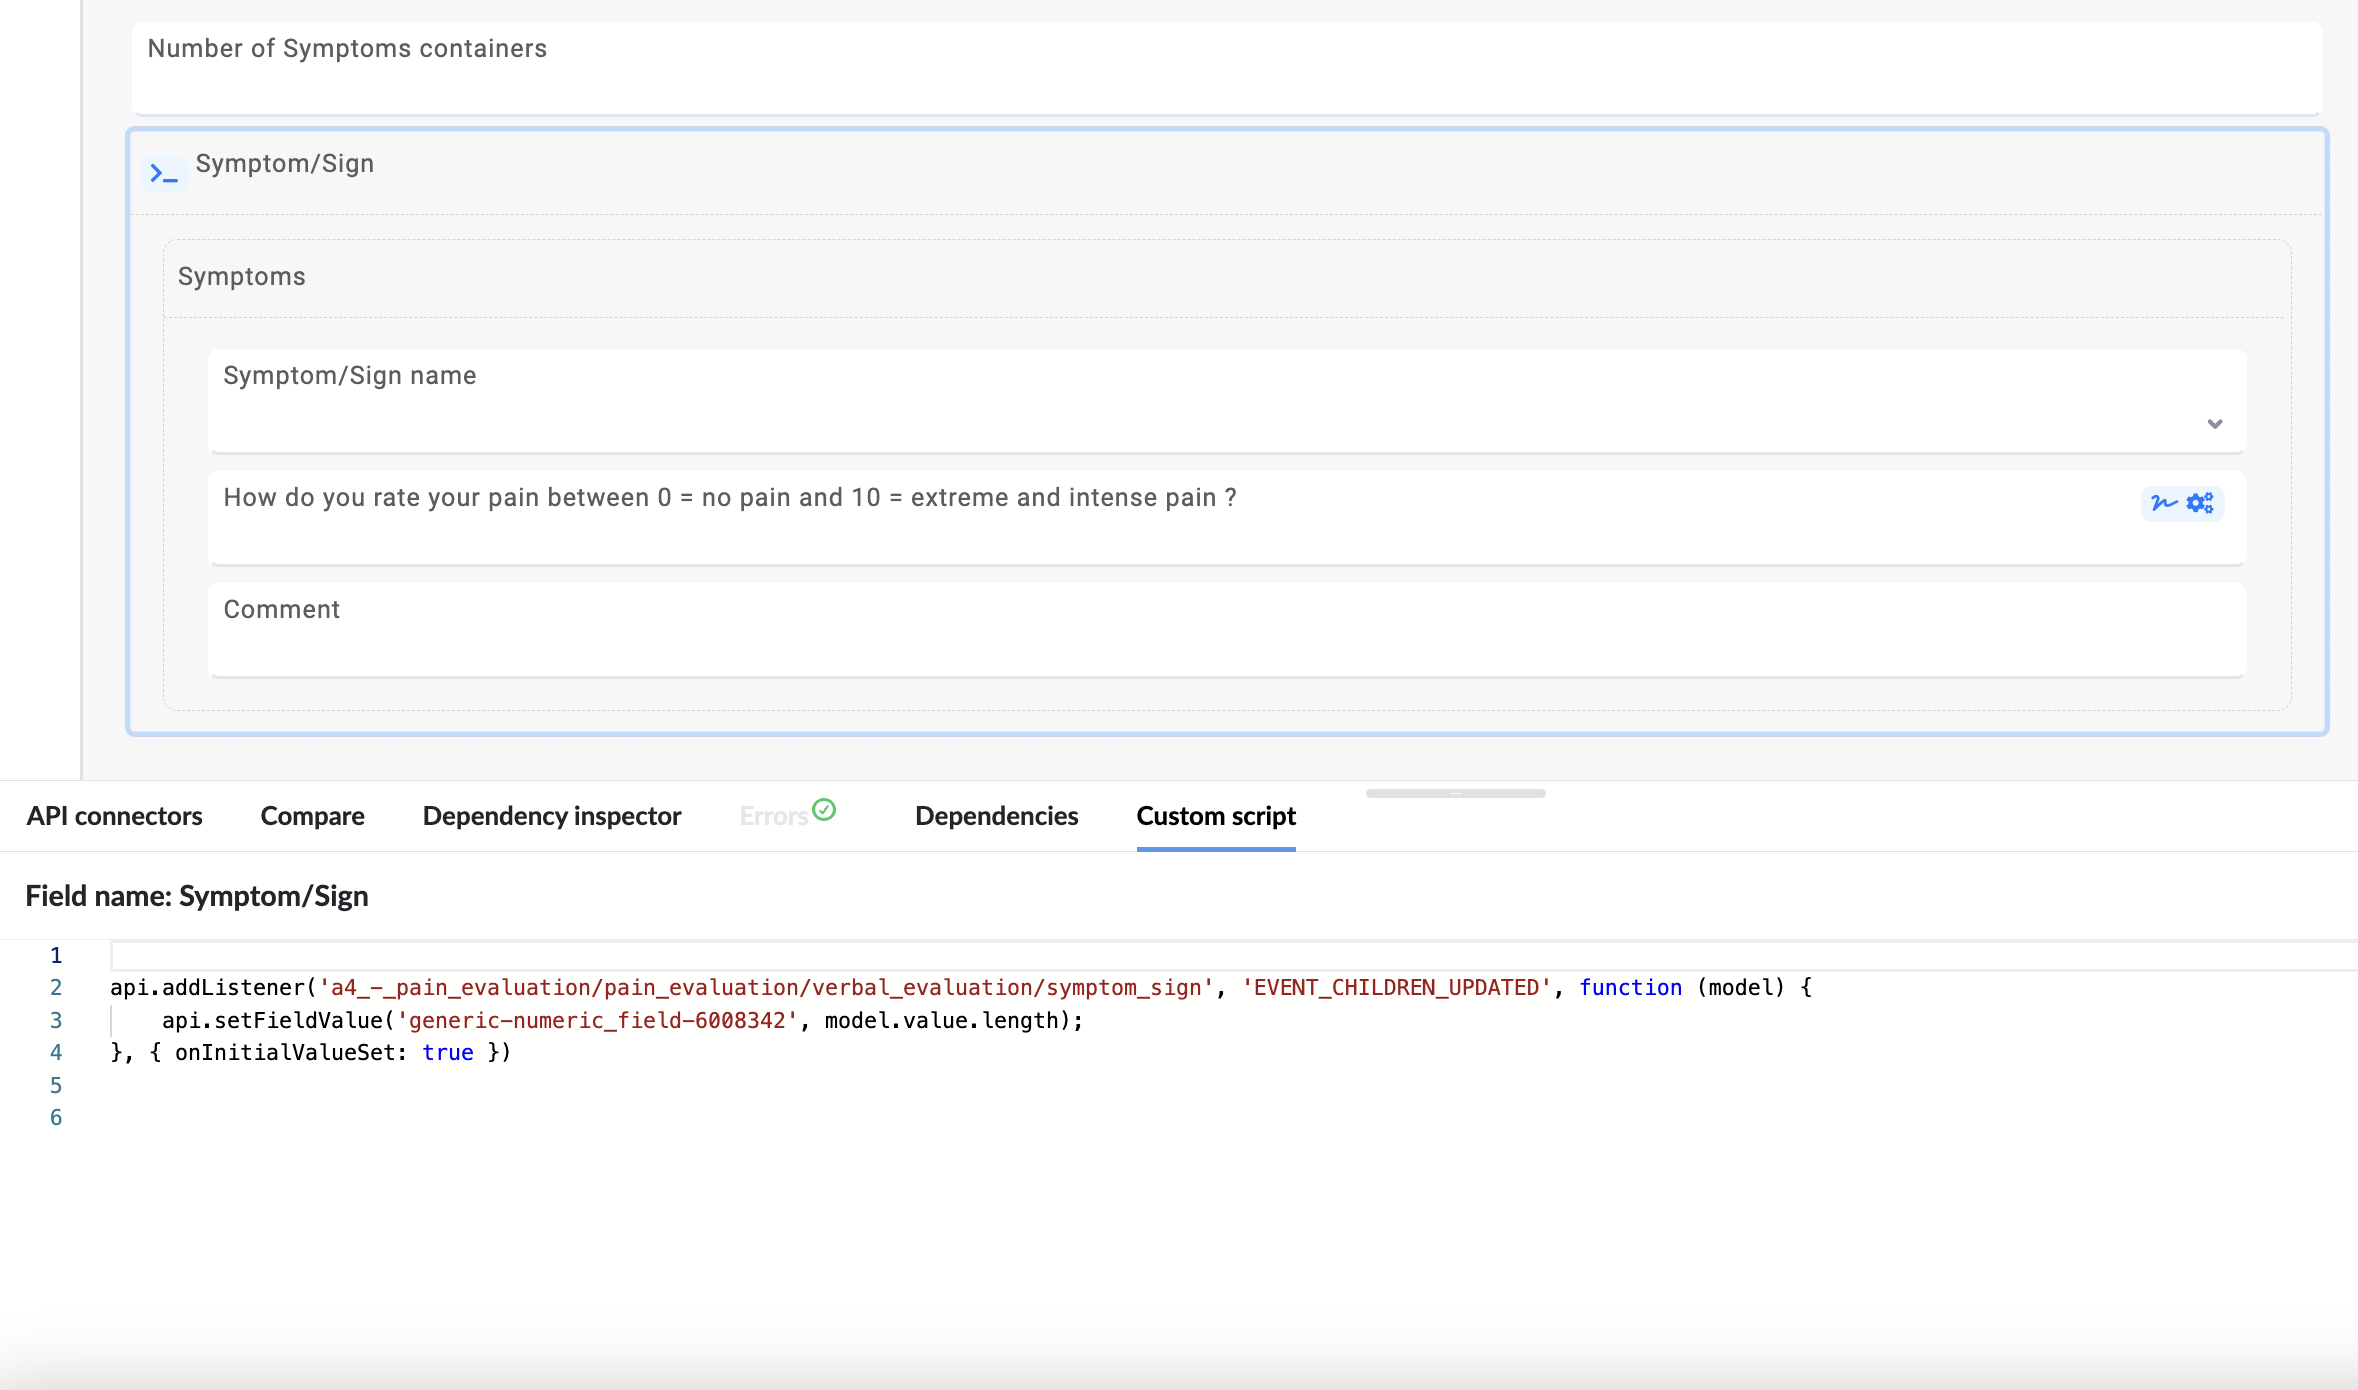
api.addListener('a4_-_pain_evaluation/pain_evaluation/verbal_evaluation/symptom_sign', 'EVENT_CHILDREN_UPDATED', function (model) {
  api.setFieldValue('generic-numeric_field-6008342', model.value.length);
})
How do I set different values in a multiplicity container via script?
Let's say you have an array of values (can commonly be from an API response) and you want to set each value to a different index of a multiplicity container.
First we need a array of values, in this example we will set it in the script, but you can get it from a different source if that is your use case.
Secondly, in the script we will use the scriptApi function duplicateModel to make more instances of the multiplicity container. Here we need to be careful to use it 1 time less than the number of our values, since we will already have 1 initial container there when we open the form.
And lastly we set the values, we will use forEach on the array to get each value and the index and then use setFieldValue to set the values. Here we will use the properties searchWithinContainerTag and containerMultiIndex to let the script know exactly where we want the values to be.
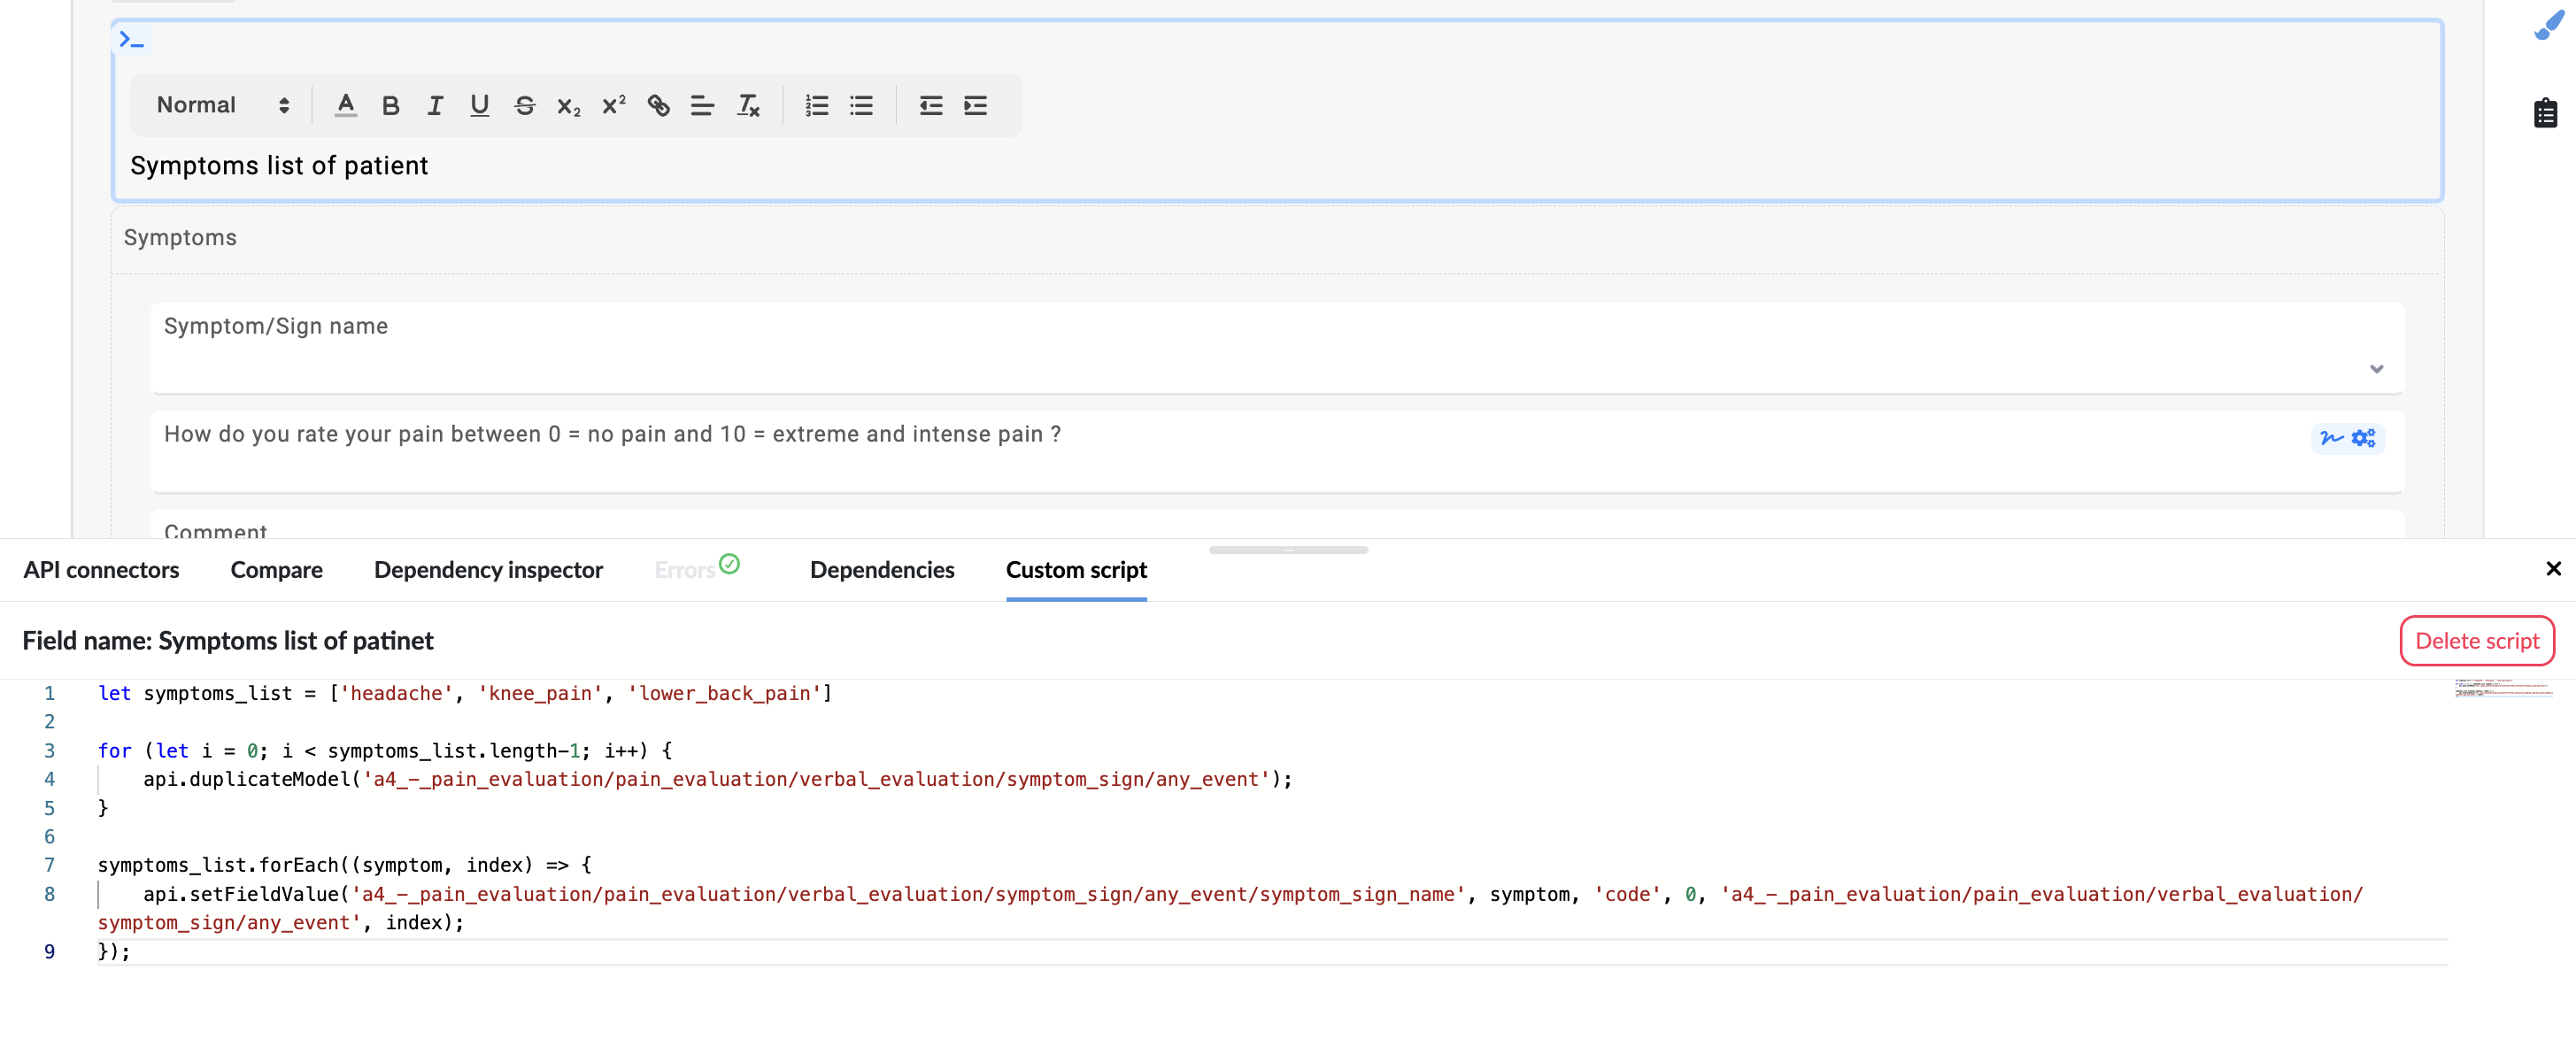
let symptoms_list = ['headache', 'knee_pain', 'lower_back_pain']

for (let i = 0; i < symptoms_list.length-1; i++) {
  api.duplicateModel('a4_-_pain_evaluation/pain_evaluation/verbal_evaluation/symptom_sign/any_event');
}

symptoms_list.forEach((symptom, index) => {
  api.setFieldValue('a4_-_pain_evaluation/pain_evaluation/verbal_evaluation/symptom_sign/any_event/symptom_sign_name', symptom, 'code', 0, 'a4_-_pain_evaluation/pain_evaluation/verbal_evaluation/symptom_sign/any_event', index);
});
Can multiple users work simultaneously on the same form?
Simultaneous work on the same form can result in some unwanted issues. While multiple people may work on the same form, please note that if you save a version of the form and the other user/s also save a version of the form (different from your version), you will not have each others changes in the end. We strongly recommend that you wait with your work until the other person finishes.
While we cannot show you if someone is actively making changes to the form, we can warn you if any other users simultaneously have the same form open. We use the following methods to inform you about this:
When showing the list of forms on Select Screen, a small icon will appear in the
statuscolumn if someone else has the form open.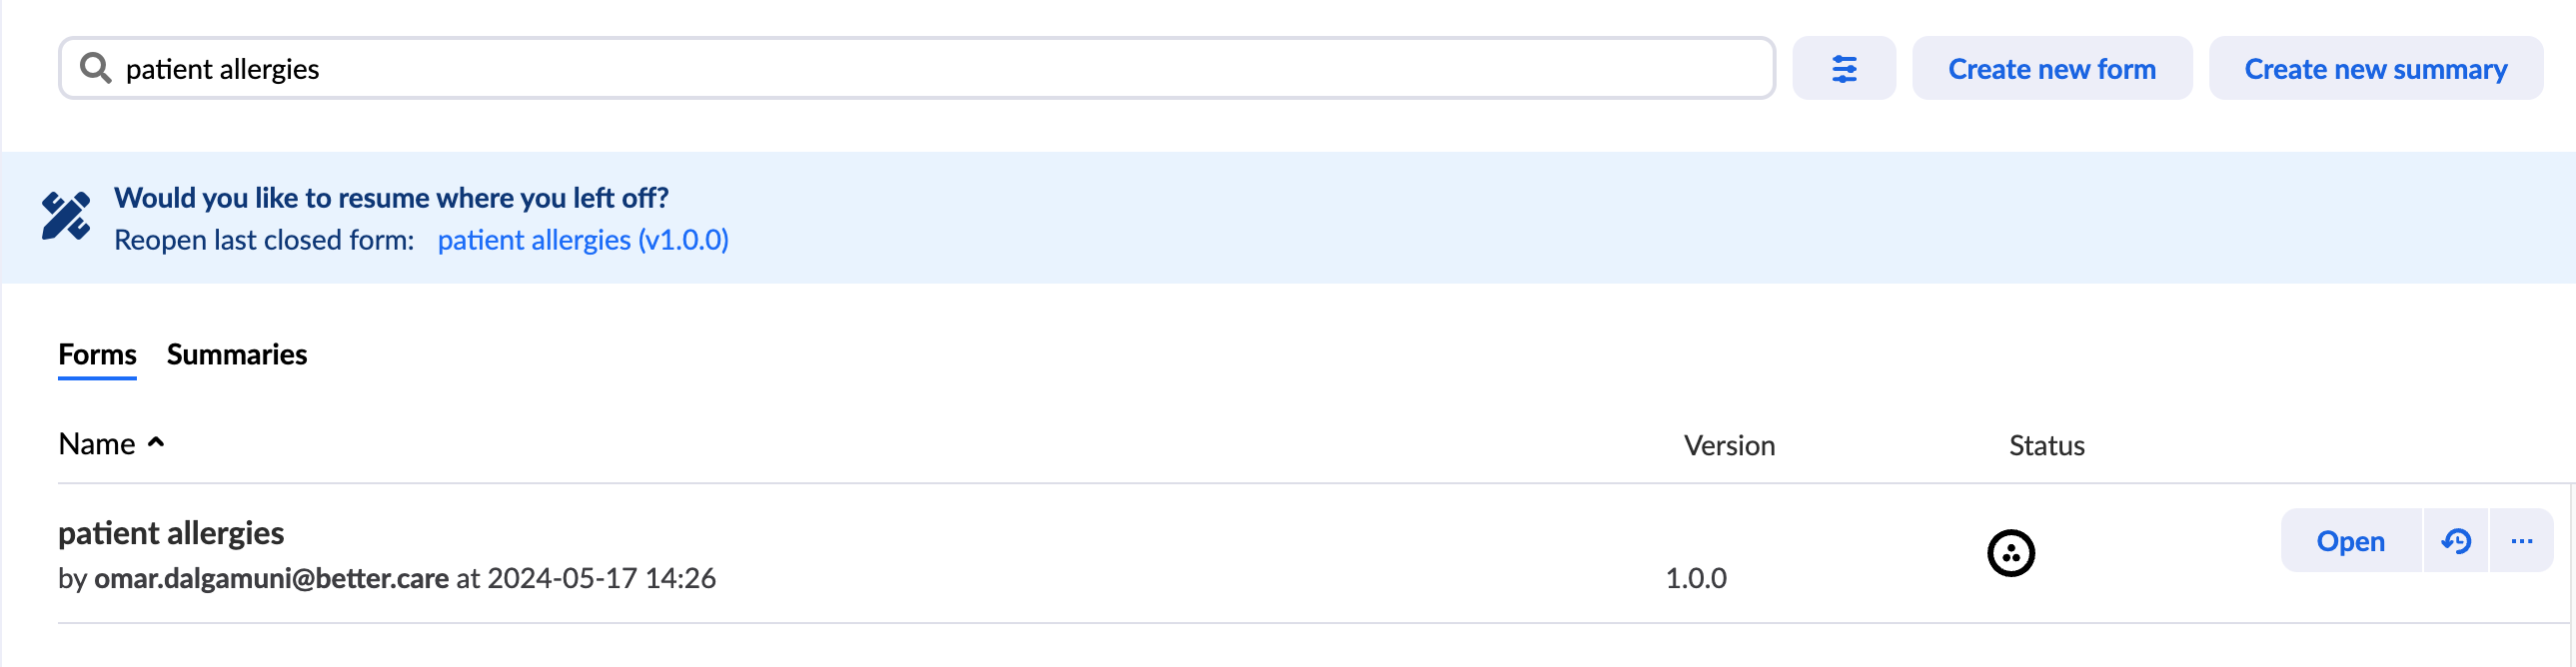
Collaboration icon on select screen When you open the form, an icon next to the form name will appear in the top left corner of the main toolbar.
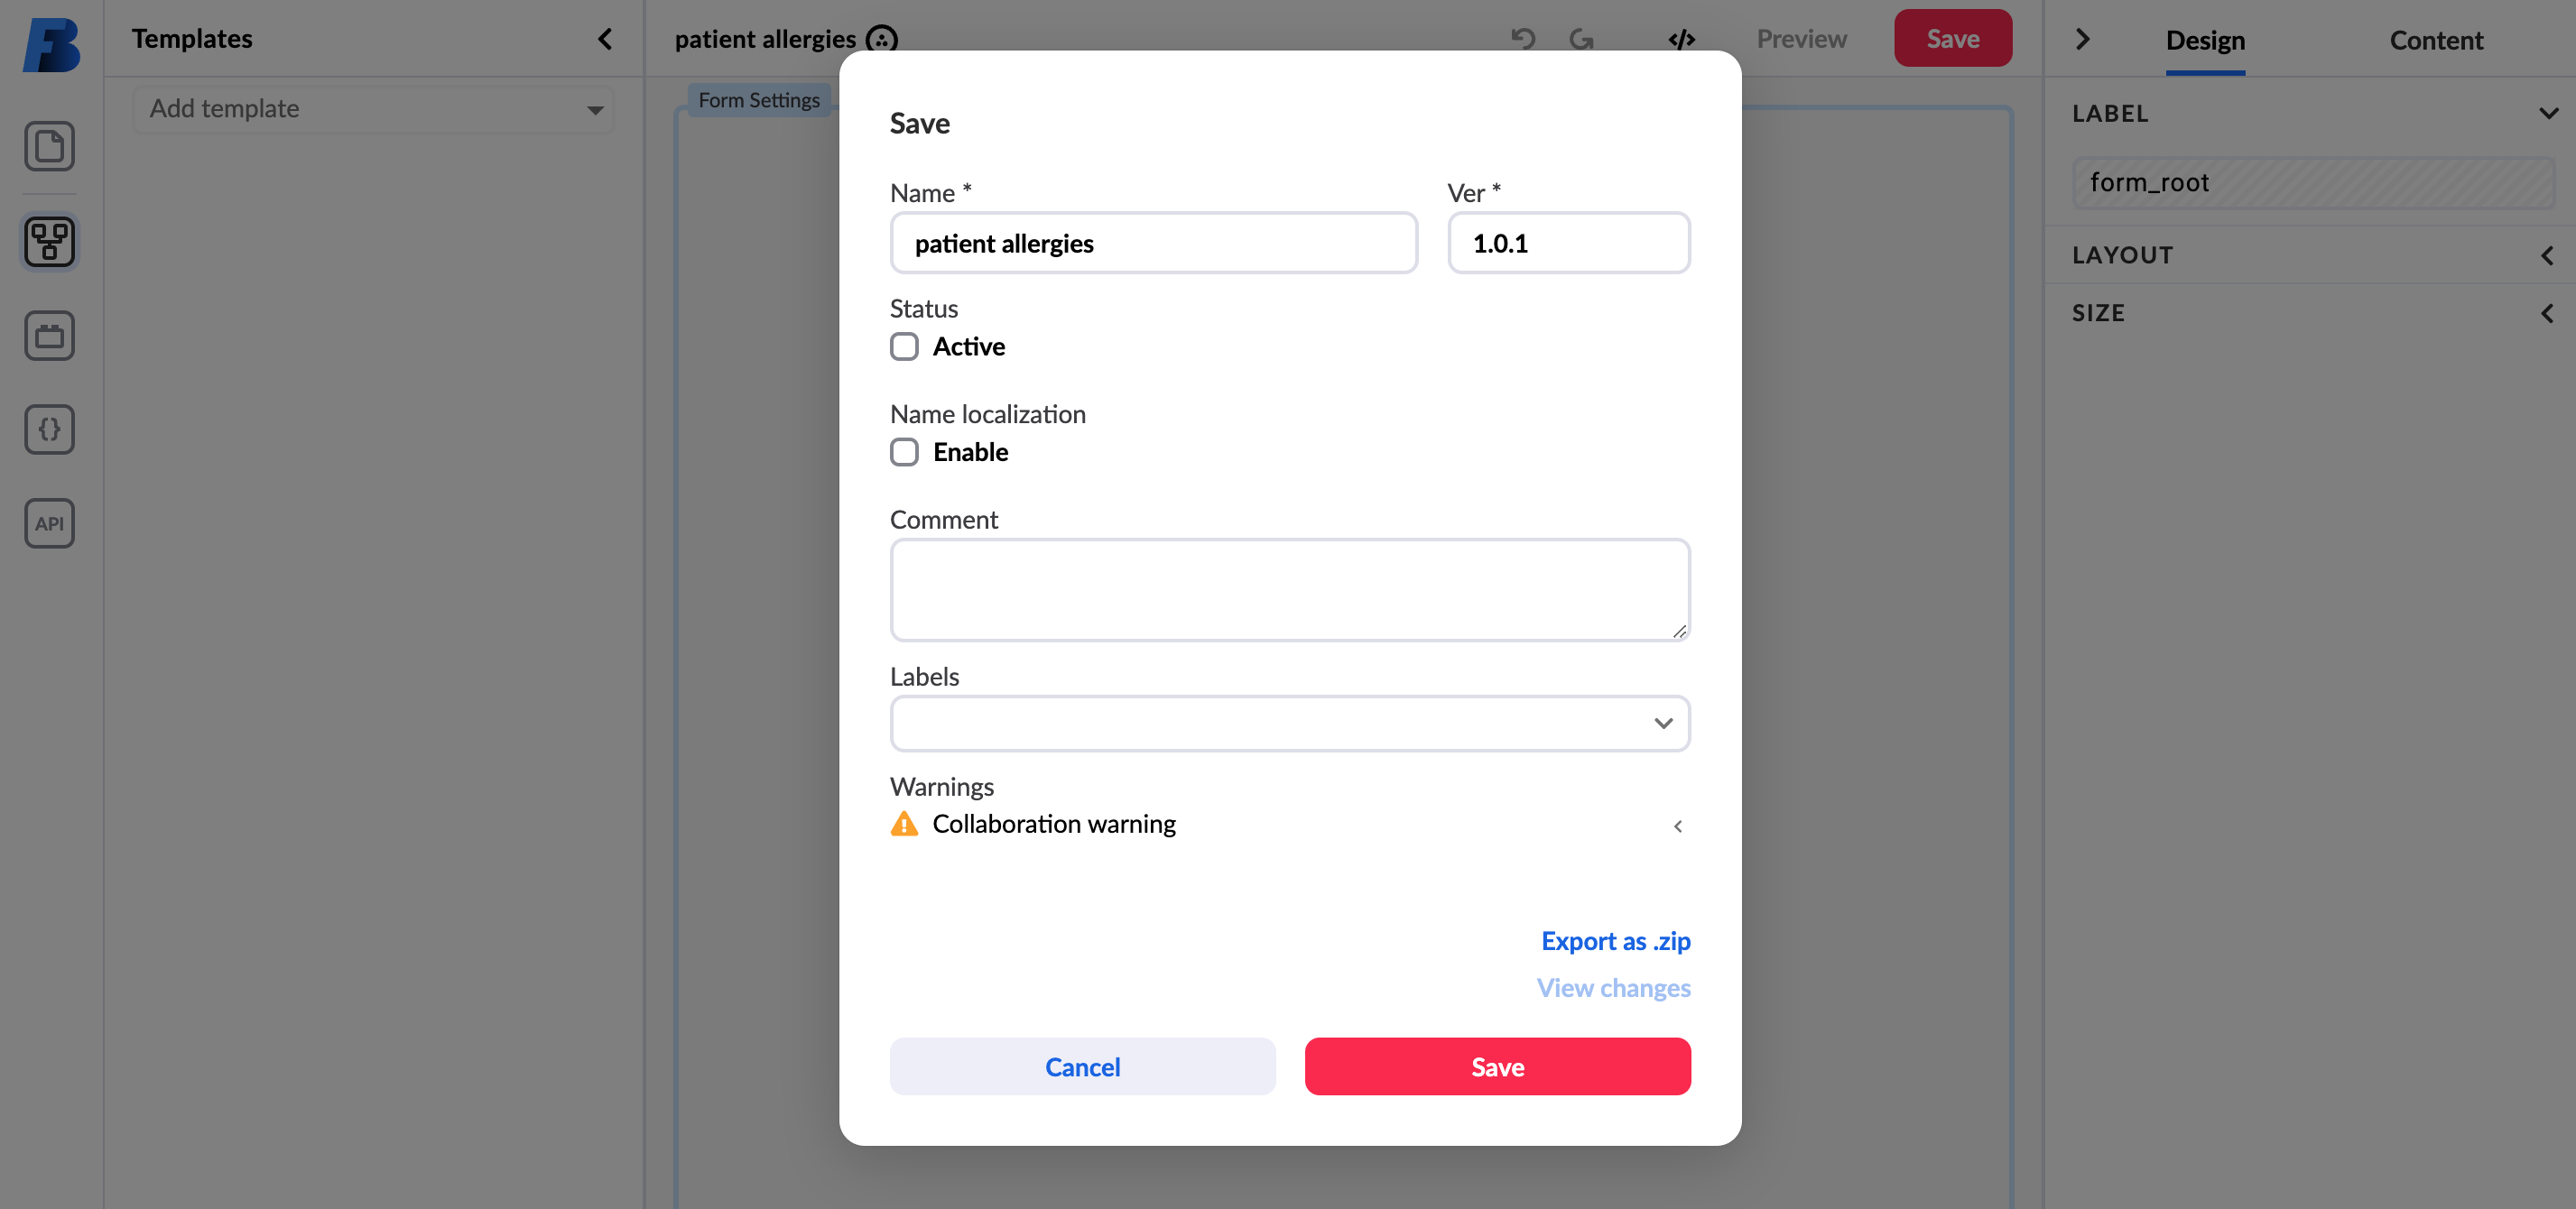
Savebutton in the toolbar will have a red background if someone else has the form open.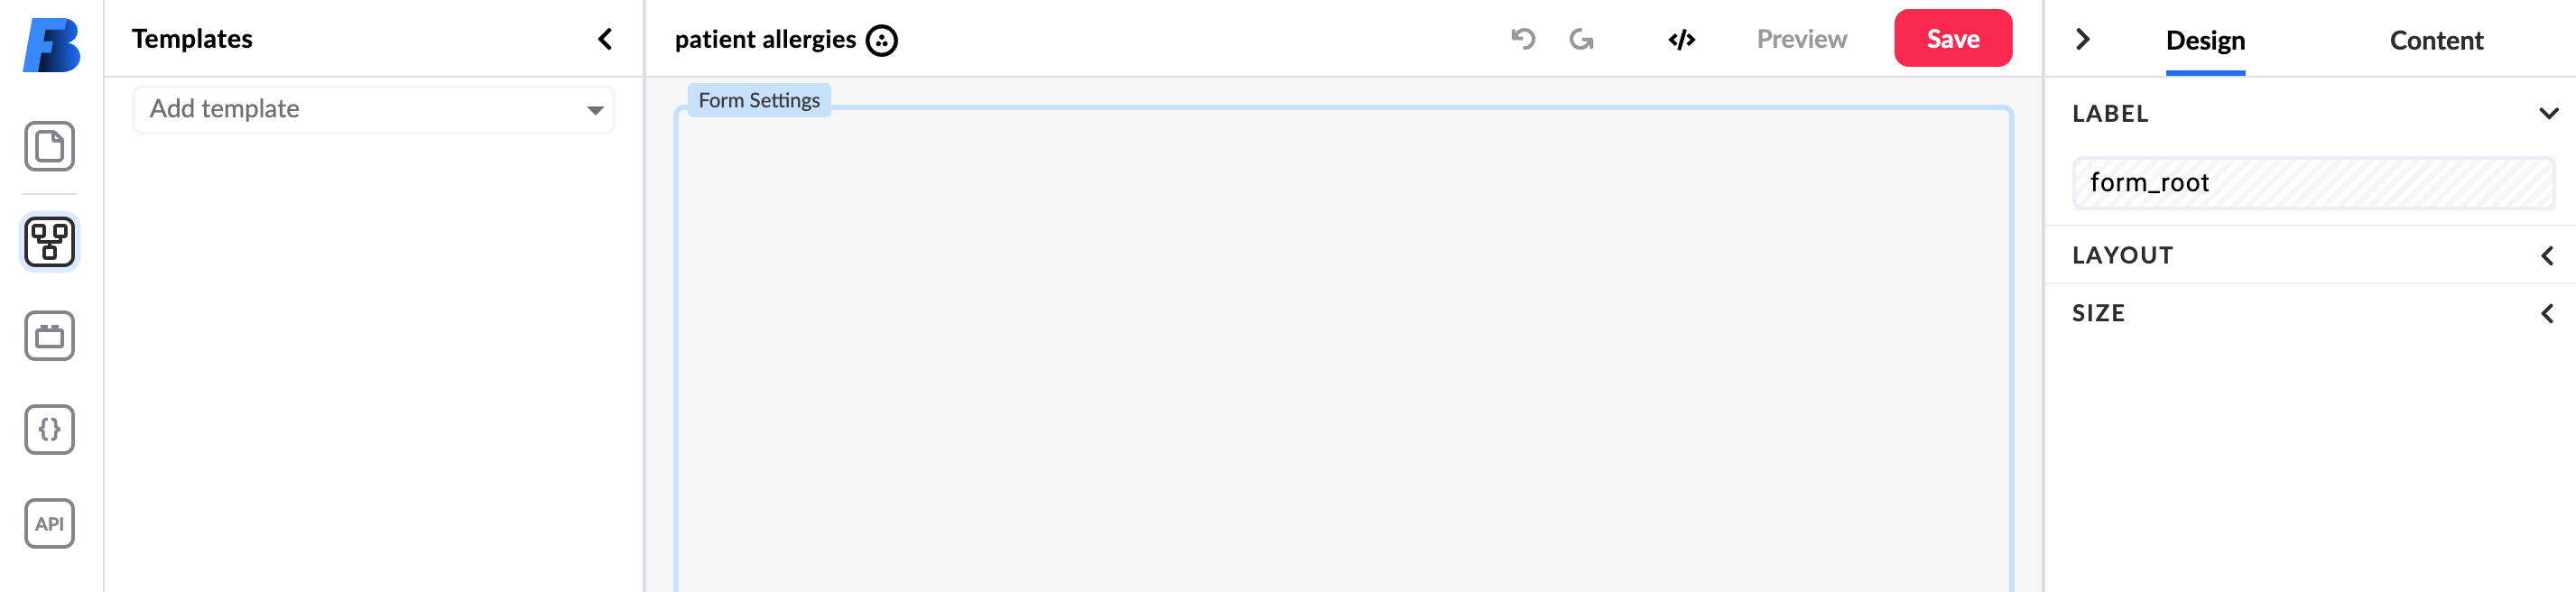
Collaboration icon in toolbar. Save button with red background When you try to save the form, the modal window will have a warning informing you that someone else has the form open.
Warning in Save window If you hover over an icon, a tooltip will appear with the name of the user who has the form open.
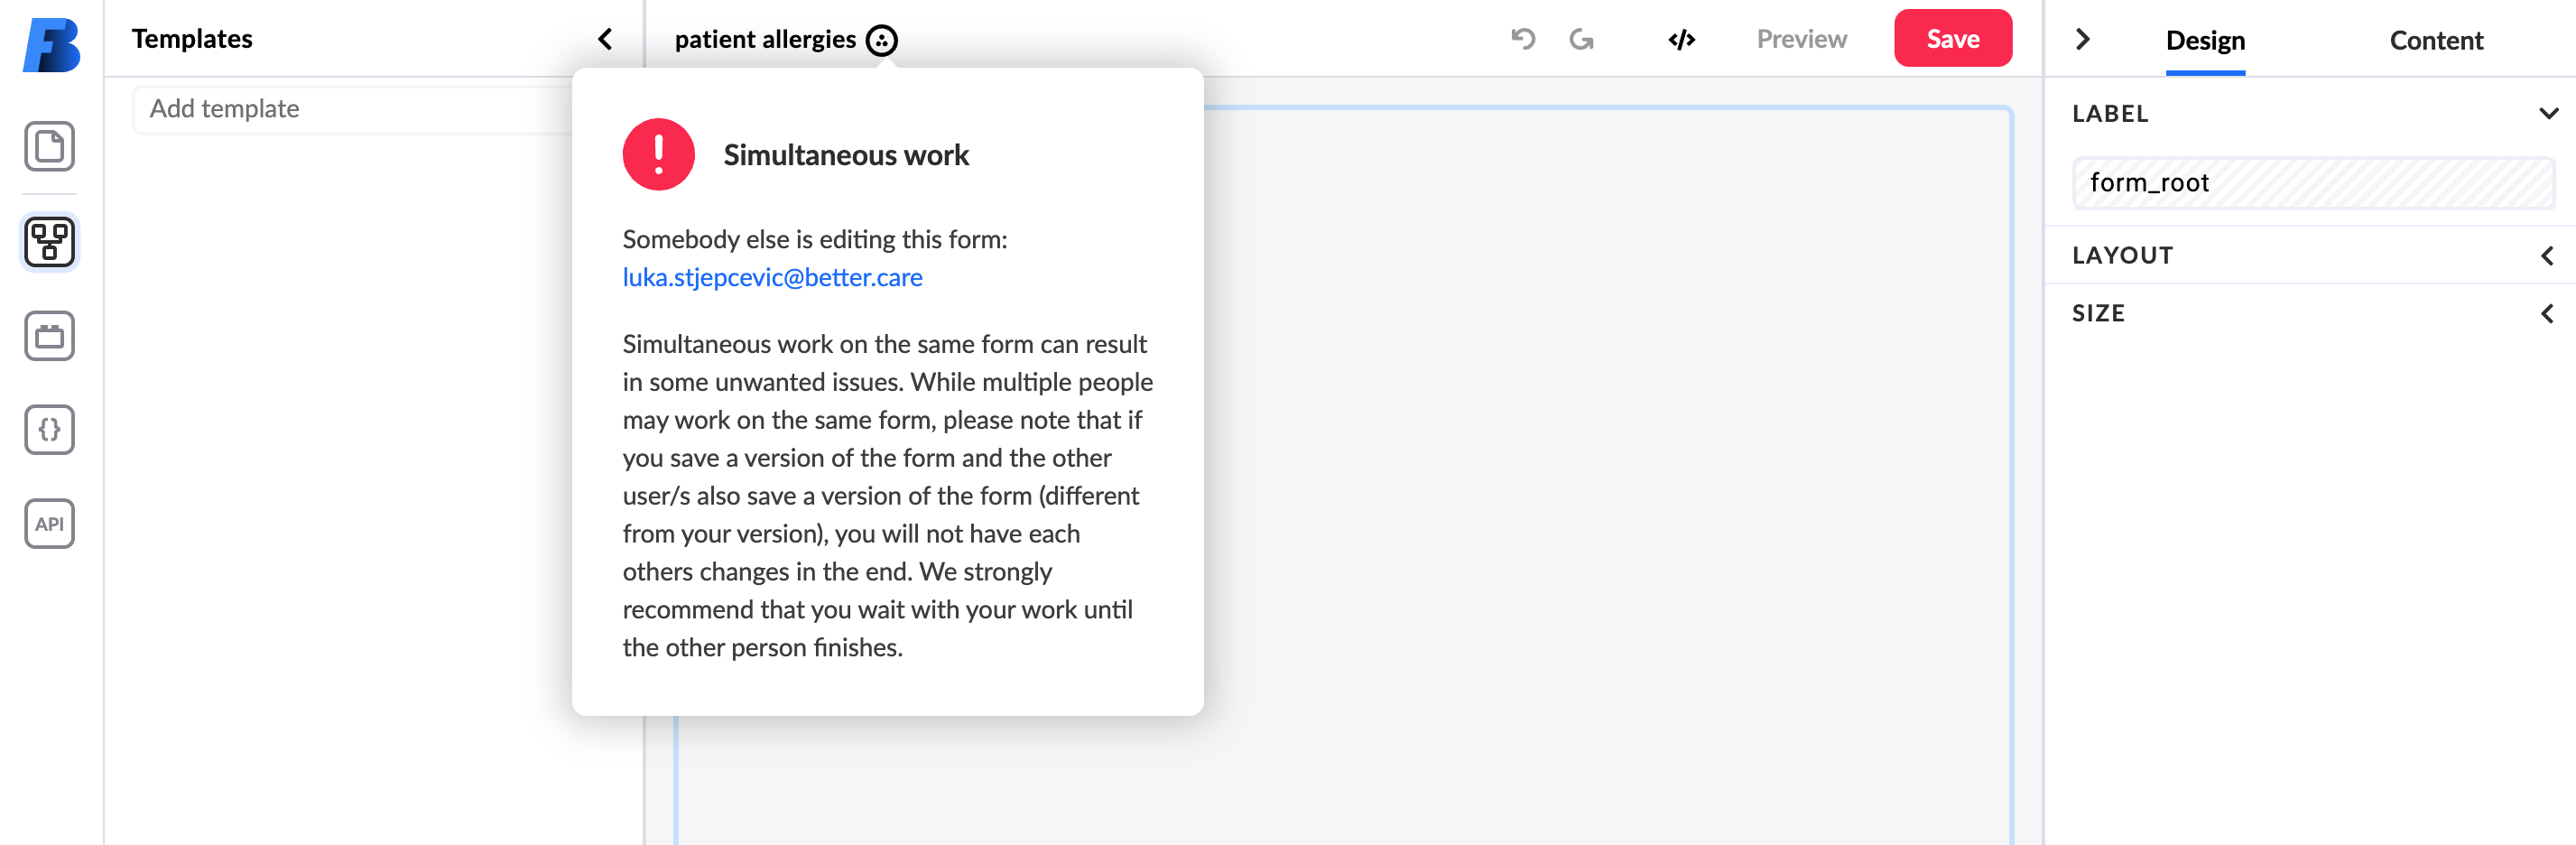
Hovering over the icon will show you who has the form open
Labels on forms that were copied from different project
When you copy a form to another project, the labels on the form will be light gray. If you want to add that label to the project, simply click on it.
Expression assistant
Expression assistant is a very powerful tool - you can use it to format text, add calculations and date functions. By clicking on a function, you open a dropdown that shows correct syntax and short explanation of the function.
You can find the expression assistant in most fields where you can configure the value as an expression, this includes setting values in fields via dependencies, API configuration, variable value configuration, default values on fields, widget configurations, list bindings, etc..
It is a good idea to make use of this whenever you need help setting a value that would include some sort of function, most commonly using CONCAT to bind text together, or using CALC and ROUND for numeric field calculation, you can even format dates with it with FORMAT_DATE, and more, give it a try next time you need to configure a value!
Using 'debounce' to optimize listeners on form elements and variables
A Listener sets up a function that will be called whenever the specified event is delivered to the form element, or triggered on a specified variable. Listeners can be added using the ScriptApi functions addListener and addVariableListener.
it is a good practice to use debounce to optimize listeners.
Debounce limits the rate at which a function will be executed by specifying the amount of time in milliseconds that the listener should wait before processing a new event. This is useful for events that are triggered rapidly one after another, such as key presses. The example below shows the difference between using debounce and not using it. Without using debounce, the API is called on each key press, while with debounce, the API is called only after the user stops typing for 400ms, which makes the API calls more efficient.
Using form version numbers to convey the significance of changes
You can use version number sequences to convey the significance of changes between versions, and the decision of which sequence to change between releases is based on the significance of the changes from the previous release, whereby the first sequence is changed for the most significant changes, and changes to sequences after the first represent changes of decreasing significance.
Form version is defined by a three-part version number (Major.Minor.Patch). Risk and functionality are the measures of significance:
- New, breaking changes are indicated by increasing the major number (high risk or major functionality change)
- New, non-breaking features increment the minor number (medium risk or medium functionality change)
- All other non-breaking changes increment the patch number (lowest risk or low functionality change)
These are only guidelines on how you can use version numbers within your team or your development process. Teams or project managers can decide the criteria by which to increase those numbers, and adapt it to better fit their processes.
For example, a project manager can set the guidelines as follows:
- For any trivial bug fixes on forms that will not affect the overall functionality of the form, increase the Patch part of the version.
- When you add new functionalities to the form without breaking any existing functionalities, increase the Minor part of the version.
- If you receive new guidelines from the client that require major changes to the form, increase the Major part of the version.
- You can jump multiple minor versions at a time to indicate that significant features have been added, but are not enough to warrant incrementing a major version number
Version numbers are unique and must be changed when saving a form. Studio automatically suggests a new version number by incrementing the Patch part of the version. The default initial version number that Studio suggests for you is 1.0.0.
You can freely change any parts of the version number to reflect the changes you have made.
Why do I only see settings and membership on a project?
This issue can arise due to multiple reasons. Below is a list of the most common causes along with troubleshooting steps:
Wrong credentials
If you are connecting to an OAuth2 project, double-check your credentials to ensure they are correct.Server not accessible
The server might not be accessible due to various reasons, such as:- A firewall blocking access to the project
- A missing VPN connection
- Server maintenance or downtime
Limited user roles
The user account you are using may have restricted permissions. Check with your platform administrator to confirm that your roles allow access to the necessary tools.Network issue
Connectivity problems could also be the cause. Ensure that:- Your internet connection is stable
- You can access the project’s platform without interruptions
Design
Put fields on the canvas by double-clicking or dragging and dropping
When you create a new form, you can simply start by adding fields to the canvas and play around with the design to get familiar with the basics. In video below, you can see an example of adding fields, dragging them around to change the layout, changing the position of the fields label and changing size of the fields.
Icons on fields
Fields can have several different icons on them. You can click the icons, and the form builder will take you to the source. For example, if the 'select' field has a warning icon, clicking it will take you to the right panel, where you can add options for the select field simply by entering a value and pressing enter on your keyboard.
The same applies for all other icons on the fields:
- dependency icon will take you to the bottom panel, where you can add and edit dependencies,
- script icon will take you to the script panel,
- error icon will show details when you hover over it...
Adding fields to dependencies with the field picker
When you are creating a dependency, you can add the field to it by using field picker functionality - simply click on the field. This also works within expression assistant.
Using tags to manipulate multiple fields at once in dependencies
There are numerous use cases where it's necessary to perform an action on a multiple fields at once based on a specific condition. Despite having a field picker, this task can be quite tedious, especially if there are numerous fields involved. Fortunately, you can simplify this process by assigning a tag to all the fields that should be affected by action at once and then use this tag in dependencies to apply it to them.
Tags can easily be added in the property panel, found in the Content tab under the Tags section. This will significantly simplify the entire process, making it much easier to manage.
Here is a video showing how to add tags to the fields:
And how to use the tags in dependencies:
Using buttons to navigate through pages
One of the common uses of buttons is to use them for navigation through multipage forms. You can use it in a dependency on any field and action, but in this example we will show you how to use them on a button click event.
Using buttons to save a composition
Another common use of buttons is to use them to save a composition. In the example below see how to save a composition inside the form using a button and dependencies.