Form logic and review tools
This content is intended for beginner Studio users.
Your vital signs form now has a simple set of fields and components. In this step, you will make the form smarter by adding conditional logic that controls how the form behaves.
Form builder includes three features that define your form's logic and behaviour:
- Dependencies: The rules that control how fields and components behave based on the values you enter in the form.
- Dependency inspector: Shows all the dependencies that affect a selected field, so you can understand and debug logic at a glance.
- Compare: Lets you compare two saved versions of a form side by side, so you can see exactly what changed in between.
All three are found in the bottom panel of the Form builder editor.
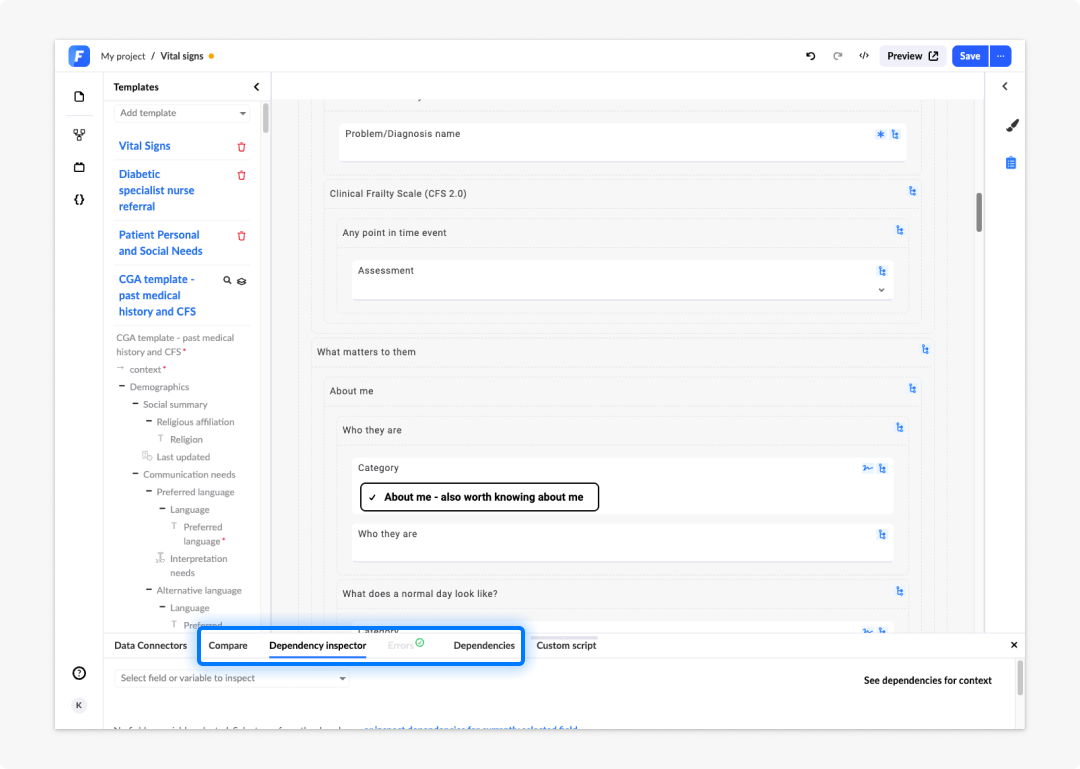
Dependencies
A dependency is a rule that tells Studio to do something when a condition is met.
For example: Show a field only if another field has a specific value, hide a field when a condition is no longer true, or navigate to the next page automatically.
Dependencies use a simple if / else structure. You define a trigger condition, then one or more actions to take when that condition is true and optionally, a different set of actions when it is not.
A more detailed explanation on how dependencies work can be found in the Logic and behaviour section.
Adding a dependency
To add a dependency to a field or component on your vital signs form:
- Open the Dependencies feature at the bottom by clicking on it. You can stretch this window out as far as it is comfortable for you.
- An empty dependency should already exist there. If not, you can simply click on Add a new dependency
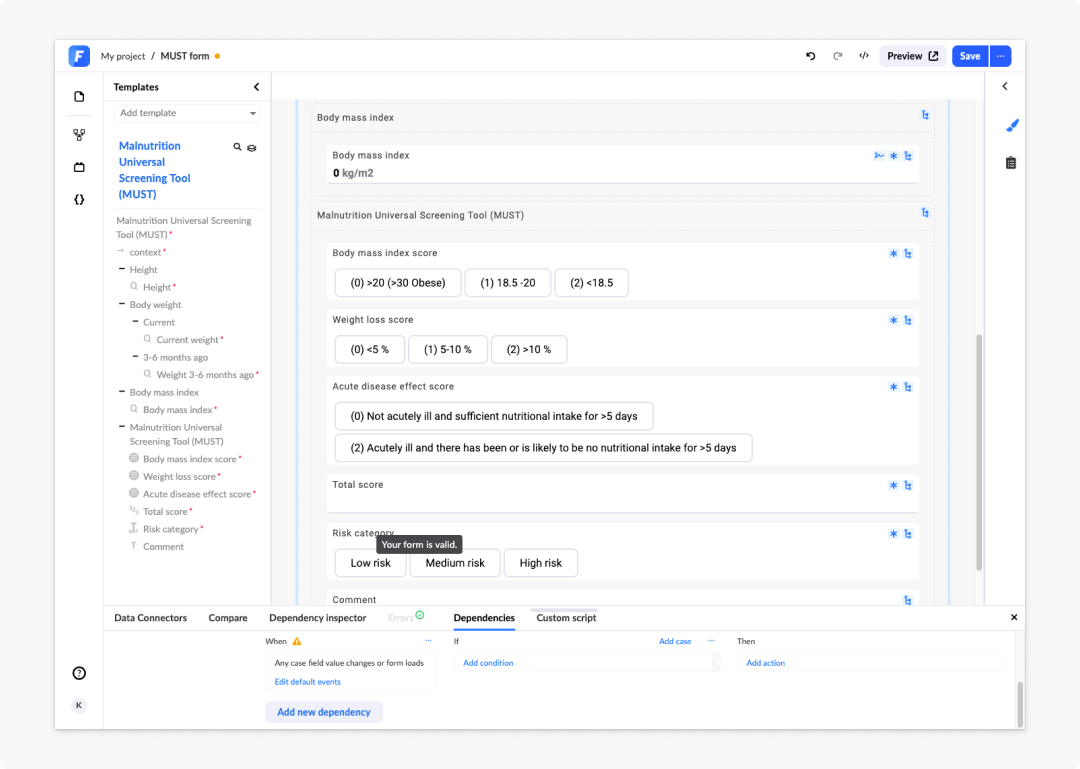
Creating a dependency
The Vital signs form includes the Body mass index (BMI). Rather than asking the user to enter this manually, you can have Studio calculate it automatically from the Height and Weight fields already available on the form.
This is a good first dependency to build, as it uses the Expression assistant, including the CALC and ROUND functions.
Step 1: Select the BMI field and set a condition (IF)
As we already have our Dependencies panel open, we simply:
- Navigate to the Body mass index field on the canvas.
- In the IF section, click Add condition.
- Move your mouse on the Height/Length field and click on it.
- Click and select magnitude.
- Set the operator to is not empty.
Add a second condition:
- Click on the + symbol to add a second line and select and.
- Add a second condition: Weight magnitude is not empty.
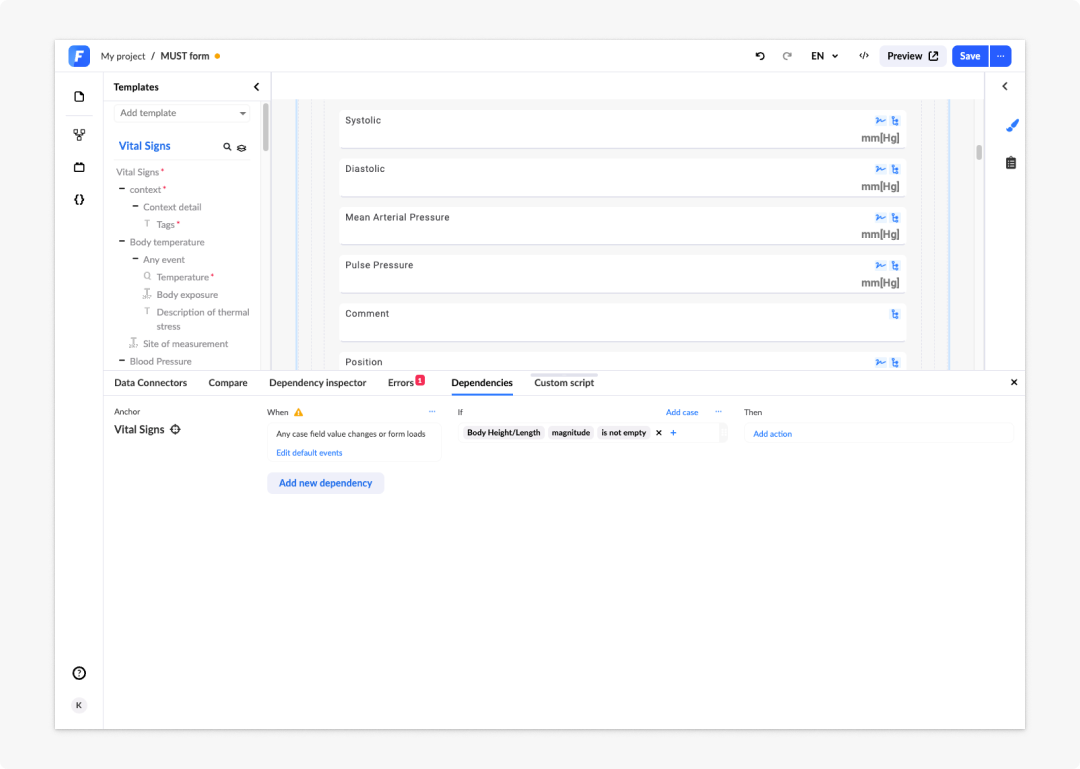
Step 2: Set the action (THEN)
Now define what happens when this condition is met:
- In the THEN section, click Add action.
- Click the Body mass index field on the canvas or select it from the dropdown. Studio will reference it as the target.
- Set the action type to Set.
- Set the property to Magnitude. This is the numeric value of the BMI field.
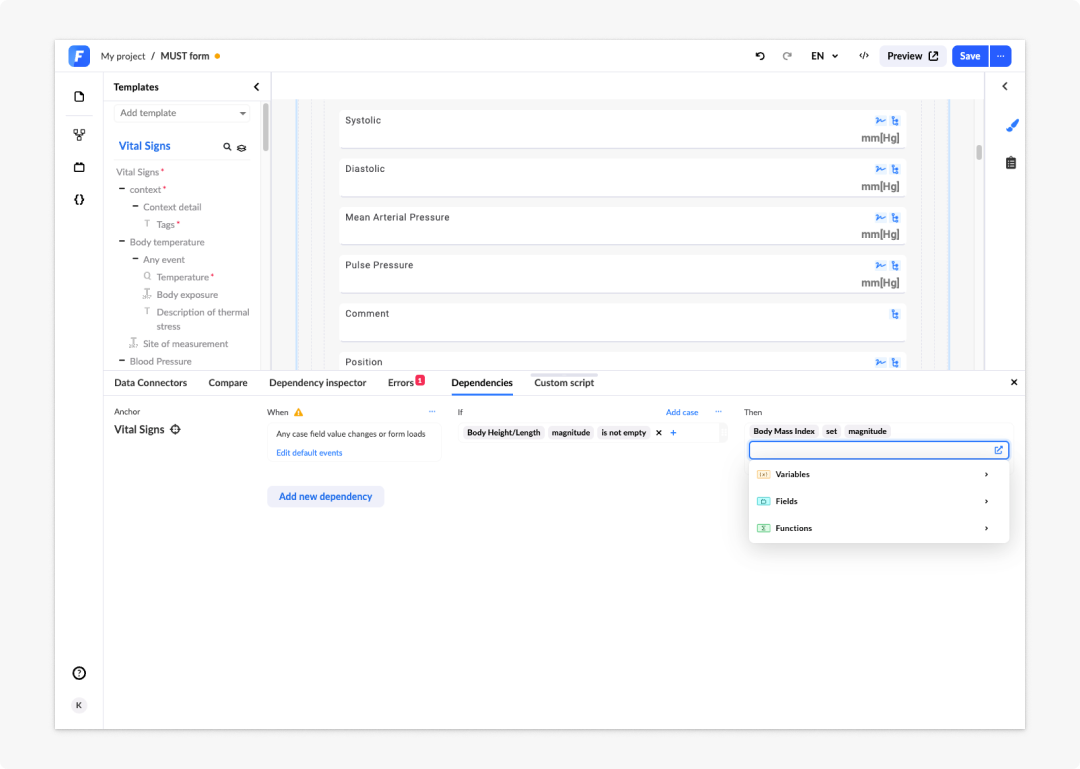
Step 3: Write the BMI expression
Now you will define the value to set (the BMI formula) using the Expression assistant.
The Expression assistant is a built-in tool in Form builder that helps you write expressions and calculations without needing to know code. It provides a searchable library of functions including text, number, date, and general functions, and lets you reference form fields directly by clicking on them. As you build an expression, it validates it in real time and alerts you to any errors.
For reference, the final expression we are building should look like this:
ROUND(CALC((weight_magnitude) / ((height_magnitude / 100) * (height_magnitude / 100))), 2)
- In the Expression assistant, click Functions
- From the dropdown menu, select or search the
CALCfunction. This is used for all numeric calculations in Studio. - Inside the
CALCbrackets, build the BMI formula: weight (kg) ÷ height (m)²:
CALC((weight_magnitude) / ((height_magnitude / 100) * (height_magnitude / 100)))
Because height in the Vital signs template is stored in centimetres, you need to divide it by 100 to convert to metres before squaring it.
To enter this in the Expression assistant:
- Each element of the calculation needs to be entered as separate.
- Inside the
CALCbrackets, add an opening bracket and click the Weight field on the canvas to referenceweight magnitude. Add a closing bracket. - Type
/(divide). - Add an opening bracket, then add another opening bracket and click the Height field to reference
height magnitude. Type/ 100and add a closing bracket. - Type
*(multiply), then add an opening bracket, referenceheight magnitudeagain, type/ 100, and add a closing bracket. - Add a final closing bracket to close the denominator, then a closing bracket to close the outer
CALC.
Bracket order matters. If the brackets are mismatched, Studio will alert you that the expression is invalid. If the calculation produces a wrong result, check the bracket positions first.
Step 4: Round the result
The raw BMI calculation will produce a long decimal. Wrap the entire expression in the ROUND function to limit it to 2 decimal places.
- In the Expression assistant, click Functions and insert
ROUND. - Place the entire
CALC(...)expression inside theROUNDbrackets. - After the closing bracket of
CALC, add a comma and the number 2. This sets the number of decimal places. - Add the final closing bracket for
ROUND. - Click Finish to apply the expression.
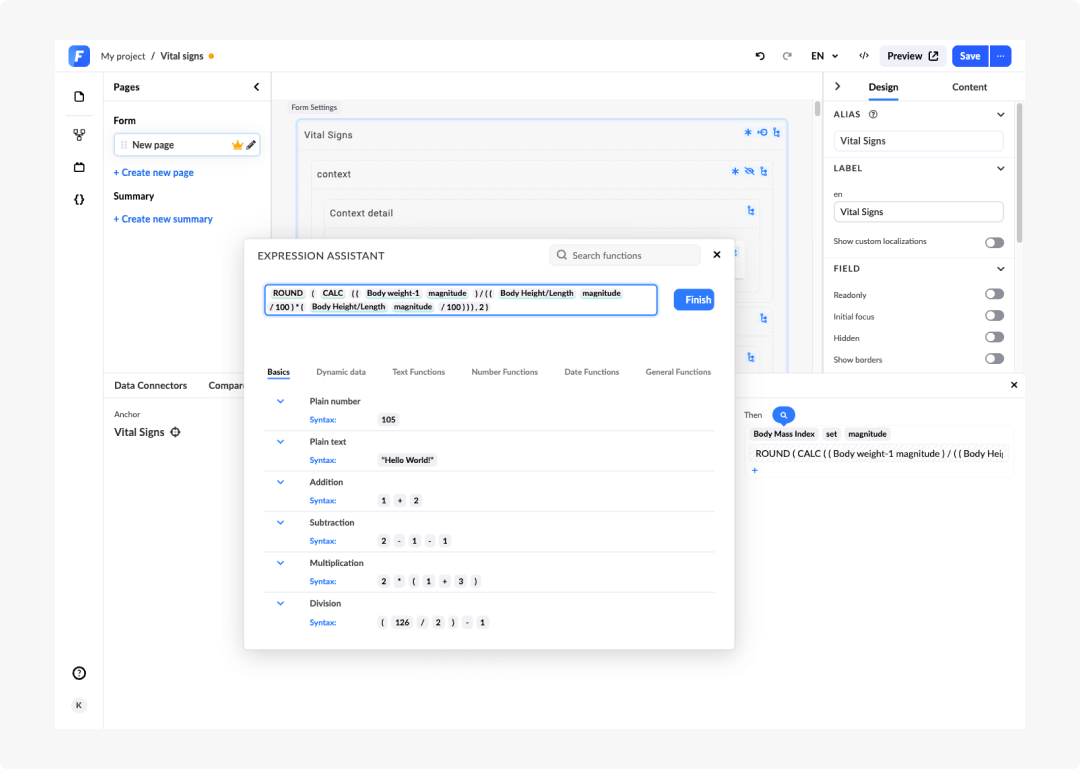
Step 5: Preview the result
You do not need to save and activate to check your formula. The Preview panel updates live as you build.
- Click Preview in the Form builder top toolbar.
- Enter a height, for example 170 cm.
- Enter a weight, for example 60 kg.
- The BMI field will calculate and display the result automatically, rounded to 2 decimal places.
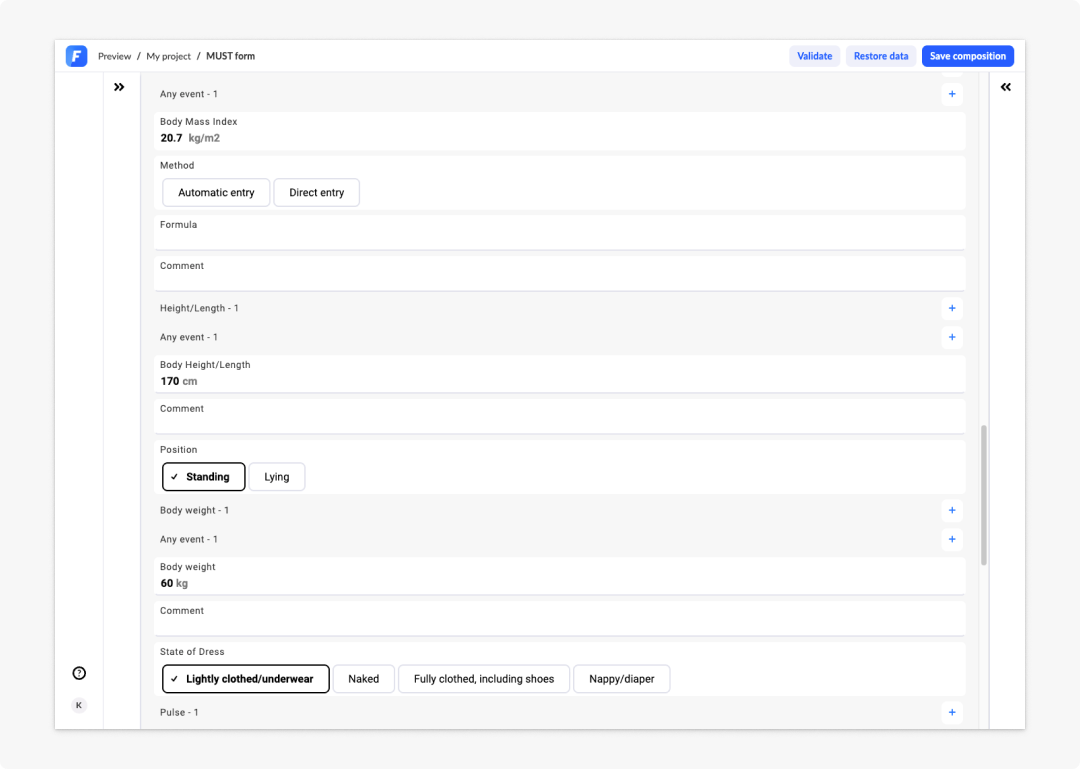
The Preview is live. Any change you make in the editor is reflected in the Preview immediately. You do not need to re-open it.
You can add multiple if/else cases within a single dependency, and multiple dependencies on a single field. Dependencies can also trigger navigation actions — for example, moving the user to the next page when a required section is complete.
Do not forget to save your form again! Click on Save, add the comment to describe what you have done (Added dependency for BMI) and save the form. You will see the form version has already been modified.
Dependencies and the Expression assistant are covered in full in the Build in Studio section of this documentation.
The Dependency inspector
As a form grows, it can become difficult to remember which dependencies affect which fields. The Dependency inspector solves this by showing you, for any selected field, every dependency that currently targets it.
Using the Dependency inspector
- Select any field on the canvas. For example, the Body mass index field you configured above.
- Open the Dependency inspector tab in the bottom panel.
- The inspector will display a list of all dependencies that affect the selected field, including the conditions and actions defined in each one.
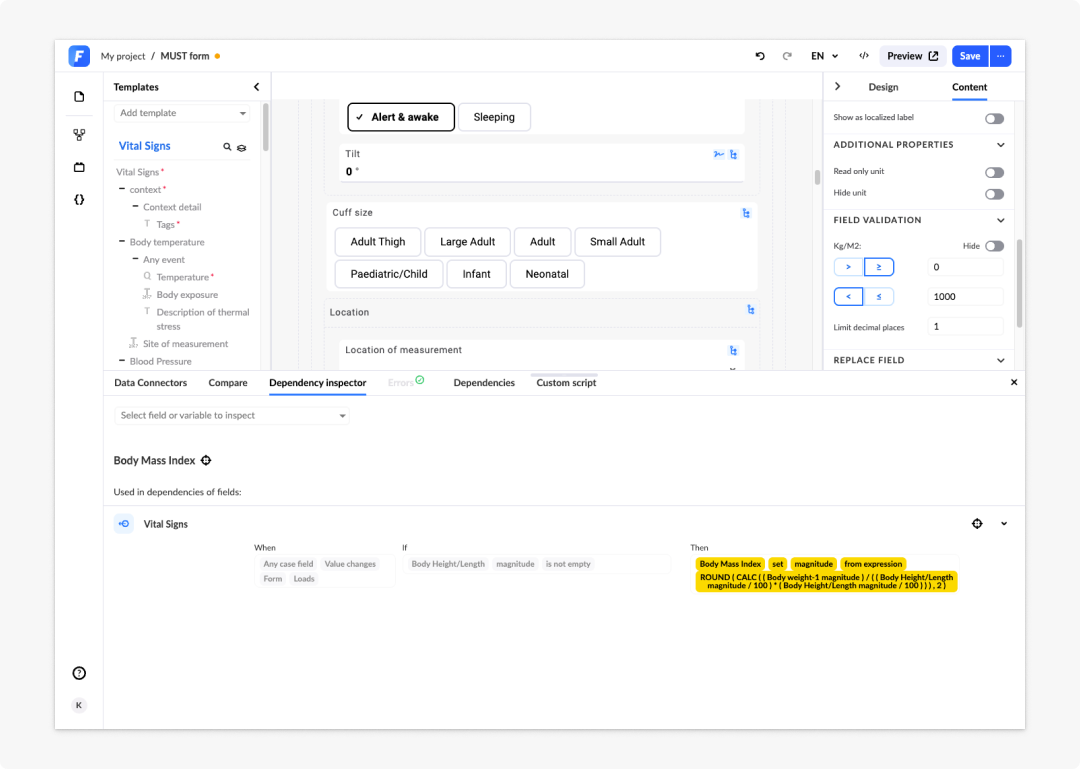
This is especially useful when troubleshooting unexpected field behaviour. Rather than scanning every dependency in the form, you can go directly to the field in question and see exactly what is acting on it.
The Compare feature
Before activating a new version of your form, it is good practice to review what has changed since the last activated version. Compare lets you diff two saved versions of the same form side by side, highlighting additions, removals, and modifications.
Comparing versions
- Open the Compare tab in the bottom panel.
- Select the version you want to compare against from the dropdown — for example, the last activated version.
- Studio will display a list of differences. You can click on any of them and the changes will be highlighted and displayed side-by-side.
- You can review the differences to make sure you are on the right track before proceeding to the next step.
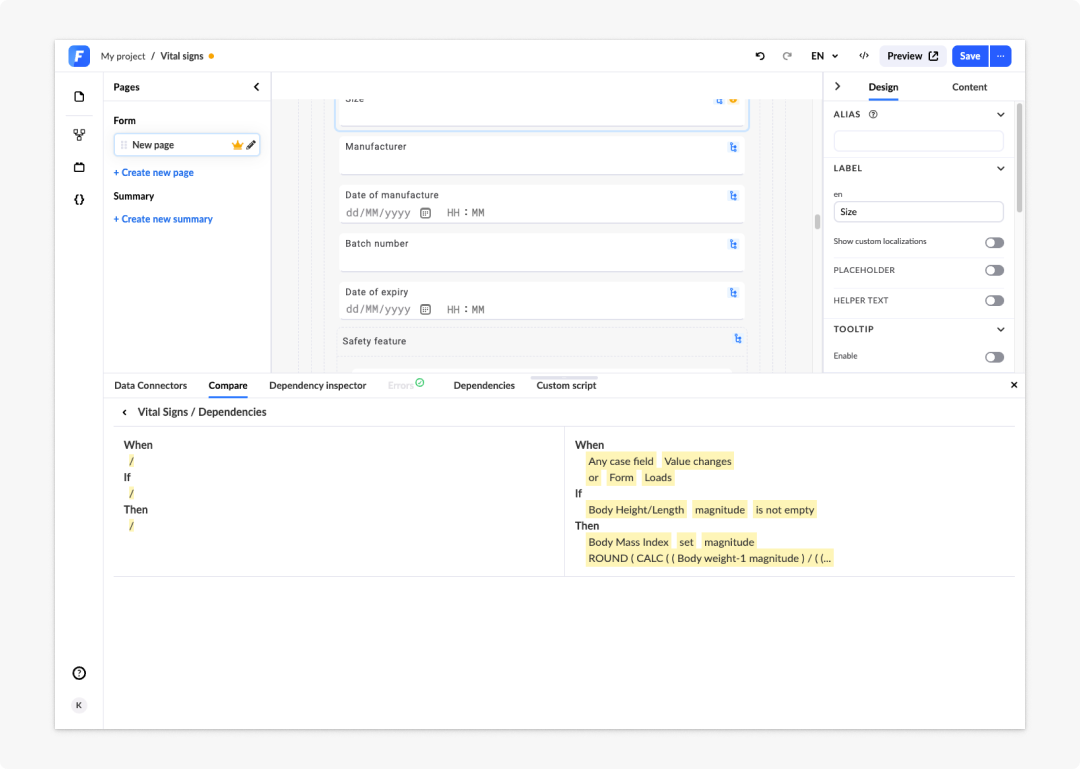
Use Compare as a final check before every activation. It takes a few seconds and can help you catch accidental changes like a moved field, an unintended label edit, or a dependency that was modified without being noticed.
Using your form
Once activated, your form will be available either in your Better Portal or the dedicated end-user app, which you set up with Form renderer.
Frequently asked questions (FAQs)
What is a dependency in Form builder and how is it structured?
A dependency is a rule that tells Studio to do something when a condition is met. Examples of this are showing or hiding a field, calculating a value automatically, or navigating to the next page. Dependencies use a simple if/else structure: you define a trigger condition, then one or more actions to take when that condition is true, and optionally a different set of actions when it is not.
What is the Expression assistant and what can it do?
The Expression assistant is a built-in tool in Form Builder that helps you write expressions and calculations without needing to know code. It provides a searchable library of functions including text, number, date, and general functions, lets you reference form fields directly by clicking on them, and validates expressions in real time, alerting you to any errors.
Do I need to save and activate my form to test whether a dependency is working correctly?
No. The Preview panel updates live as you build, so you can check your logic immediately. Any change made in the editor is reflected in the Preview without needing to re-open it.
What does the Dependency inspector show and when is it useful?
The Dependency inspector shows, for any selected field, every dependency that currently targets it, including the conditions and actions defined in each one. It is particularly useful when troubleshooting unexpected field behaviour, as it lets you go directly to the field in question rather than scanning every dependency in the form.
What does the Compare feature do and when should I use it?
Compare lets you diff two saved versions of the same form side by side, highlighting additions, removals, and modifications. It is recommended as a final check before every activation to catch accidental changes such as a moved field, an unintended label edit, or a dependency that was modified without being noticed.