Projects in Studio
This content is intended for all Studio users.
Applies to: Licensed organisational accounts (cloud and on-premise)
Trial users: Trial Studio accounts include one pre-built project, already connected to an openEHR and FHIR repository. You cannot create additional projects on a trial account. To upgrade, check the Ready for launch? section on your Studio dashboard.
Beginner users: If you are following the Start here section and your project has already been set up by your organisation, skip this page and go straight to Your first form.
In Better Studio, a project is the top-level container for everything you build in Studio. It represents the connection between the Studio interface and an EHR server.
Project connectivity issues in Chrome and Edge: Starting with Chrome version 142, a new Local Network Access permission prompt may block connections from Studio to Better Platforms hosted on your local network. When prompted, you must allow local network access for connections to work. If you dismiss or block the prompt, connections to your projects may fail.
The prompt appears only once per site — after you allow it, Chrome remembers your choice. This also applies to Microsoft Edge version 143 and other Chromium-based browsers. In the browser console, this shows up as a CORS error mentioning Permission was denied for this request to access the 'local' address space — despite the wording, it is not an actual CORS misconfiguration.
Learn more in the official Chrome documentation.
The Projects section in Studio contains all the projects you have added or that have been added to your account. The list includes the project name and the role assigned to you in the project membership.
You can search through the projects using the search bar.
The EHR server is where Studio stores and retrieves your templates, forms, views, data connections, clinical compositions, and settings. Every project is linked to exactly one EHR server, and you can create as many projects as your organisation needs. One per environment or server is a common pattern.
When trial users log in to Studio for the first time, you will find a pre-built sample project already waiting for you.
If you are a licensed user and are ready to build something of your own, start a new project.
How to create a project
Projects can be created only if you have a licensed (organisational) user account and the required Studio role. If this option is not available to you, talk to your Studio administrator or contact our Sales team for an upgrade.
Under the hood, Studio needs the EHR server in order to get, use, and store forms, templates, views, and compositions. Therefore, you need to have at least one project with a mandatory EHR server connection added. Studio allows adding an unlimited number of projects, and you can switch between them at any time.
To add a project:
- Go to your Studio dashboard.
- Select Projects in your left-side navigation menu. You will see a list of all projects currently added to your account.
- Click on the Add project button on the top right, next to the search bar. This will launch the multi-step project setup wizard.
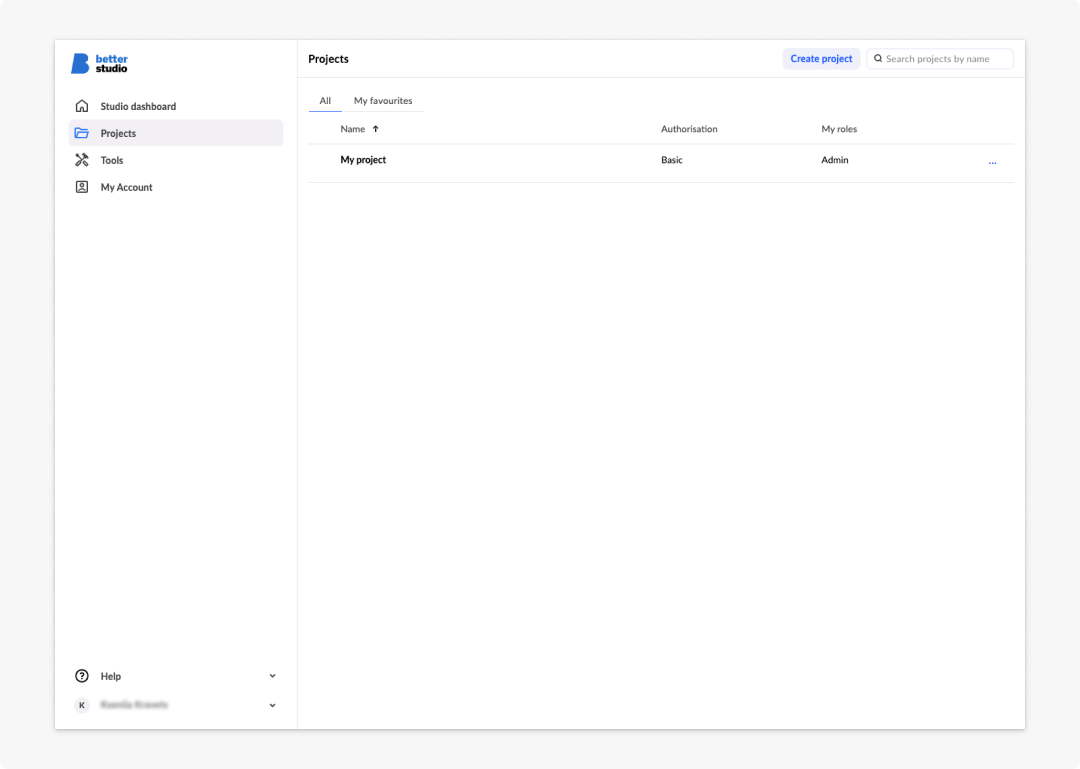
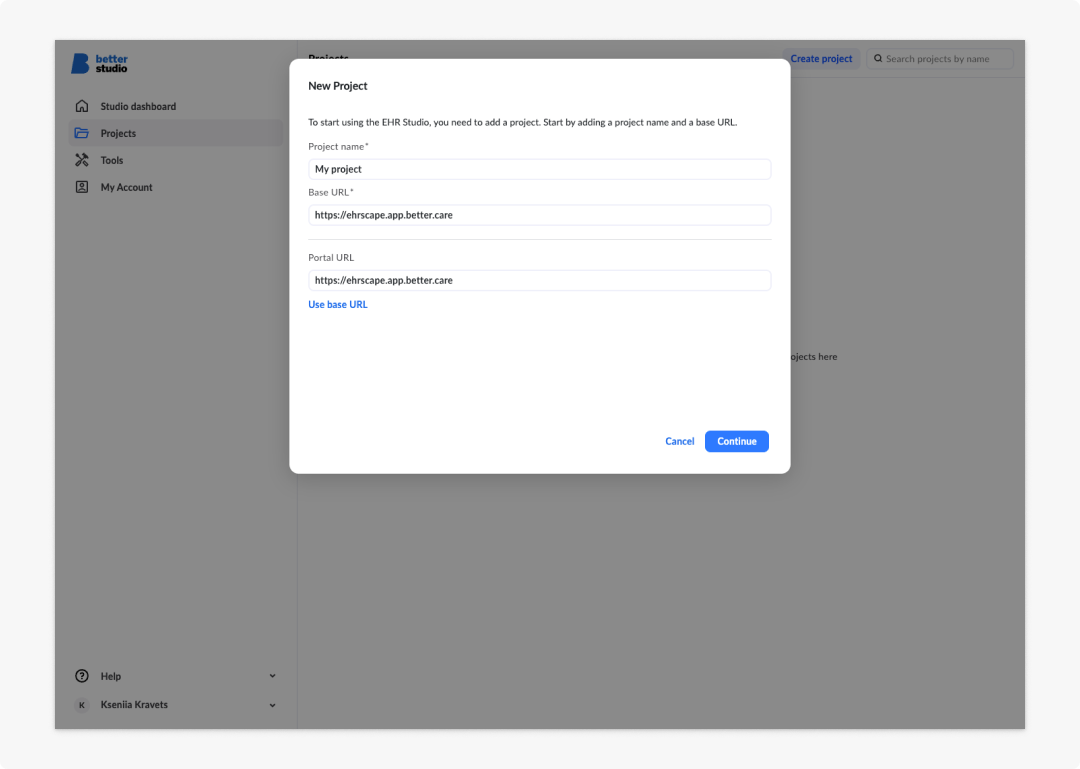
Step 1: Project details
In the first step of the wizard, enter the following:
- Project name (required): A clear, recognisable name for the project. This is what you and your team will see in the project list.
- Base URL (required): The URL of the EHR server this project will connect to.
- Portal URL (optional): The URL of the Portal endpoint, if your environment uses one. If your Portal endpoint matches the Base URL, select Use base URL.
Step 2: EHR server authorisation
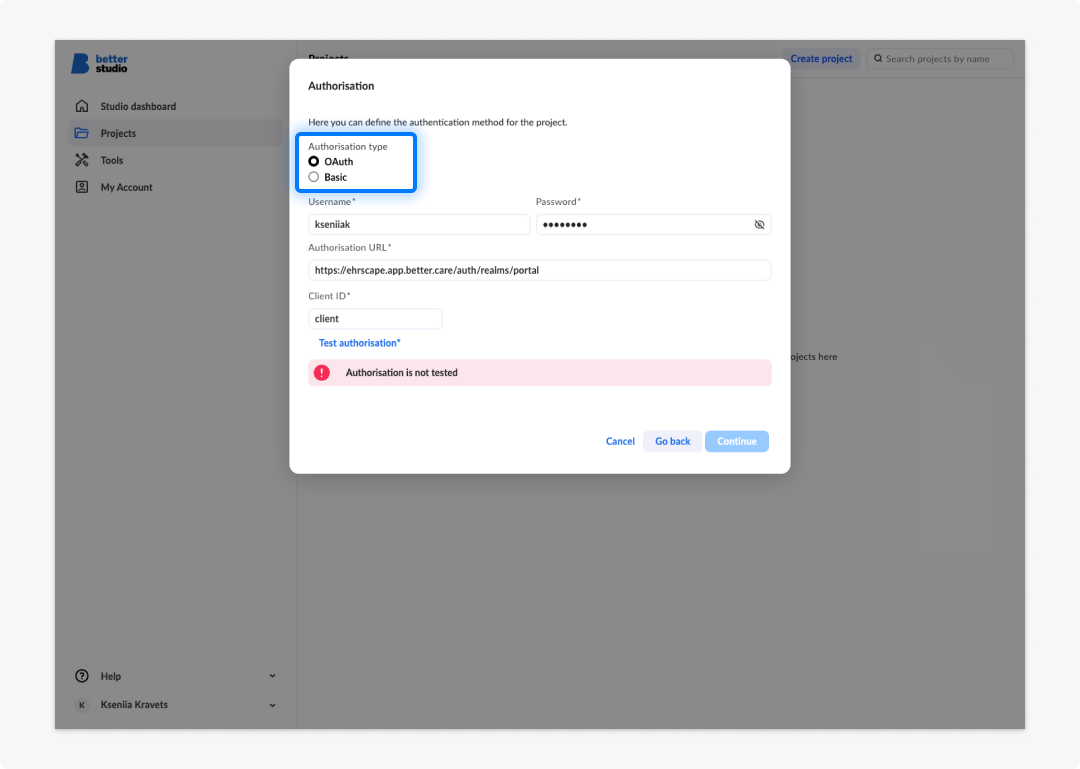
Studio supports two authorisation types. Select the one that matches your EHR server configuration.
-
Basic authorisation: Enter the EHR server username and password, then click Test authorisation. The connection must be validated successfully before you can continue.
-
OAuth authorisation In addition to a username and password, OAuth2 requires:
- Authorisation server URL
- Client ID
Click Test authorisation to validate the connection before continuing.
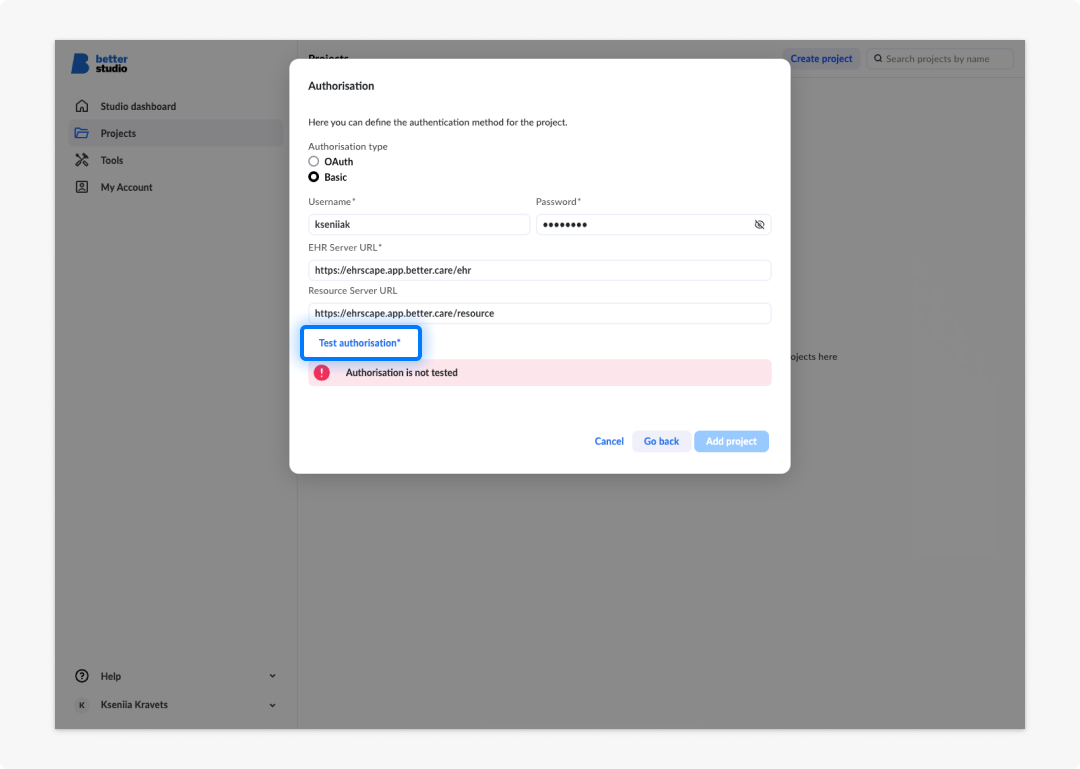
The EHR server username and password are separate from your Studio login credentials. Make sure the EHR server user has sufficient permissions — the FORM_ADMIN or ADMIN role is required to access Form builder. If you are unsure of your role, check the Roles section in the EHR Platform Admin console or contact your EHR Platform administrator.
EHR server validation
Studio always validates the EHR server connection when adding a project. If validation fails, an Authorisation failed notification will appear. Common causes include:
- an incorrect username or password
- an EHR server version below the minimum supported version (Platform 3.0.23 or later is required)
- the EHR Server REST API or admin REST API not being exposed
- one or both URLs being unreachable
If validation fails, contact your EHR server administrator for assistance.
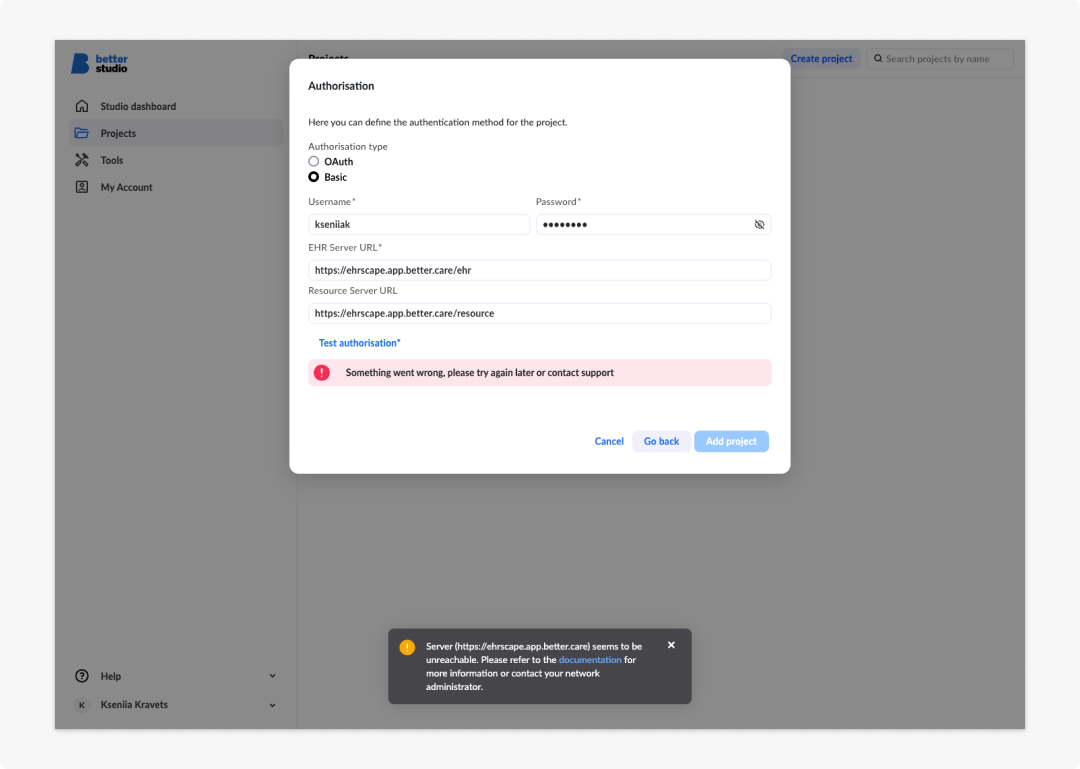
EHR server and Resource server URLs
When adding a project, you provide the EHR Server URL. This is where Studio stores and retrieves templates, views, and compositions.
You can optionally provide a Resource server URL if your environment has a separate resource server configured. The resource server is where Studio fetches resources such as forms, global APIs, global variables, images, and other files.
If your environment has a separate server for resources, you can provide the Resource server URL. If you don't provide the Resource server URL, Studio will use the EHR server URL for fetching resources.
Integrated Better services (OAuth only)
During the OAuth authorisation flow, the Better services configuration step allows you to connect to multiple Better services within the wizard. Each connection must be tested individually before the Add project button becomes available.
A successful connection displays a checkmark and the service version information.
Terminology adapter URL
You can provide the Terminology adapter URL by setting the test value of the external variable called terminologyUrl in Administration > External variables.
Setting the Terminology adapter URL has been deprecated since Studio version 3.8. Previously added Terminology adapter URLs have been migrated to the terminologyUrl variable. All existing APIs using the Terminology adapter url are backwards compatible.
Bypass server
The Bypass server option is enabled by default and it is recommended to keep it enabled. If you disable it, you can add a domain where all requests will be routed through the Studio backend server. This is only useful if your Better EHR platform does not have a proper CORS configuration.
The Bypass server option has been removed from Studio starting with version 3.14. It is no longer visible or configurable unless the Advanced User setting for your account is enabled.
Editing project settings
Only users with the Admin role can edit project properties.
To edit a project:
- Open the project from the projects list.
- Navigate to Settings
- Click the Edit button in the top right corner.
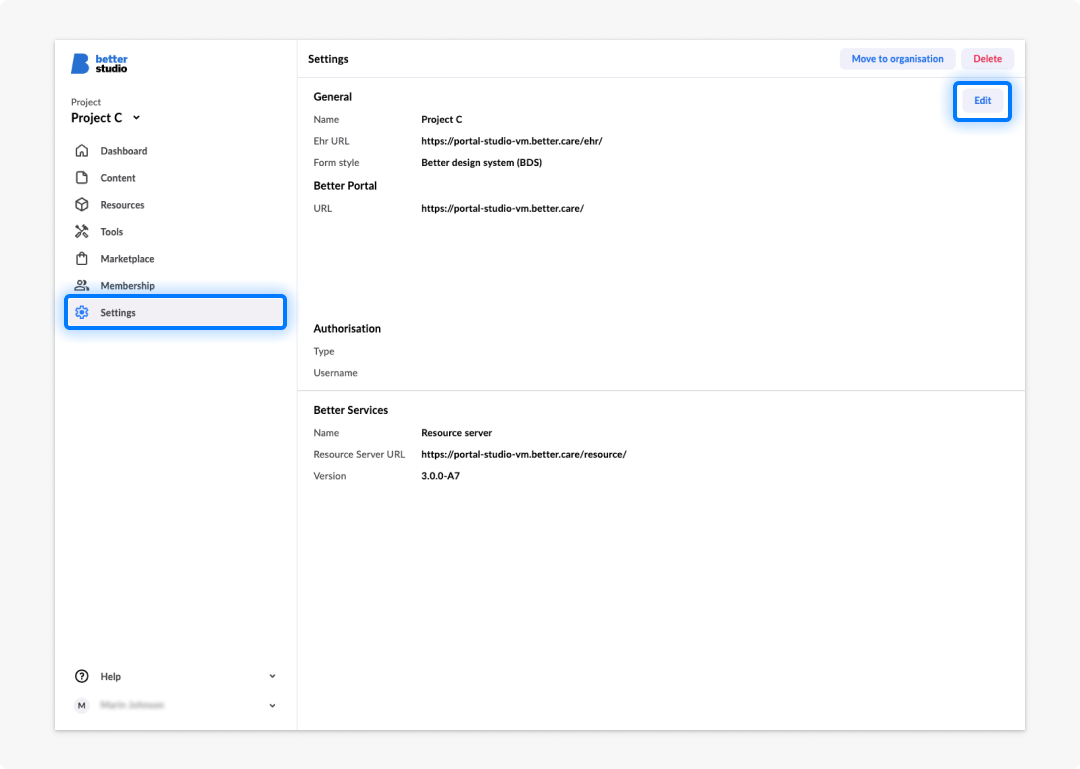
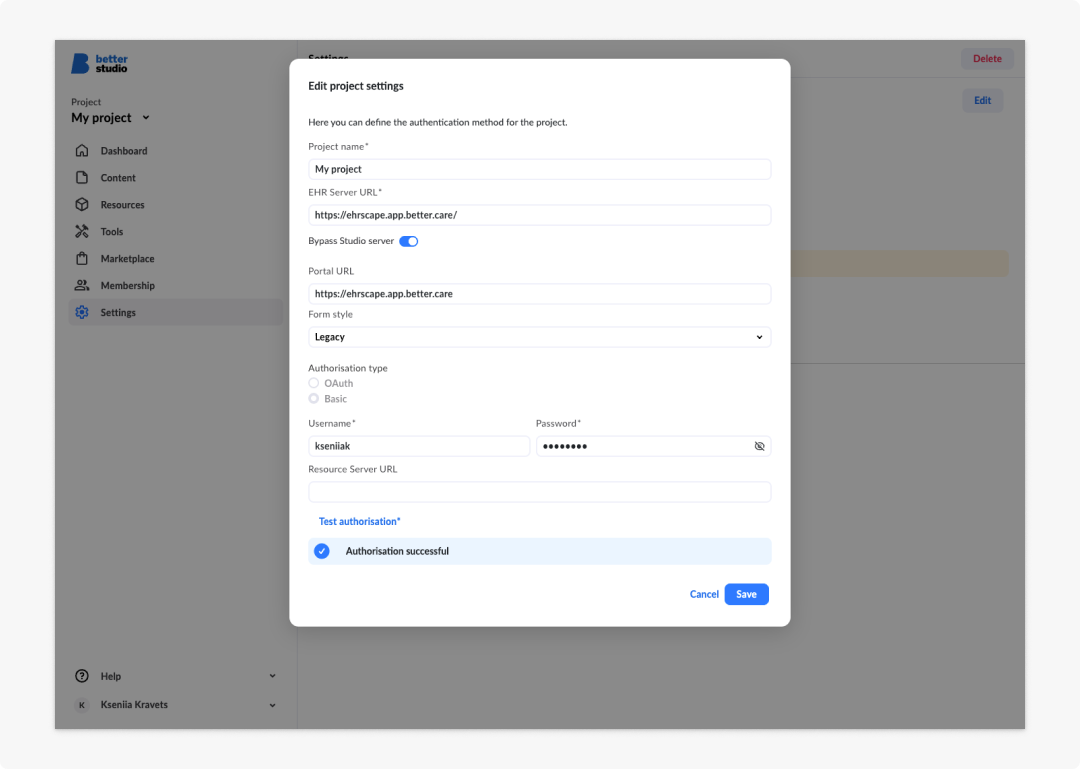
You can update the following:
- Project name
- EHR Server URL
- Resource Server URL
- EHR server credentials (username and password for Basic auth, or Authorisation URL and Client ID for OAuth2)
- Save your changes.
Managing dashboards
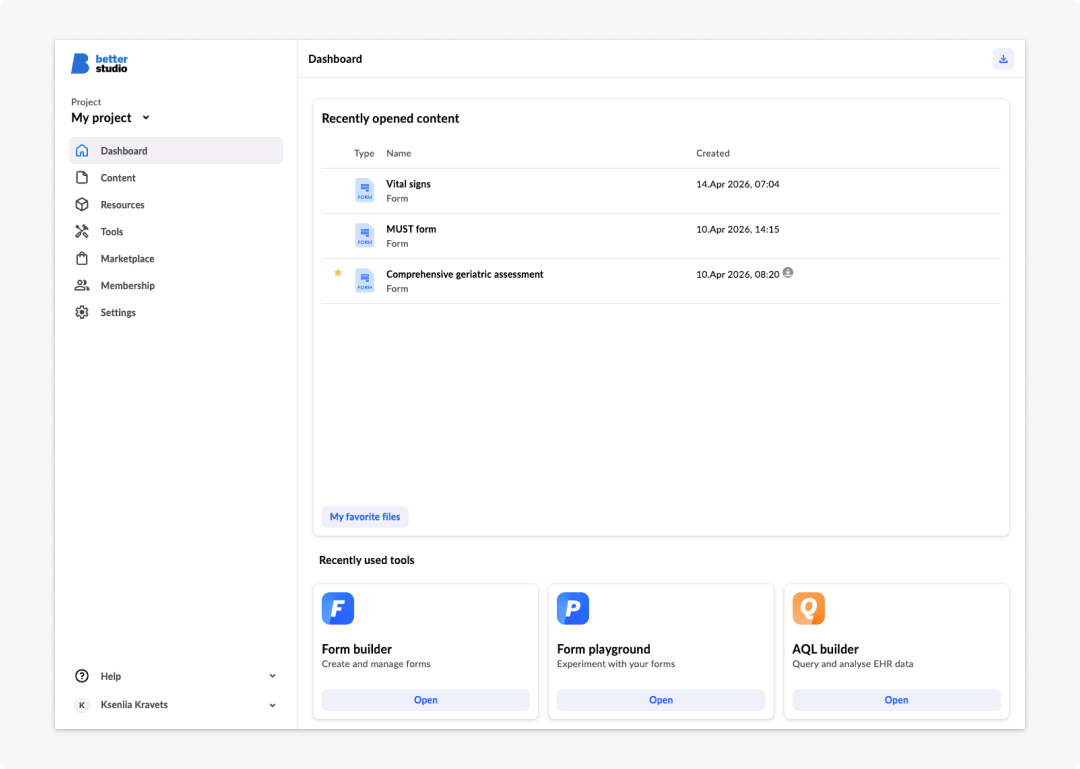
Dashboards give you quick overview on your recent work. Studio dashboard shows you the list of last projects you have worked on. Project dashboard gives you a quick view on recently opened content, such as forms and summaries.
Never lose a project, form or summary you have created. Simply mark the important content as favorite and gain quick access by opening My favorites list view on Studio dashboard, project dashboard or content page.
Deleting a project
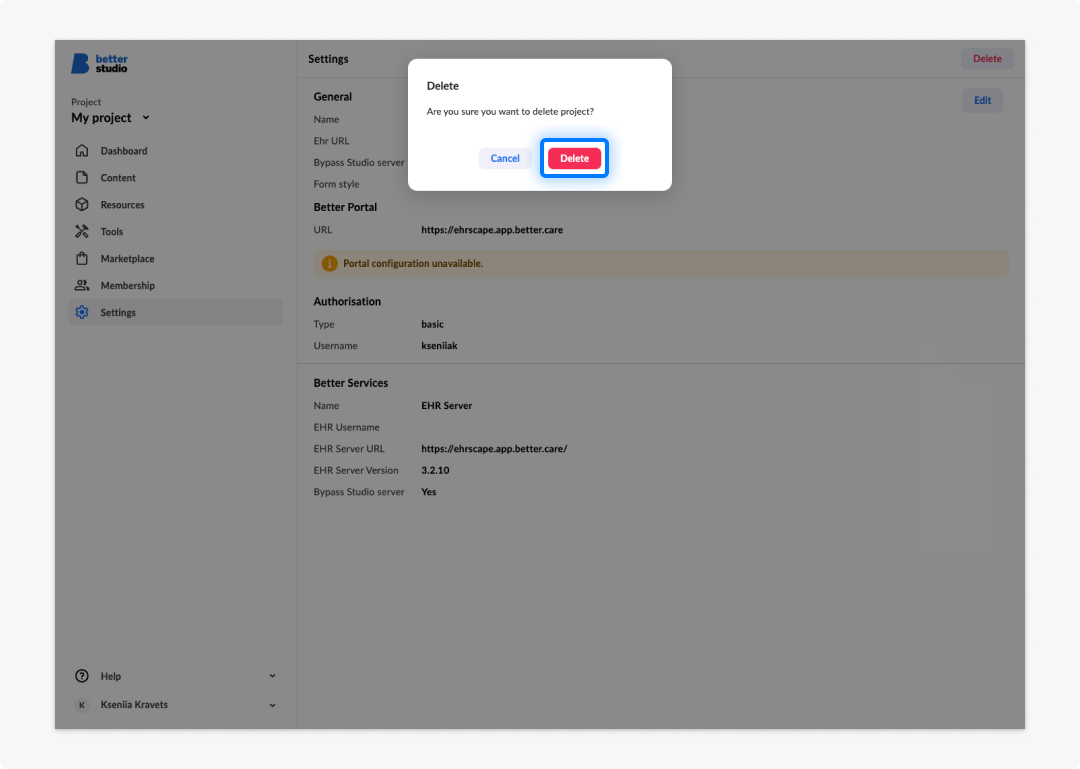
To delete a project:
- Open the project from the projects list.
- Navigate to Settings
- Click on Delete project.
- Confirm the deletion when prompted.
Deleting a project removes it from Studio. It does not delete data from the EHR server.
Managing project members
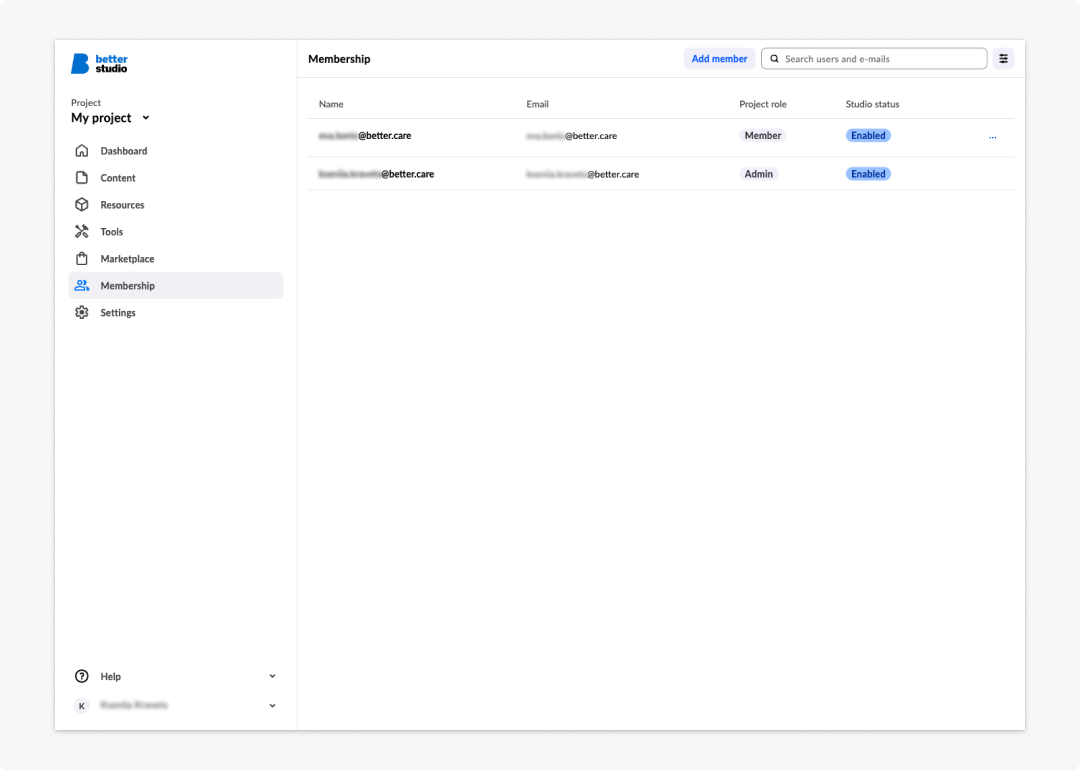
In licensed organisational accounts, Admin users can add or remove other Studio users to a project. When adding them, they also assign them roles within the project.
To add a member:
- Open a project and navigate to the Membership section.
- Enter the user's email address and select a role.
- Click Add.
The user will receive an email confirming they have been added to the project and notifying them of their assigned role.
Member roles
We differentiate between two roles within a Studio project.
| Role | Permission |
|---|---|
| Admin | Can edit project properties, add and remove members, and change member roles |
| Member | Can view project properties only, they cannot view, add, or remove members, or edit properties |
Assign the Admin role only to users who need to manage the project configuration. Most team members working in Form builder or AQL builder will only need the Member role.
Move project to organisation
Organisation members can move their projects to the organisation, allowing the admin to manage project membership. To do this:
- Open a project and navigate to the Settings section.
- Click the Move to organisation button in the top right.
- Select your organisation.
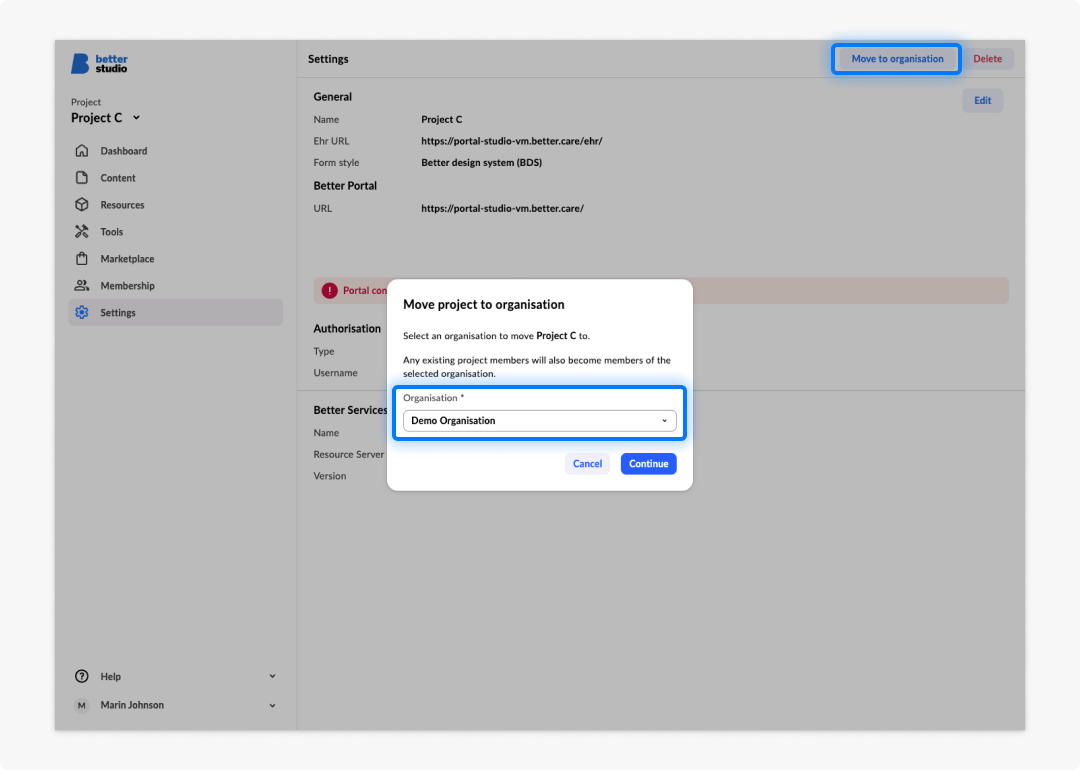
All existing project members are automatically added to the organisation with a User role. For more information on how to manage a Studio organisation, check the dedicated section here.
Import resources to EHR Platform
Studio allows you to import templates, forms, summaries, and all the necessary resources to use within your projects.
You can import resources that is in the following formats:
- Form bundles (.zip)
- Summary bundles (.zip)
- Templates (.opt or .xml)
- Template bundles (.zip)
- AQL Views (.json)
Bundles are .zip files that contain multiple connected resources. They can have templates, which define the underlying structure of forms and summaries, as well as AQL views that search and write data.
To import a new resource:
- Open your project in Studio.
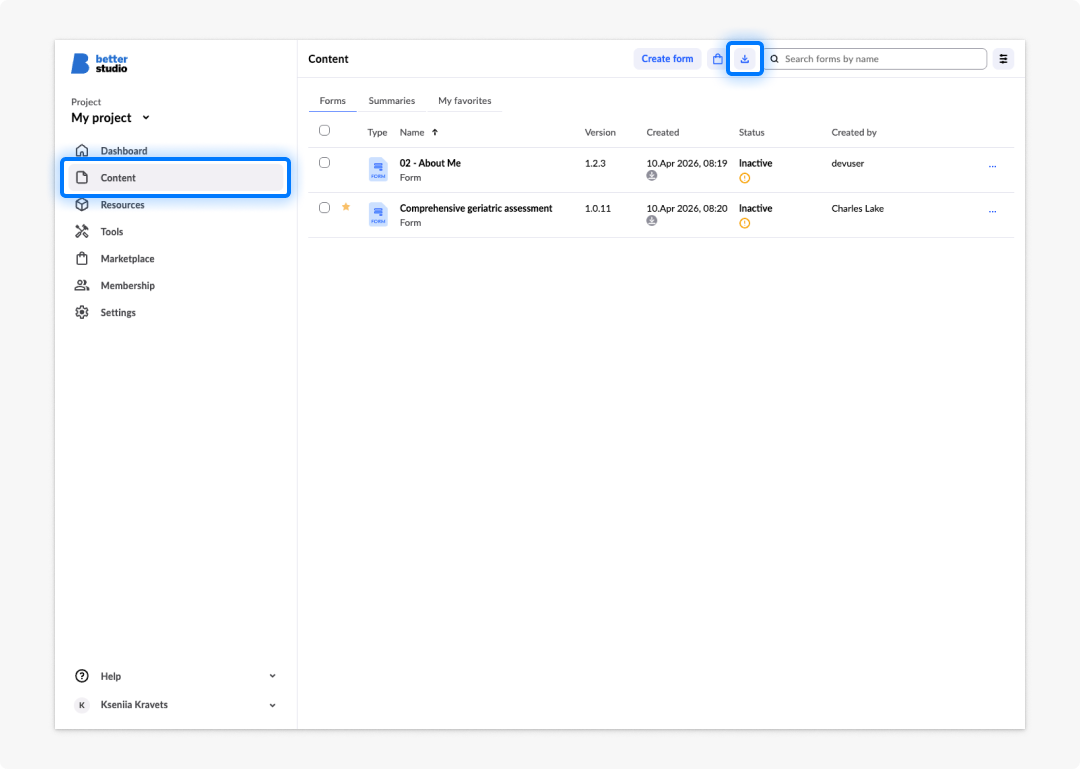
- Navigate to Resources in the left-side menu.
- Click on the Import icon in the top right corner.
- Browse your files or drag and drop your .zip folder into the pop-up window.
- The import wizard will show you the list of files you are importing (Resources in process).
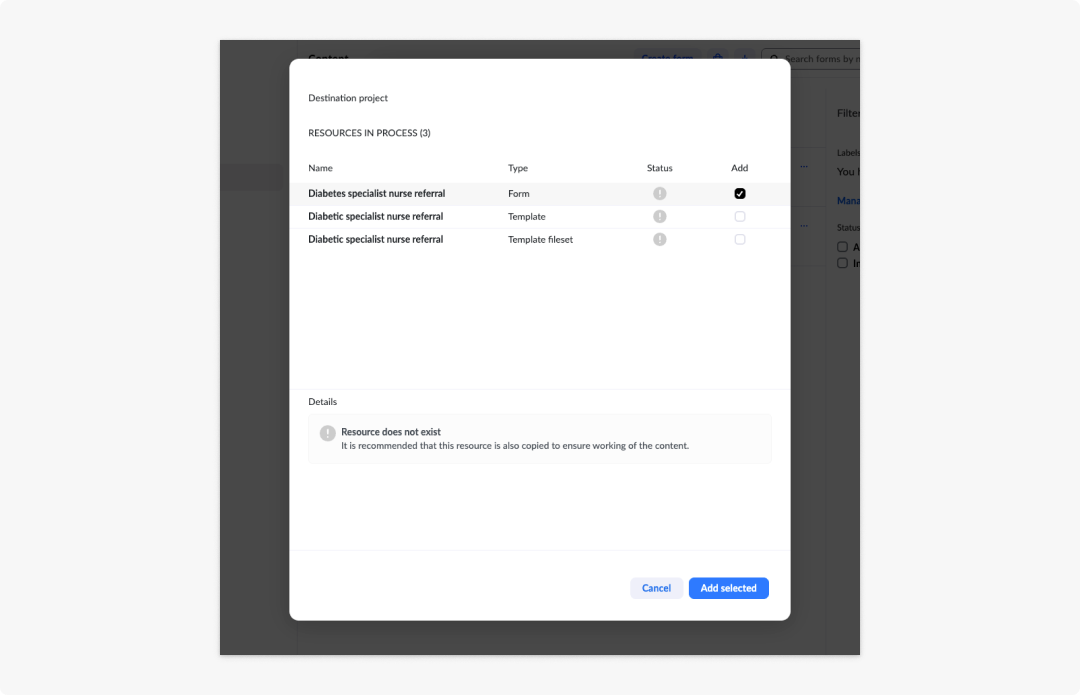
The system will show you all the resources that are included in the bundle and allow you to choose which ones you want to import. You will be able to see their names, the file type, and their status. If there are any resource conflicts, you can check them by clicking on the red error icon. Make sure to fix any conflicts beforehand to avoid these conflicts.
- Check the Add checkbox next to the resources you want to import.
- Click on Add selected in the bottom right corner.
Once the import is successful, you will see your resources on the Resources list.
For more information on supporting resources, check the dedicated section here.
Frequently asked questions (FAQs)
What happens if EHR server validation fails when I am adding a project?
Studio displays an "Authorisation failed" notification. Common causes include an incorrect username or password, an EHR server version below Platform 3.0.23, the EHR Server REST API or admin REST API not being exposed, or one or both URLs being unreachable. Contact your EHR server administrator for assistance.
What roles can be assigned to project members, and what can each role do?
There are two roles. Admins can edit project properties, add and remove members, and change member roles. Members can only view project properties. They cannot view, add, or remove members, or edit properties.
What file formats can I import into an EHR Platform project?
You can import form bundles (.zip), summary bundles (.zip), templates (.opt or .xml), template bundles (.zip), and AQL views (.json).
Does deleting a project in Studio delete the data on the EHR server?
No. Deleting a project removes it from Studio only. Data on the EHR server is not affected.