Logic and behaviour
This content progresses from beginner to advanced Studio user knowledge.
A well-built clinical form does not just collect data. It responds to it. Form builder lets you add logic that makes fields appear, disappear, become required, or change value based on what the user enters. This page covers the tools available for adding that behaviour, from simple conditional rules to advanced scripting.
Dependencies
A dependency is a rule that links the behaviour of one form element to the state or value of another. Every dependency follows the same logical structure:
When a trigger event occurs → If a condition is met → Then execute an action.
All dependencies are managed in the Dependencies tab in the bottom panel of the Form builder editor.
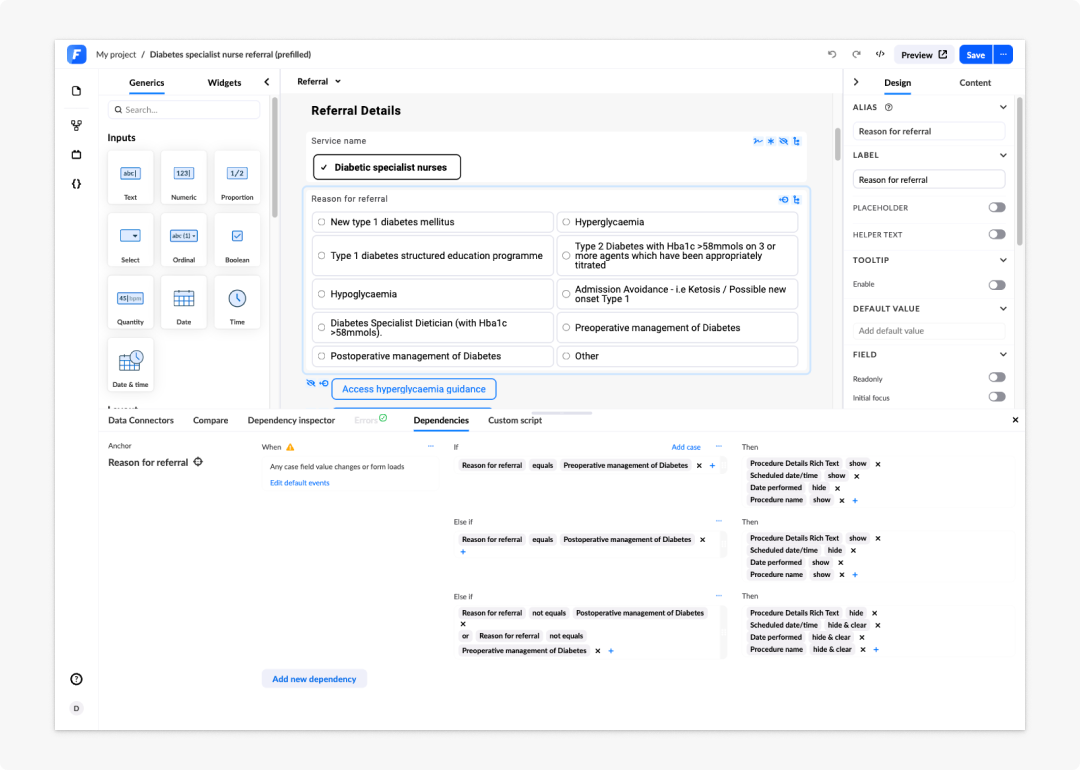
The When clause (trigger)
The When clause defines what event triggers the dependency to be evaluated. You can think of it as the starting signal: until this event fires, the dependency does nothing.
Default triggers
By default, every dependency fires on two events:
- Any case field value changes: Re-evaluates the dependency whenever any field referenced in the If clause changes.
- Form loads: Evaluates the dependency as soon as the form opens, so the initial state of the form is always correct.
When you add a button to a form, the default trigger is Button click instead.
Additional triggers
You can replace or supplement the defaults with:
| Triggers | When it fires |
|---|---|
| Field value changes | When a specific named field changes |
| Form loads | When the form is first rendered |
| Field visibility changes | When a field's visibility state changes (shown or hidden) |
| Collapse toggles | When a collapsible container is expanded or collapsed |
| Button click | When the user clicks a specific button |
The If clause (condition)
The If clause defines the condition that must be true for the Then actions to execute. Conditions are written against specific form fields or variables using operators from the table below.
You can combine multiple conditions within a single case using and / or logic. You can also stack multiple cases in a single dependency, which behave as if / else if chains. Leaving a case's condition empty turns it into an else case — it executes whenever all preceding cases are false.
Available condition operators
| Operator | Description | Supported on |
|---|---|---|
equals/not equals | Exact match or non-match against a specified value | All inputs |
is empty/is not empty | Whether the field has a value | All inputs |
contains/not contains | Whether the field value includes a specified value (partial match) | Text inputs, coded text, ordinal, scale |
starts with/ends with | Whether the string value starts or ends with a specified value | Text inputs |
</>/=/>=/<= | Numeric or date/time comparison | Numeric fields, date, time, datetime, variables |
changes | Fires whenever the field value changes, regardless of what it changes to | All inputs |
is hidden/is shown | Whether the field is currently visible on the rendered form | All fields |
is disabled/is enabled | Whether the field is currently interactive (not applicable in read-only forms) | All inputs and containers |
is valid/is not valid | Whether the field, container, or page currently passes validation | All inputs, containers, pages |
Clinical examples
- Use
equalsto show a "Specify" free-text field only when the user selects "Other" from a coded dropdown. For example: "Other reason for referral". - Use
>=on a numeric field to trigger an alert when a patient's heart rate exceeds 100 bpm. - Use
is not emptyon a date field to enable the discharge summary section only after an admission date has been entered. - Use
containson a multi-select field to show a clinical guidance panel when "Type 1 diabetes" is among the selected diagnoses, even if other diagnoses are also selected. - Use
is not validon a page to disable the navigation button that advances the user to the next section, preventing submission of incomplete data.
The Then clause (actions)
The Then clause defines what happens when the When event fires and the If condition is true. You can add multiple actions to a single Then clause, so one dependency can trigger several changes at the same time.
Available actions
| Action | What it does |
|---|---|
Show | Makes the target field or container visible |
Hide | Makes the target field or container invisible |
Toggle visibility | Switches the target field or container between visible and hidden each time the dependency fires |
Hide & clear | Hides the target field and simultaneously removes its current value |
Enable | Makes the target field interactive |
Disable | Makes the target field read-only (visible, but not editable) |
Set value | Assigns a value to the target field, computed from an expression |
Clear value | Removes the current value from the target field |
Reset | Resets the target field to its default value |
Deselect | Removes the current selection from a dropdown, coded text, or similar selection field |
Make required | Marks the target field as required, so the form cannot be submitted without a value |
Make optional | Removes the required constraint from the target field |
Show validation error | Displays a custom validation error message on the target field |
Clear validation error | Removes a previously shown validation error from the target field |
Collapse | Collapses a collapsible container |
Expand | Expands a collapsible container |
Show value | Makes a specific selection value visible in a dropdown or coded text field |
Hide value | Hides a specific selection value from a dropdown or coded text field |
Hide & clear value | Hides a specific selection value and removes it from the field's current selection if it was selected |
Enable value | Makes a specific selection value interactive (selectable) in a dropdown or coded text field |
Disable value | Prevents a specific selection value from being selected in a dropdown or coded text field |
Call API | Triggers a data connector call when the dependency fires |
Some additional actions may be available depending on the type of dependency and type of component or field you are working on.
Clinical example
Combining actions: In a medication review form, when the user selects "Patient is nil by mouth", a single dependency can simultaneously hide the oral medication section, disable the dosage fields for enteral medications, and set the route field to "IV", all within one Then clause.
Show/Hide rules
A show/hide rule makes a field visible only when a condition is true. When the condition is false, the field is hidden and its value is not included in the submitted data.
Show/hide rules are the most common type of dependency in clinical forms. They reduce visual noise, guide the clinician through the relevant pathway, and ensure that irrelevant fields do not appear in the record.
To add a show/hide rule:
- Select the target field (the one you want to show or hide) on the canvas.
- Open the Dependencies tab in the bottom panel.
- An empty dependency structure is available by default. If the panel is empty, select Add new dependency.
- In the When clause, confirm or set the trigger (default is field value change + form load).
- In the If clause, select the source field, choose the operator, and enter the value.
- In the Then clause, select the target field and choose Show or Hide.
Clinical example
In a diabetes referral form, the field "Specify other reason for referral" should only appear when the clinician selects "Other" from the reason for referral options. The dependency reads:
- When "Reason for referral" value changes or form loads
- If "Reason for referral" equals "Other"
- Then show "Specify other reason for referral"
- (Else) hide "Specify other reason for referral"
The else case is handled by adding a second case with no condition, which acts as a default, hiding the field whenever the first condition is not met.
Because hidden fields do not submit their values, always review show/hide logic carefully when fields contain clinically important data that might be needed even when hidden.
Hide or show warnings: Let's create a warning message for a NEWS2 assessment, where if the patient is in hypercapnic respiratory failure, a warning appears to provide CPR or ventilation. If the patient is not in respiratory failure, this message is not visible.
Enable/Disable rules
An enable/disable rule makes a field interactive or read-only based on a condition. Unlike a hidden field, a disabled field remains visible — the user can see its value but cannot change it.
Enable/disable is useful when you want to display pre-populated or calculated values that should not be overridden, or when you want to lock part of a form once a condition is met.
To add an enable/disable rule:
- Follow the same steps as show/hide
- Select Enable or Disable as the Then action.
Clinical example
Locking entered data: In a referral form, once the clinician has confirmed the referral by checking "Referral confirmed", disable the referral details section so the submitted information cannot be accidentally changed. The dependency reads:
- When "Referral confirmed" value changes or form loads
- If "Referral confirmed" equals true (checkbox is checked)
- Then disable the "Referral details" container
Pre-populated read-only field: A BMI field is calculated automatically from the height and weight fields. Disable the BMI field to prevent manual overrides while keeping the calculated value visible to the clinician.
Value-setting rules
A value-setting rule assigns a value to a field automatically when a condition is met, or clears it when a condition is no longer true. Values can be static (a fixed string or number) or dynamic (an expression computed from other field values).
To add a value-setting rule:
- Follow the same steps as show/hide.
- Select Set value or Clear value as the Then action.
- For dynamic values, use the Expression assistant to write the expression.
Clinical examples
- Auto-calculate BMI: When weight or height changes, set the BMI field value to weight / (height / 100)². This saves the clinician from calculating manually and reduces transcription errors.
- Default priority based on diagnosis: When the reason for referral equals "Admission avoidance — Ketosis", automatically set the priority field to "Emergency". The clinician can review and change it, but a safe default is applied immediately.
- Pre-fill date fields: When a form loads, set "Date of assessment" to today's date, reducing data entry time while still allowing the user to edit it.
- Clear conditional fields on change: When the user changes the answer to "Does the patient have diabetes?" from "Yes" to "No", clear the diabetes type, HbA1c, and medication fields so stale data is not submitted.
Value-setting rules interact with show/hide rules. If you hide a field and clear its value in the same dependency, make sure the order of actions is correct. Clearing the value should happen before or alongside hiding, so that no residual data is carried through to submission.
Dependencies in a multiplied container
When a field is inside a multiplied container (a repeating list), dependencies on that field are scoped to the container instance. A dependency written on a field in row one of a repeating medication list will only affect other fields in row one. It will not affect rows two or three.
This scoping is intentional: It ensures that adding a new medication entry does not inadvertently trigger or reset logic in other entries. Be aware of this when building forms with repeating sections and plan your dependency logic accordingly.
Managing dependencies
When a form has many dependencies, managing them efficiently is important. The Dependencies tab provides options for each dependency and each case within a dependency.
Available management actions
Access these by selecting the ... elipsis menu at the top right of a When or If clause:
| Action | What it does |
|---|---|
Reorder | Change the evaluation order of cases within a dependency |
Duplicate | Create an identical copy of a dependency or case on the same field, ready to adjust |
Copy/Paste | Copy a dependency or case from one field and paste it onto another |
Cut/Paste | Move a case from one dependency to another |
Delete | Remove the dependency or case |
When to use each:
- Duplicate is useful when you need the same logic pattern applied multiple times with slight variations, for example: Showing different guidance panels for each option in a multi-value selection.
- Copy and paste saves time when similar logic is needed on a different field elsewhere in the form.
- Cut and paste helps reorganise logic — for example, if a case was added to the wrong dependency, move it without recreating it.
Dependency inspector
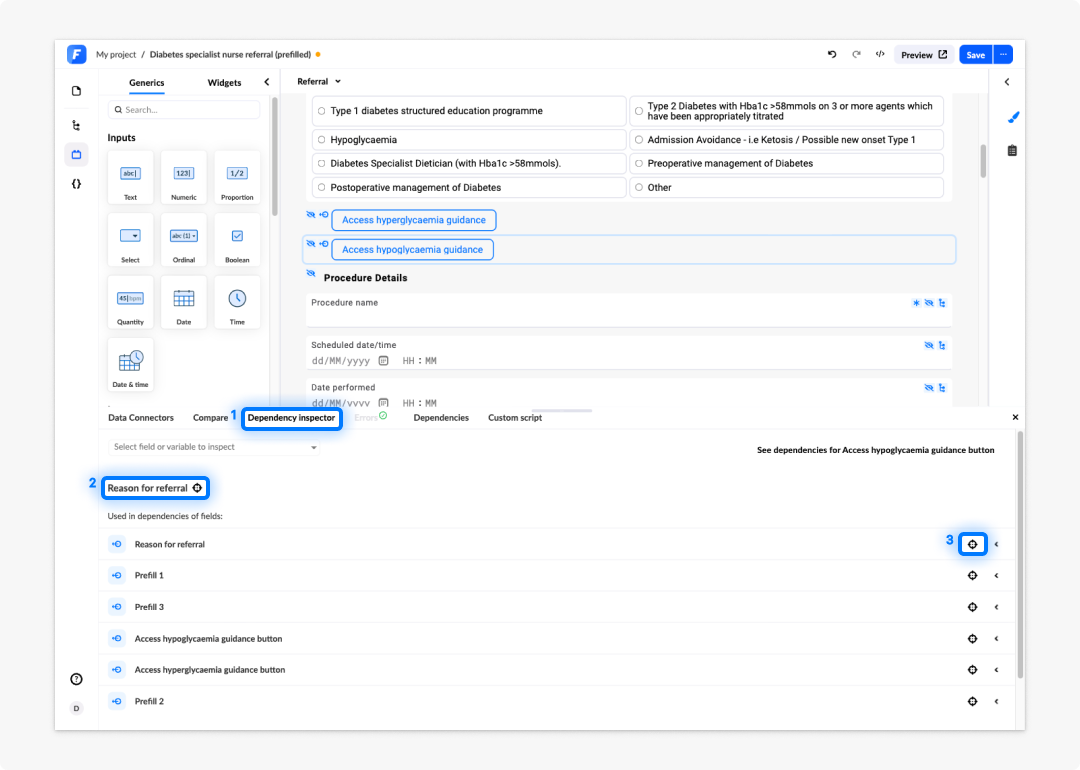
The Dependency inspector shows all the dependencies that affect a selected field — regardless of which other fields defined those dependencies. It gives you an incoming dependency view: rather than asking "what does this field do to others", it answers "what are other fields doing to this one".
To use the Dependency inspector:
- Select a field on the canvas.
- Open the Dependency inspector from the bottom toolbar.
- The panel lists all fields that have dependencies referencing your selected field.
- Expand any entry to see the full dependency, with your selected field highlighted within it.
Alternatively, use the search dropdown in the dependency inspector to find a field by name without selecting it on the canvas first.
When to use it
Use the dependency inspector to:
- Understand why a field is behaving unexpectedly (hidden, disabled, or showing a value you did not set directly).
- Review the full impact of a field before renaming or deleting it.
- Audit complex forms before testing, especially after structural changes.
Validity
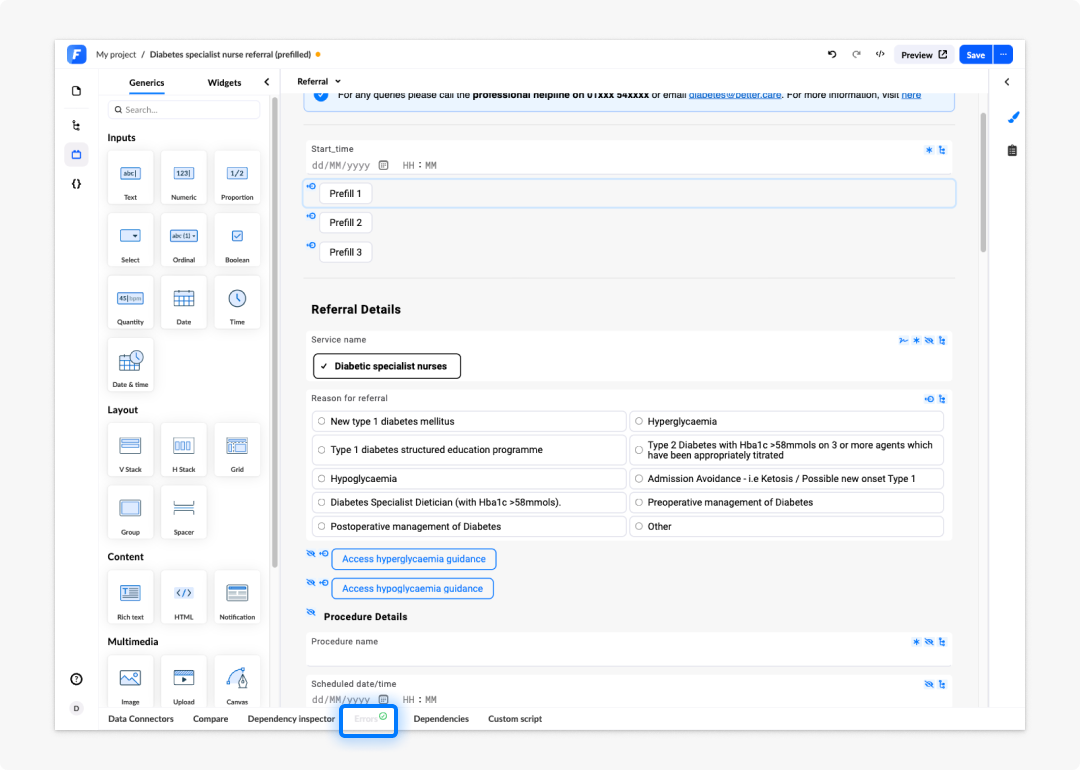
Form validity and potential errors are displayed in the "Errors" tab at the bottom of the form. A valid form shows a green tick icon. An invalid form shows a red cross icon.
By clicking the red cross icon, you can get more information about the form's errors. Clicking a specific error in the error description panel will direct you to the field in the form that contains the error.
Expression assistant
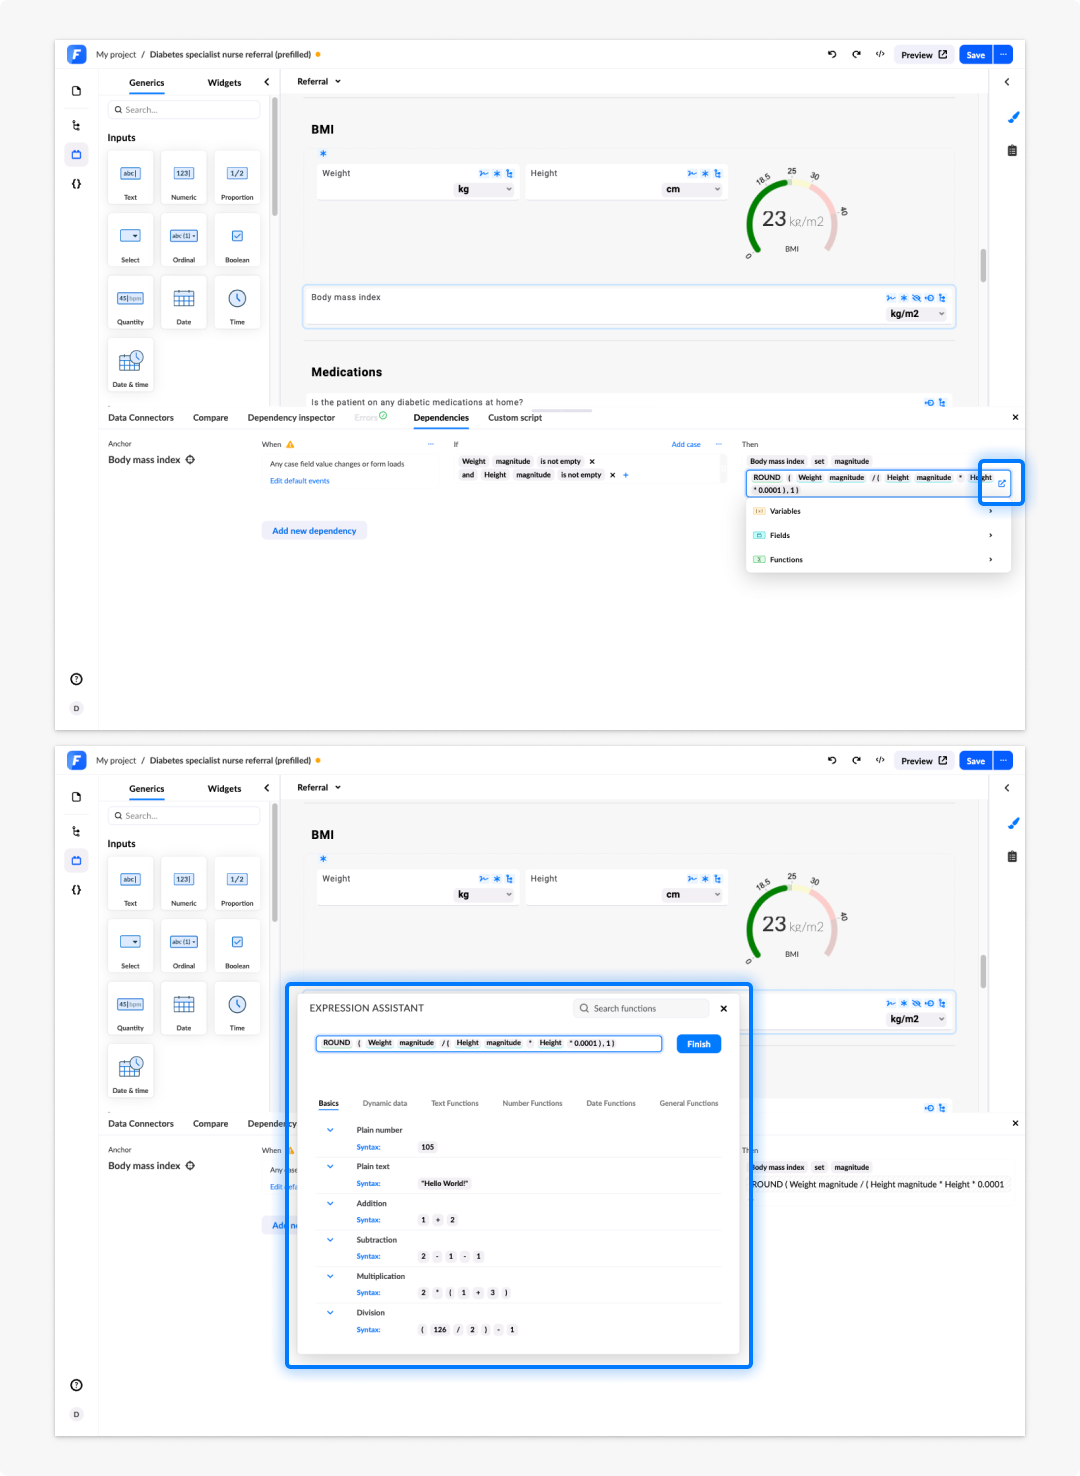
The Expression assistant is a submodule that helps you transform data into a more appropriate format before displaying or using it in a form. Use it whenever you need to manipulate a value — not just pass it through as-is.
Common use cases include:
- Concatenating two fields to display a combined value: First name and last name shown together in a coded text field.
- Formatting a date before it is displayed on the form.
- Recalculating numeric data: Computing BMI from body weight and height
Where you can use expressions
Expressions are available in the following places:
- The If clause condition editor in a dependency
- Field value bindings (binding a datasource label or value)
- Variable values and test variable values
- Data connector (API) parameters and path parameters
How the Expression assistant works
When you open the Expression assistant, it provides a dropdown of available options drawn from the current form context: AQL results, form fields, variables, data connectors, and functions.
Selecting Edit with assistant opens the full assistant panel, where functions are organised into five tabs:
| Tab | What it contains |
|---|---|
| Basics | Plain number, plain text, addition, subtraction, multiplication, division |
| Dynamic data | Form fields, variables, API / data connector result data |
| Text functions | Lowercase, uppercase, concatenation, trim, text length, substitution |
| Number functions | Round, minimum, maximum, average, count and other number options |
| Date functions | Date format, date functions |
| General functions | LIST, IF, CALC |
Clicking any function shows a description and a syntax example. Clicking Insert adds it to the expression.
Expression spots
Expressions are built from individual spots. Each spot holds one value, field reference, or function. To delete a spot, use the × icon next to it. To add a spot, click outside the expression, then hover over the position where you want to insert it and click. An empty spot appears ready for input.
Do not use the date format function on a date or date and time field. These fields only accept a predefined format, so applying a custom format will not set the field value correctly. To control how dates are displayed in the rendered form, use the date format option in Preview, or the dateFormat setting in the renderer context.
Clinical examples
Basics / arithmetic: Compute a BMI field value by dividing weight (kg) by height (m) squared, using the CALC, multiplication, and division functions with the weight and height field references as dynamic data spots. Text Functions / concatenation: Build a display label that combines a patient's given name and family name into a single coded text value. This can be useful in summary widgets or confirmation screens. Date Functions / date difference: Calculate a patient's age in years from their date of birth and today's date, and use the result to drive a show/hide dependency. An example would be showing a paediatric section only when the calculated age is under 18. Dynamic data / variables: Reference a form-level variable that stores the current clinician's name and insert it automatically into a pre-populated referrer field when the form loads.
For a full function reference and worked examples, see the Expression assistant section.
Script API / Custom script
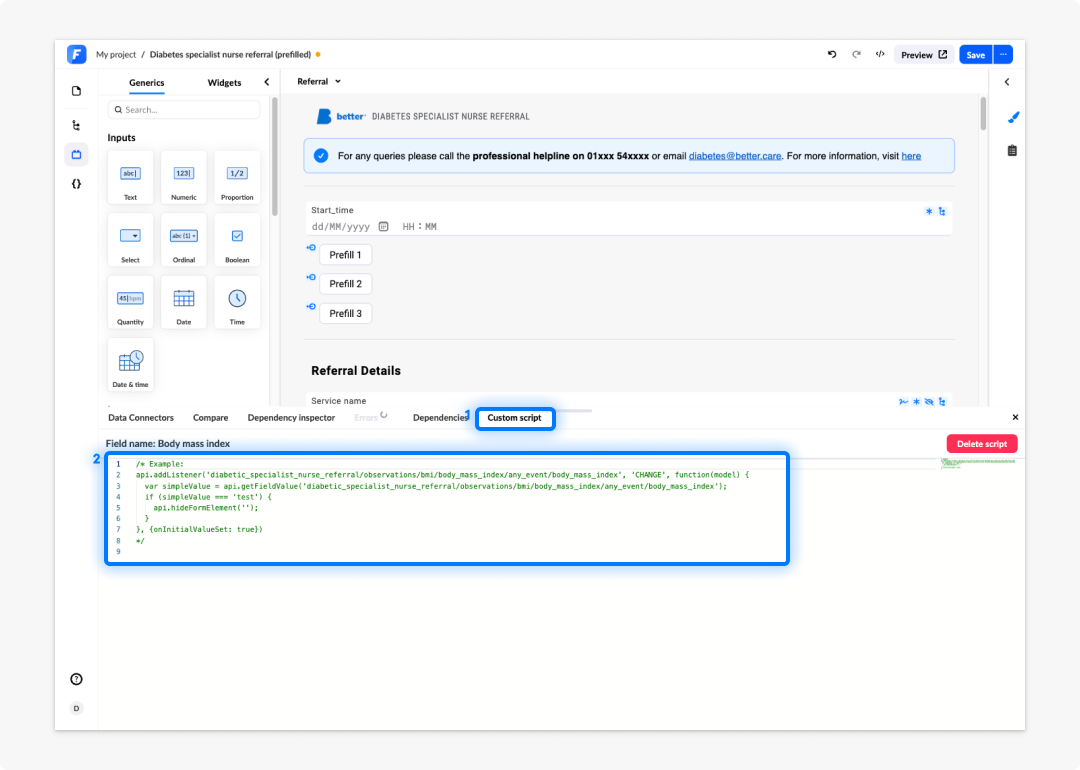
The Custom script allows you to write JavaScript that runs at defined trigger points within the form. A common examples are when a field value changes, when a page loads, or when the form is submitted. It gives you the most control over form behaviour but requires JavaScript knowledge.
Use the custom script for scenarios that go beyond what dependencies and expressions can handle:
- Setting multiple field values from a single trigger in ways that would create circular dependencies if done declaratively
- Calling an external API and mapping the response to several fields simultaneously
- Implementing custom transformation logic not available in the expression language
- Responding to complex interaction patterns involving multiple simultaneous conditions
To add a custom script:
- In the Form builder editor, open the Custom script panel from the bottom toolbar.
- Select the trigger event (field value change, page load, form submit, etc.).
- Write the JavaScript in the script editor.
- Reference form fields by their alias using the provided API methods.
Script API requires solid JavaScript knowledge. Always test scripts in Form playground before deploying a form to a live environment.
For the full method reference, see the Script API section.
- Setting multiple field values from a single trigger in ways that would create circular dependencies if done declaratively
- Calling an external API and mapping the response to several fields simultaneously
- Implementing custom transformation logic not available in the expression language
- Responding to complex interaction patterns involving multiple simultaneous conditions
To add a custom script:
- In the Form builder editor, open the Custom script panel from the bottom toolbar.
- Select the trigger event (field value change, page load, form submit, etc.).
- Write the JavaScript in the script editor.
- Reference form fields by their alias using the provided API methods.
Script API requires solid JavaScript knowledge. Always test scripts in Form playground before deploying a form to a live environment.
For the full method reference, see the Script API section.