ETL (Extract, transform, load)
This content is intended for advanced Studio users.
The Better Extract Transform Load (ETL) is an application that allows you to configure, execute and observe jobs that can connect to an EHR Server or Demographics Server, execute queries to obtain data, transform it, and write it to a target relational database.
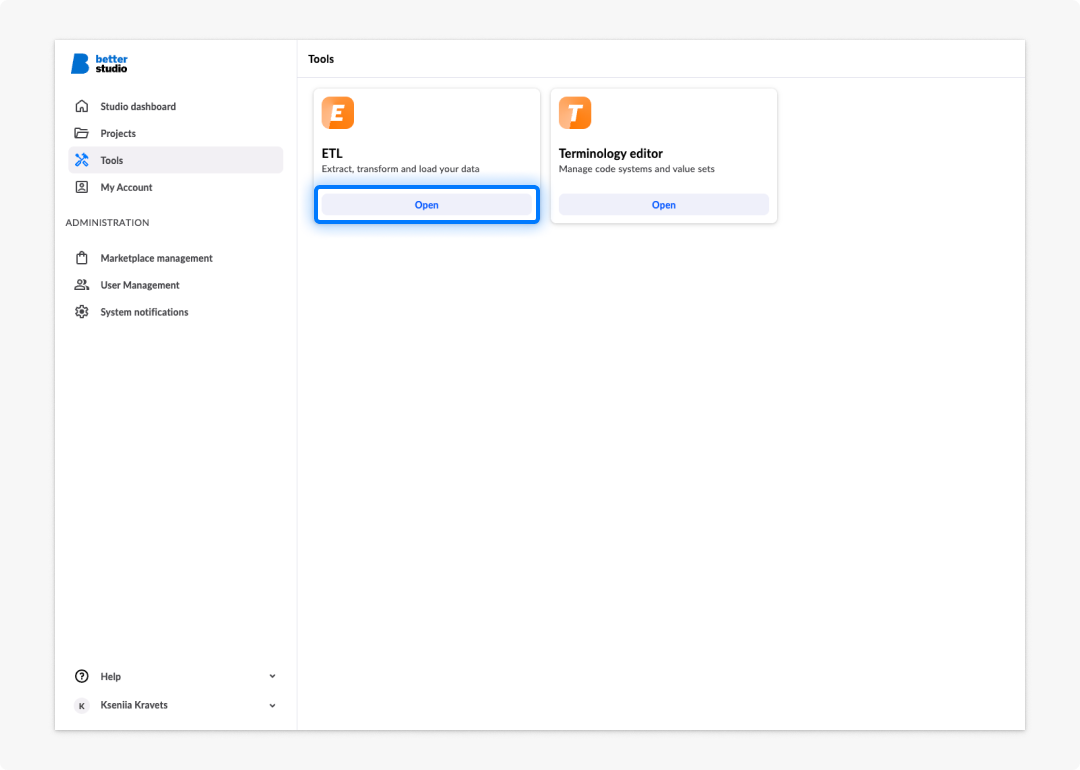
The integrated ETL is purpose-built for the complexities of clinical data mobility. For example, a team developing a post-discharge monitoring application can now:
- Extract patient observations directly from an openEHR CDR.
- Transform that complex hierarchical data into a flat structure.
- Load the results into a BI tool or reporting dashboard.
All of this is configured in the same project space where your Studio forms are built, ensuring data consistency across your application lifecycle.
Transitioning from ETL 3.x
For users migrating from earlier versions, please note that ETL 4.0 introduces several conceptual updates to align with the new API. This includes a shift in how execution is organized, such as the transition from Parameter Sets to Execution plans.
The Studio 3.15 release focuses on the core pipeline workflow and the move to a unified GUI. Additional advanced ETL capabilities and further refinements to the 4.0 engine will follow in upcoming releases.
Configuration guide
To use ETL, you need to configure a project, source connections, and target connections outside of the ETL. The ETL then references these preconfigured resources when you set up jobs and execution plans.
Step 1: Project configuration
The first step is to configure your ETL project. A project is the main instance that stores all configuration, including jobs, execution plans, scheduling triggers, execution history and reports, source and target connections, and notifications.
Studio ETL editor supports etl-server-4.x and later versions. For earlier versions, refer to the Installation guide.
The Projects page is shown at the top of the ETL main navigation.
To configure a project:
- Select Add project
- Fill in the server configuration.
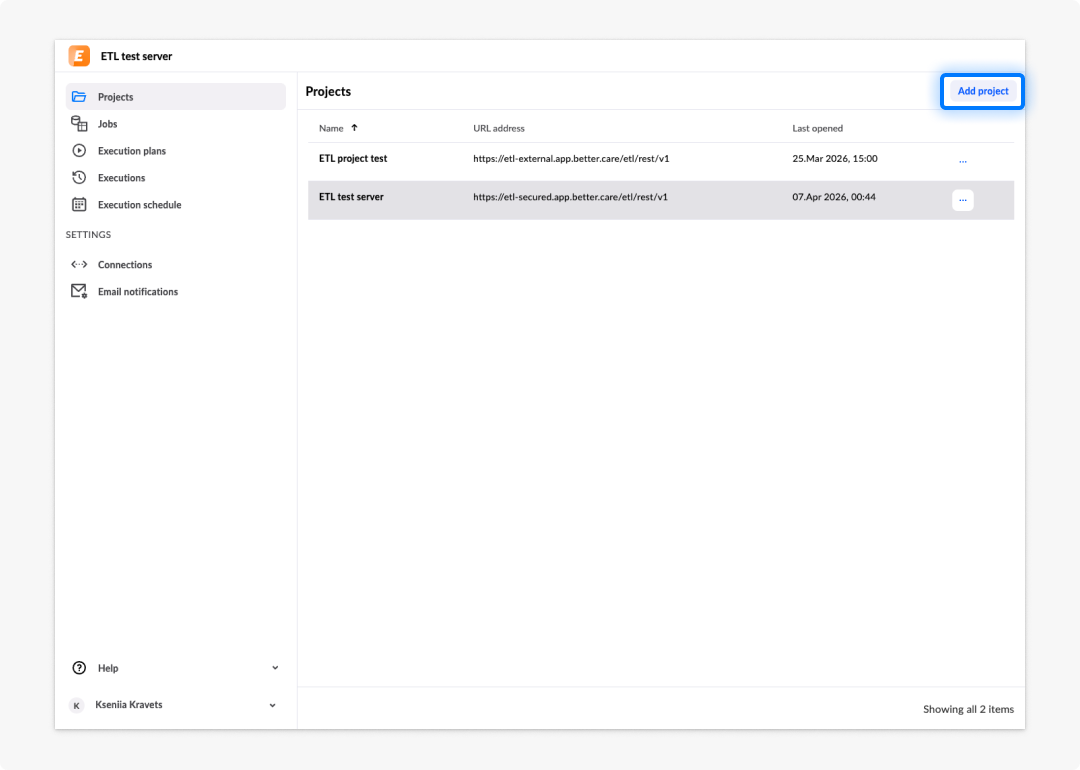
The server must be preconfigured outside of the ETL editor. ETL editor only supports OAuth2 authorisation. Get all configuration data from your system administrator or contact Support.
To follow the ETL project setup, you need the following additional configuration:
- Target connection: A database where ETL stores its configuration, job execution information, and scheduling triggers.
- Source connection: Access to at least one running instance of Better EHR Server or Better Demographics Server.
Once you create a project configuration, the project name appears in the header of the tool to indicate which project you are currently working on. You can switch between projects if more than one is configured.
Step 2: Connections configuration
The next step is to configure source (EHR Server or Demographics Server) and target (relational database) connections. Connection configurations can be shared across multiple ETL jobs and execution plans.
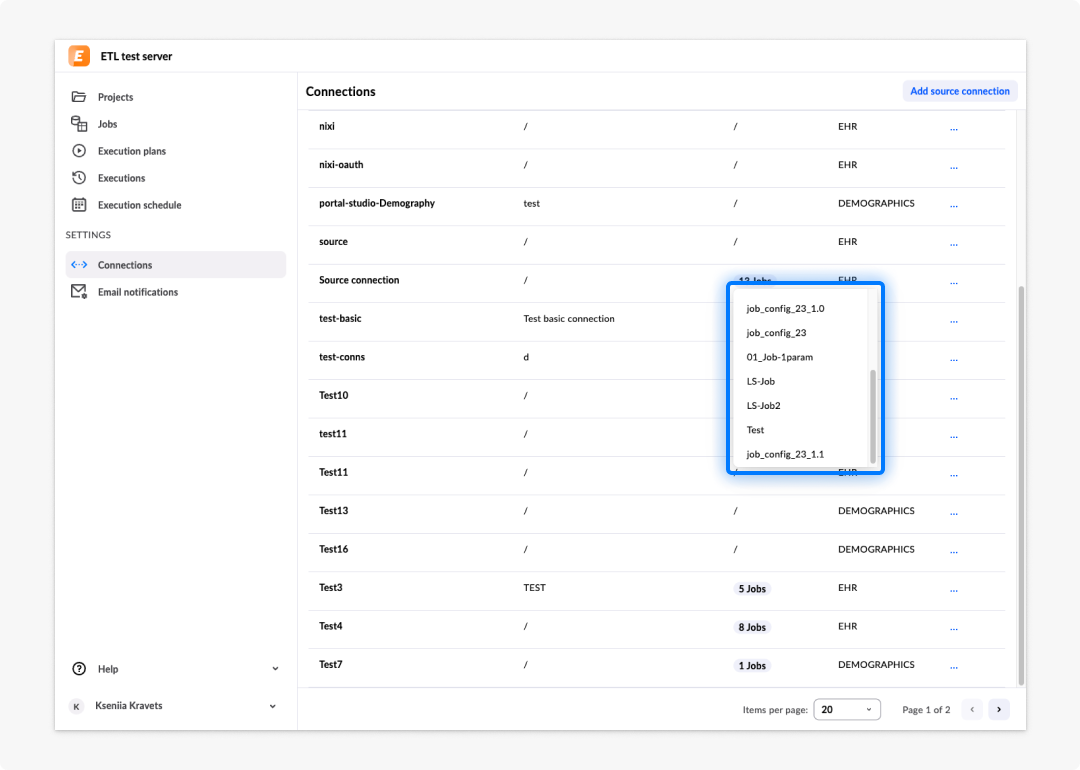
You can add, view, and edit configured connections on the Connections page under Settings in the main navigation. Source and target connections are shown on separate tabs, each displaying a list of existing configurations.
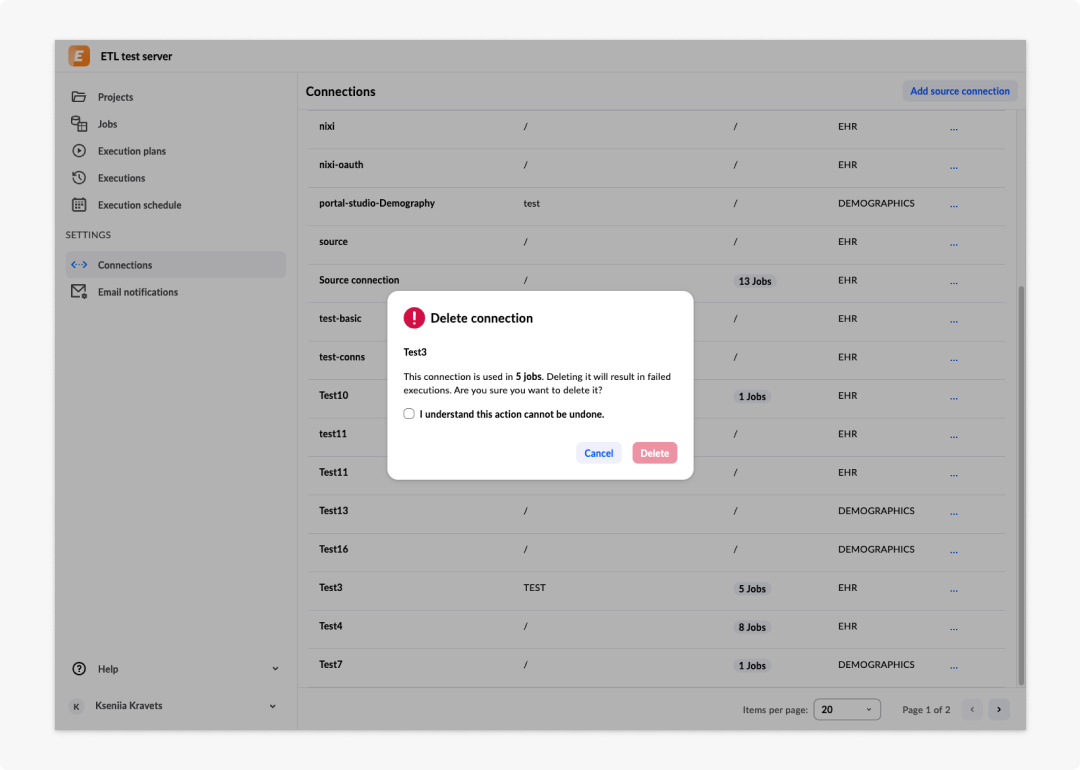
The connections list also shows which specific jobs each connection is used in. This allows you to assess the impact before changing or deleting a connection.
Source connection configuration
To configure a source connection, navigate to the Connections page under Settings, select the Source connections tab, and click Add source connection.
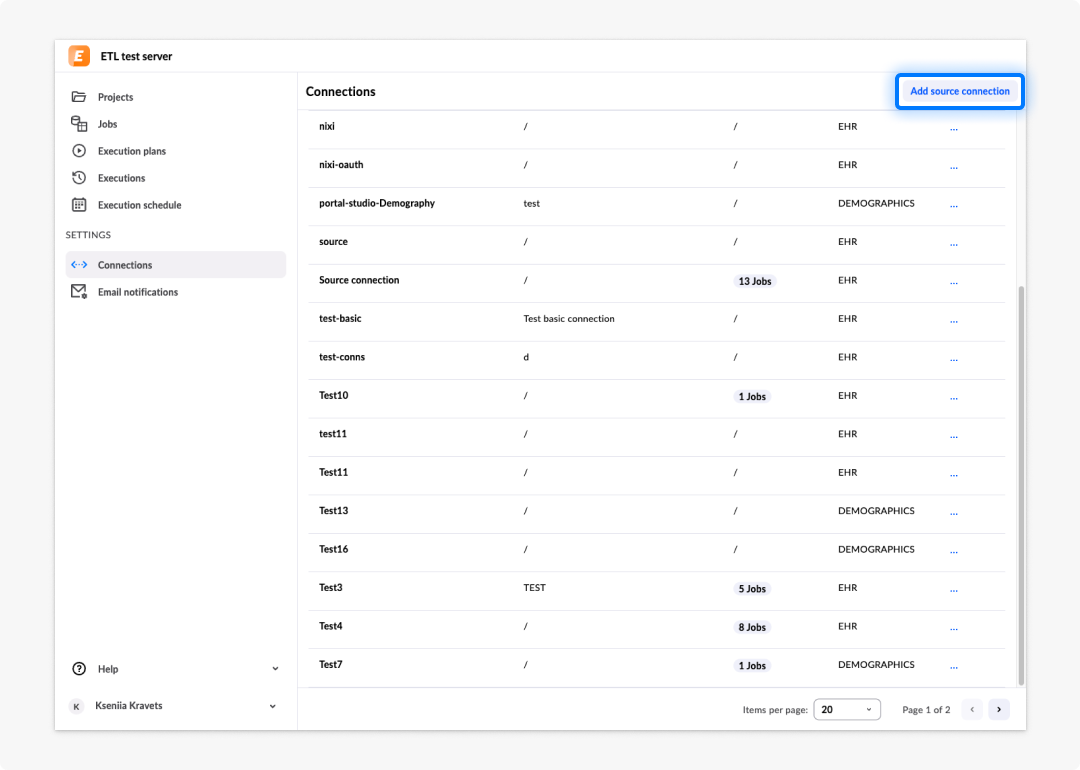
- Set the connection name and connection type — either EHR or Demographics Server.
- Add the source connection server configuration: server URL, authentication method, and credentials.
There are two authentication methods: Basic and OAuth2. Different fields are required depending on the selected method.
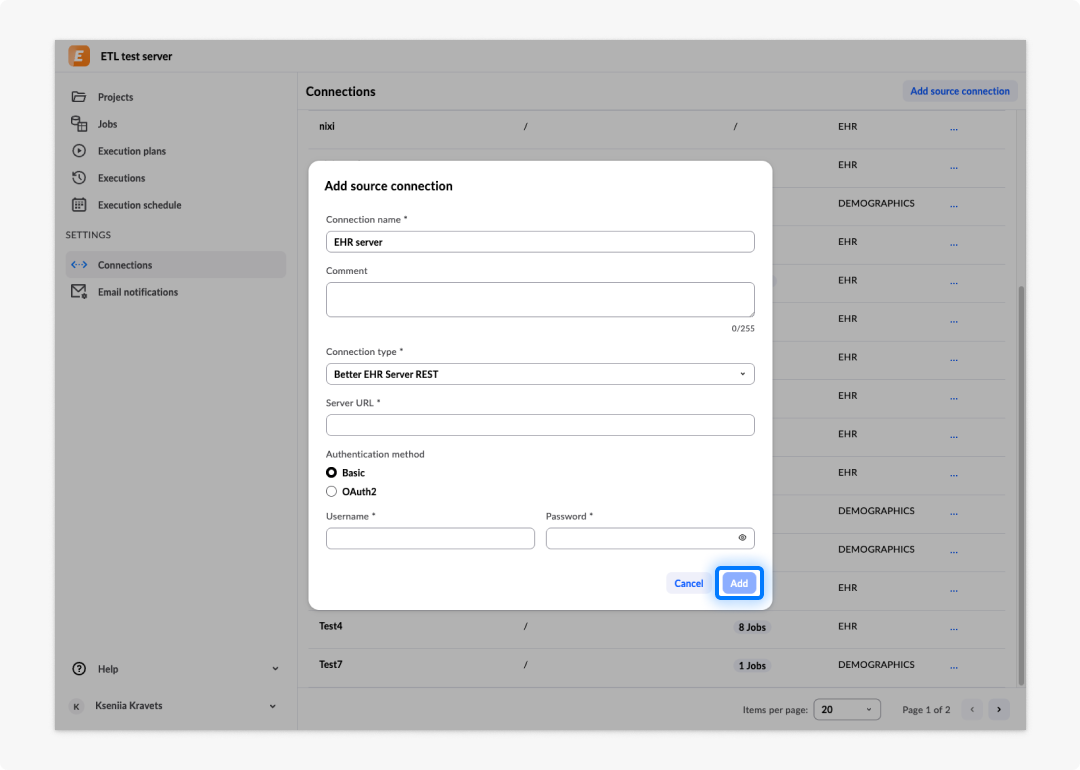
Example: OAuth2 authorisation method:
| Field | Example | Description |
|---|---|---|
| Connection name | EhrServerIn | Must be unique. |
| Comment | Some comment. | An optional free-text field. |
| Connection type | Better EHR Server REST | The input connection type. |
| Server URL | http://<hostname:<port>/<context_path>> | The URL pointing to the Better EHR Server. |
| Authentication method | OAuth2 | Basic or OAuth2. |
| Username | ehrUser | The username to log into the Better EHR Server. Make sure this user has the permissions required to execute job queries. |
| Password | password | The user's password. |
| Access token URL | http://<hostname:<port>/auth/realms/<realm>/protocol/openid-connect/token> | The URL to obtain the access token for OAuth authentication. |
| Client secret | yourClientSecret | Client secret for OAuth authentication. |
| Client ID | yourClientID | Client ID for OAuth authentication. |
| Scope | yourScope | Scope for OAuth authentication. |
Example: Basic authorisation method:
| Field | Example | Description |
|---|---|---|
| Connection name | EhrServerIn | Must be unique. |
| Comment | Some comment. | An optional free-text field. |
| Connection type | Better EHR Server REST | The input connection type. |
| Server URL | http://<hostname:<port>/<context_path>> | The URL pointing to the Better EHR Server. |
| Authentication method | Basic | Basic or OAuth2. |
| Username | ehrUser | The username to log into the Better EHR Server. Make sure this user has the permissions required to execute job queries. |
| Password | password | The user's password. |
Once saved, the connection appears in the Source connections list on the Connections page.
Target connection configuration
To configure a target connection, navigate to the Connections page under Settings, select the Target connections tab, and click Add target connection.
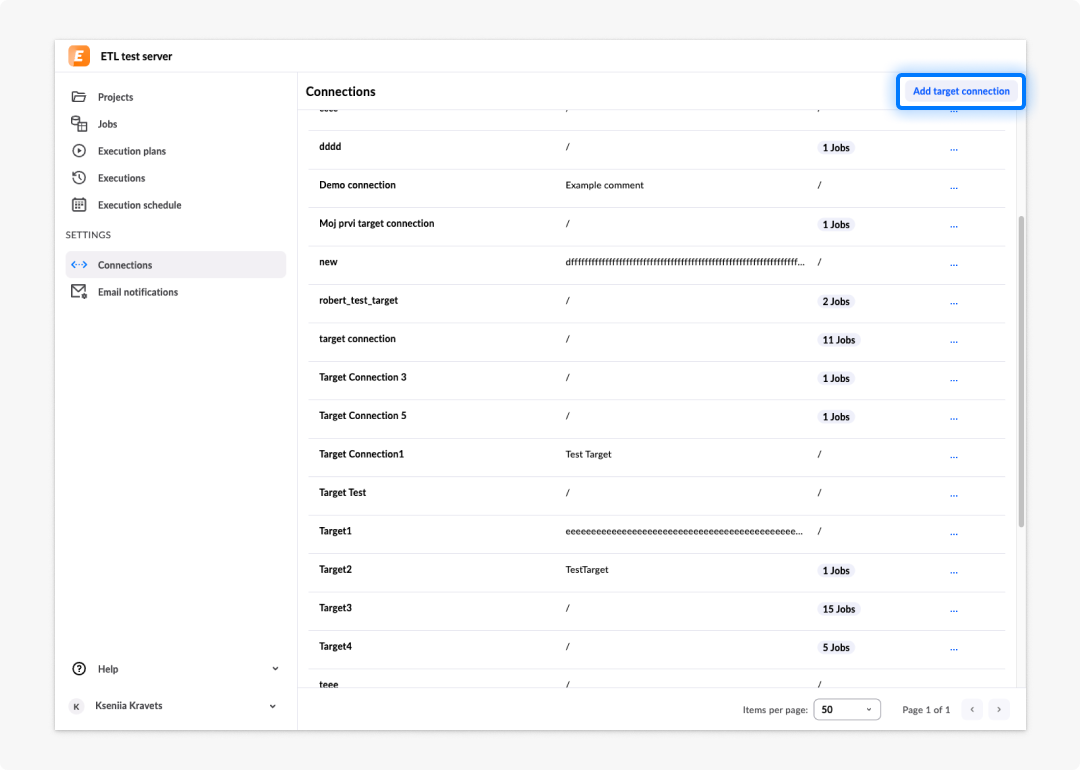
First, set the connection name and connection type. The connection type is one of the supported relational databases, configured outside the ETL project.
ETL editor is supported and tested on the following relational databases:
- PostgreSQL version 9.6 or higher
- Oracle version 12c or higher
- MySQL version 5.7
- Microsoft SQL Server version 2012 or higher
For data input processing, ETL supports EHR Server version 4.0 and Better Demographics Server version 4.8.0.
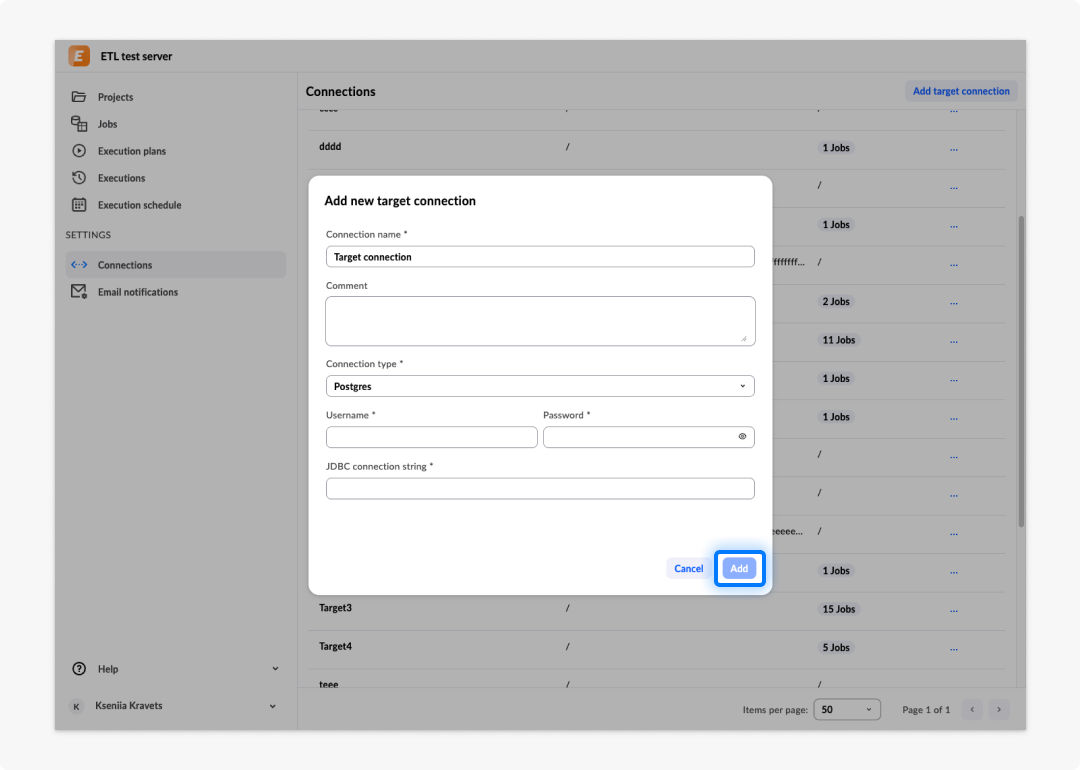
Next, add the target connection server configuration by entering user authentication credentials and the JDBC connection string.
Example: Target connection configuration:
| Field | Example | Description |
|---|---|---|
| Connection name | AnalyticsPostgresTarget | Must be unique. |
| Comment | Some comment. | An optional free-text field. |
| Connection type | Postgres | The relational database used for data output. |
| Username | ehrUser | The target database username. |
| Password | password | The database user's password. |
| JDBC connection string | jdbc:postgresql://host:port/db | Full JDBC URL including database type, host, port, and name. |
Once saved, the connection appears in the Target connections list on the Connections page.
Jobs
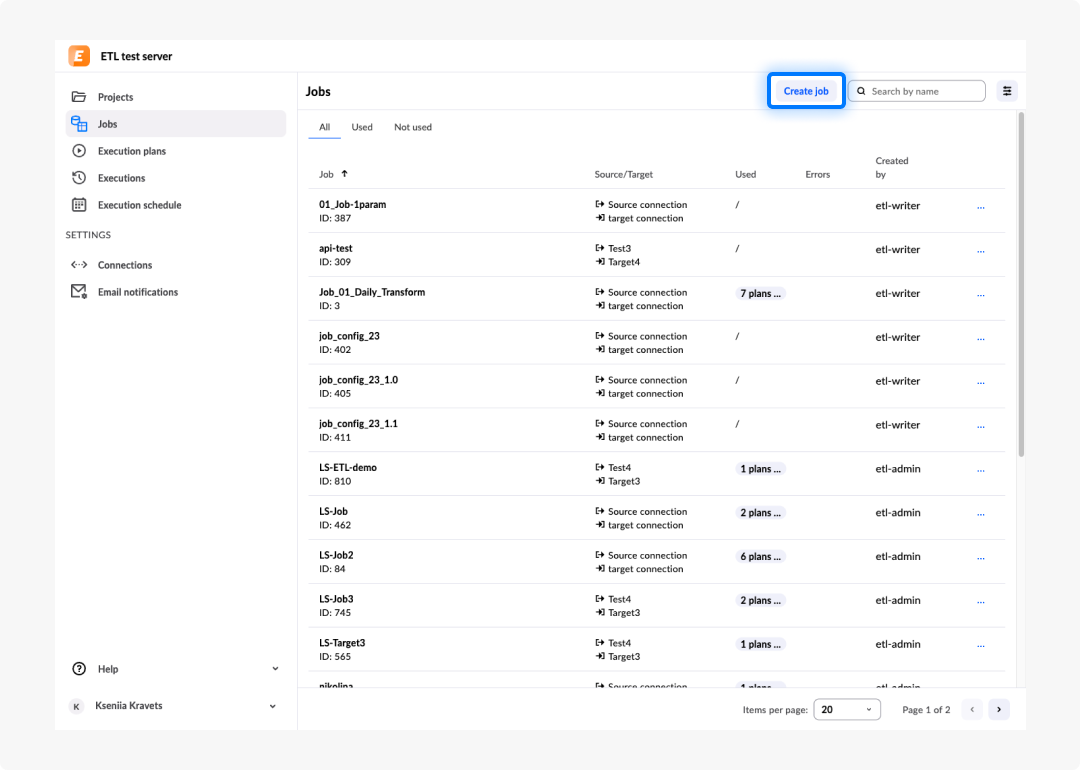
A job is the main entity within ETL. Jobs specify which data gets read (the AQL or HFQL query), from where (the source connection), the transformation applied, the output schema including parameter sets, and where to write the data to (the target connection). Jobs can be run immediately or scheduled for later (including recurring) execution.
Create a job
To create a new ETL job, click Create job on the Jobs page header.
First, add the general settings for the job:
- Job name: Must be unique.
- Source connection: Select from the list of preconfigured EHR or Demographics source connections.
- Target connection: Select from the list of preconfigured target connections.
- Output SQL table name: The name of the relational table that ETL generates.
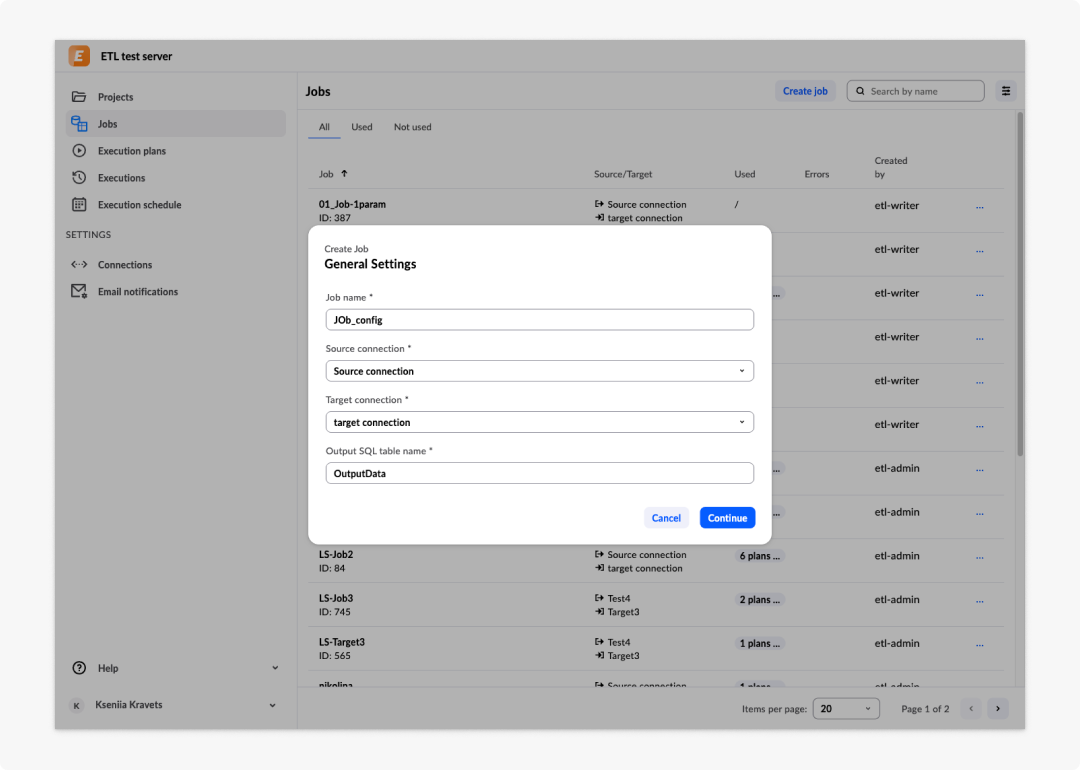
Once all required settings are filled in, select Continue to proceed.
AQL input
In case your source connection is Better EHR Server, you need to define the AQL query to execute on the input. Open the AQL editor by pressing Define in the AQL input side panel.
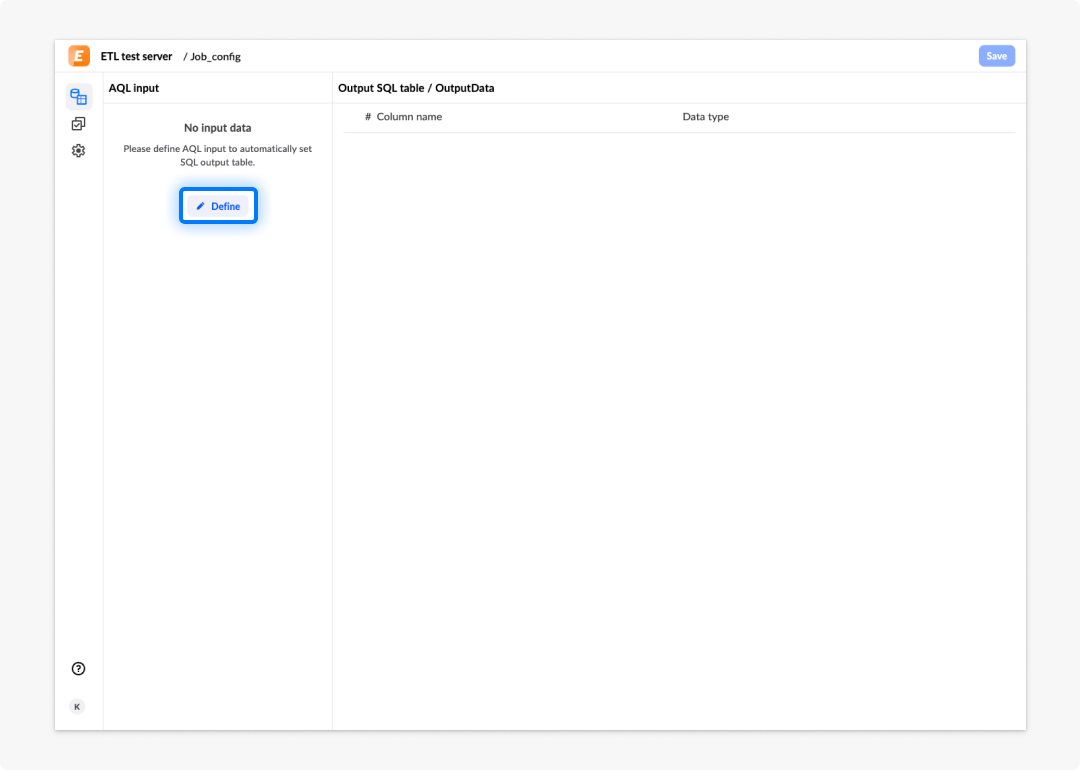
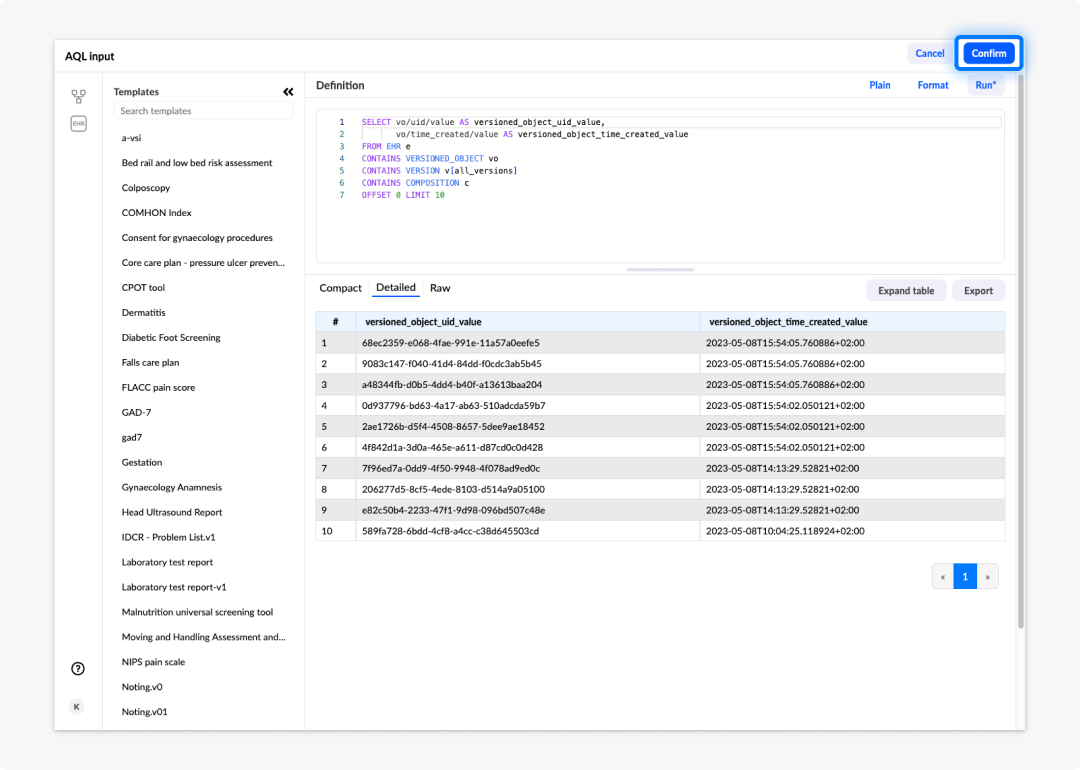
You can write your own query or select one from the Templates. For more details on how to use the AQL editor, see Connect in Studio.
Once you finish writing the query, run it to check the results, then press Confirm to submit the AQL to the ETL server for parsing and partial generation of the relational mapping.
HFQL input
In case your source connection is Demographics Server, you need to define the HFQL query to execute on the input. Open the HFQL editor by pressing Define in the HFQL input side panel.
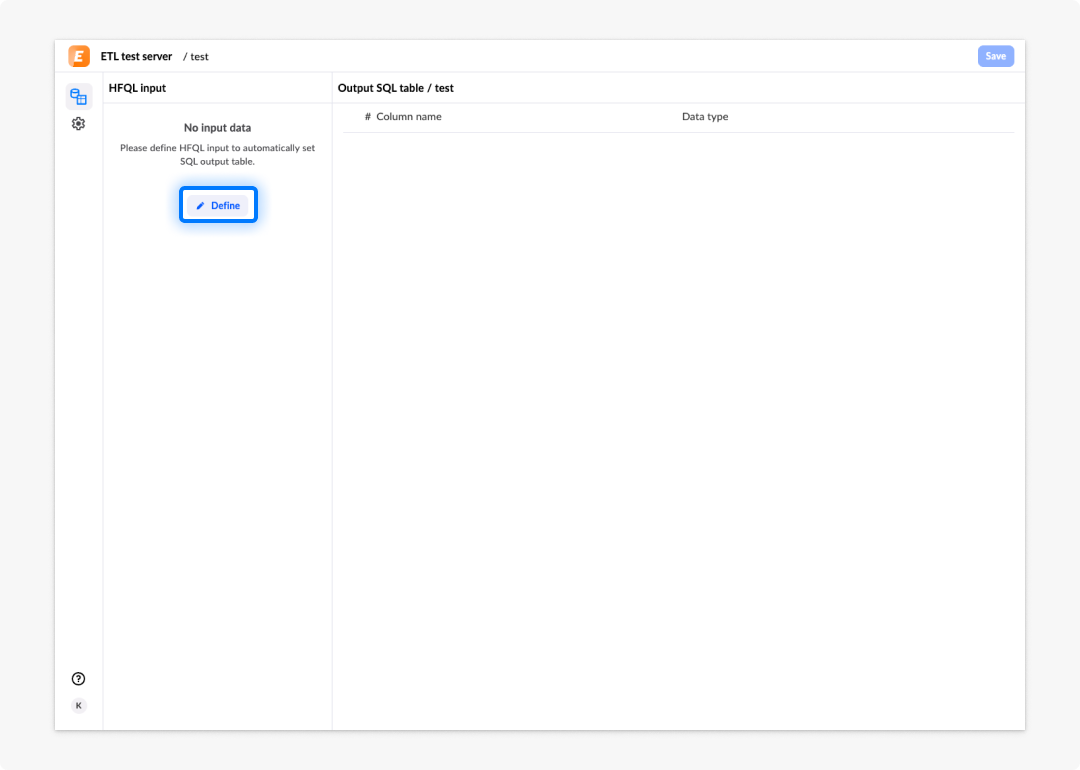
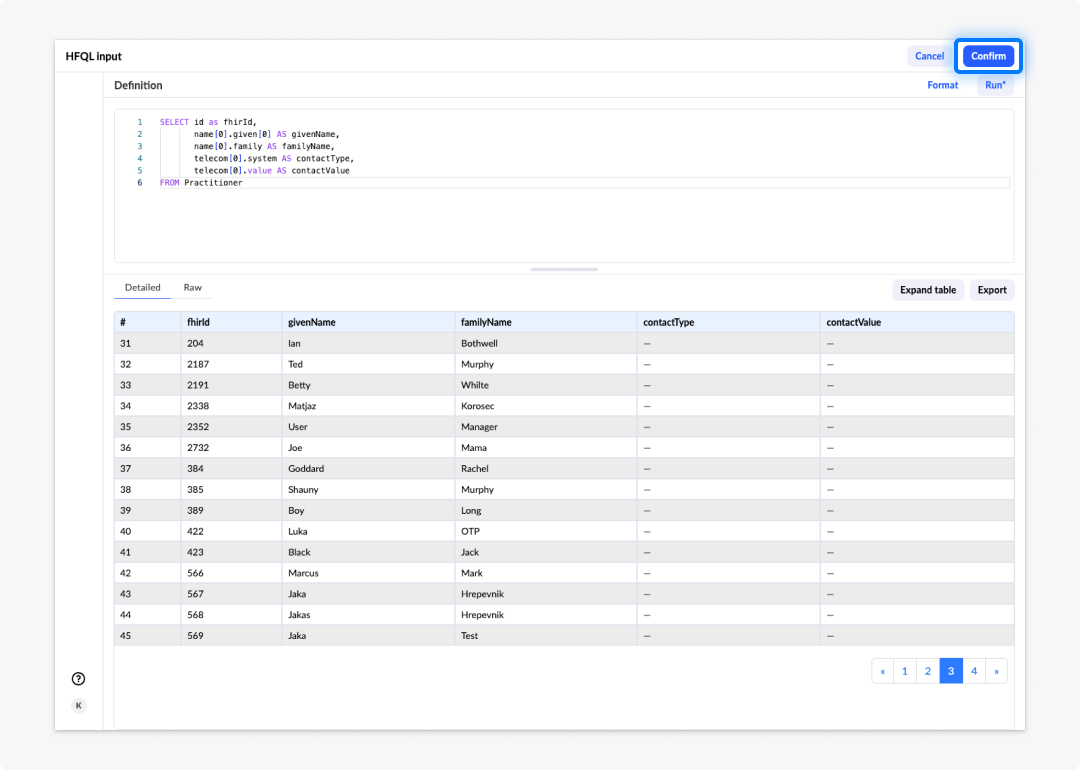
It is required for you to write your own query. Once you finish writing the query, run it to check the results, then press Confirm to submit the HFQL to the ETL server for parsing and partial generation of the relational mapping.
Mapping output table
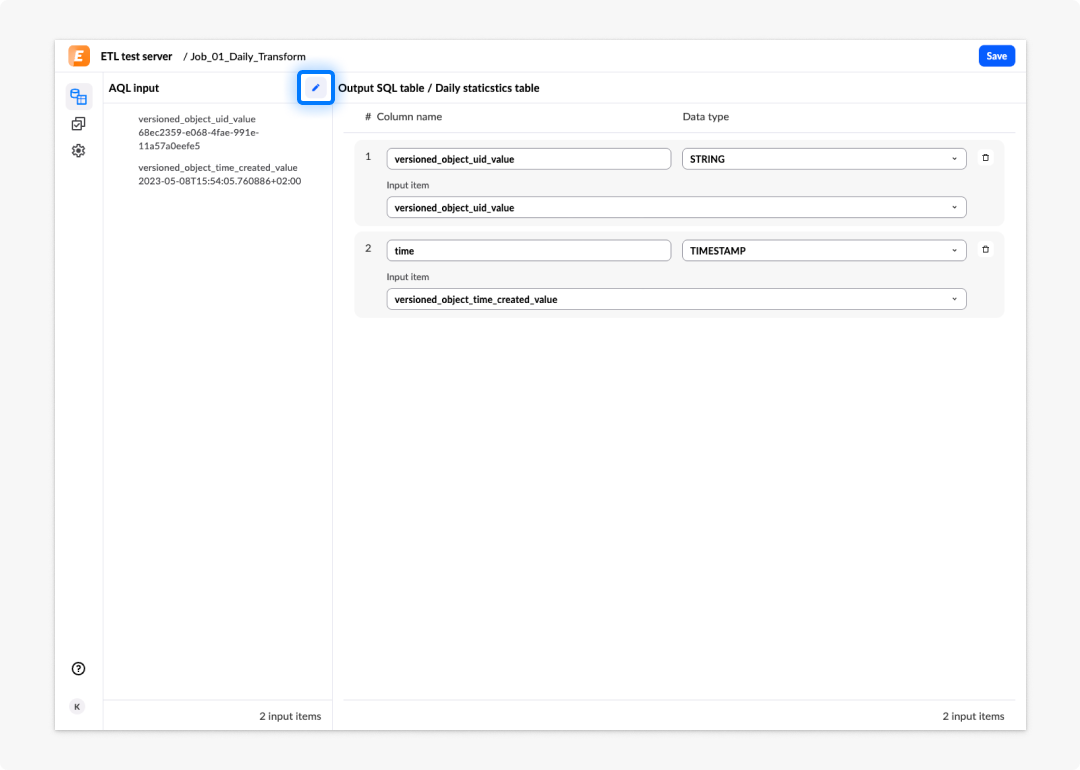
The Mapping parameter specifies the relational table to write the data to. Once AQL input is confirmed, the query is parsed, the mapping is partially generated, and displayed in the Mapping view.
The Column name and Data type fields are required. Column name defaults to the alias name if one is specified in the AQL query; the default Data type is STRING.
To add another mapping for the same AQL select, edit the AQL input, change the AQL definition, run it, and confirm. The new column name is automatically added to the Mapping.
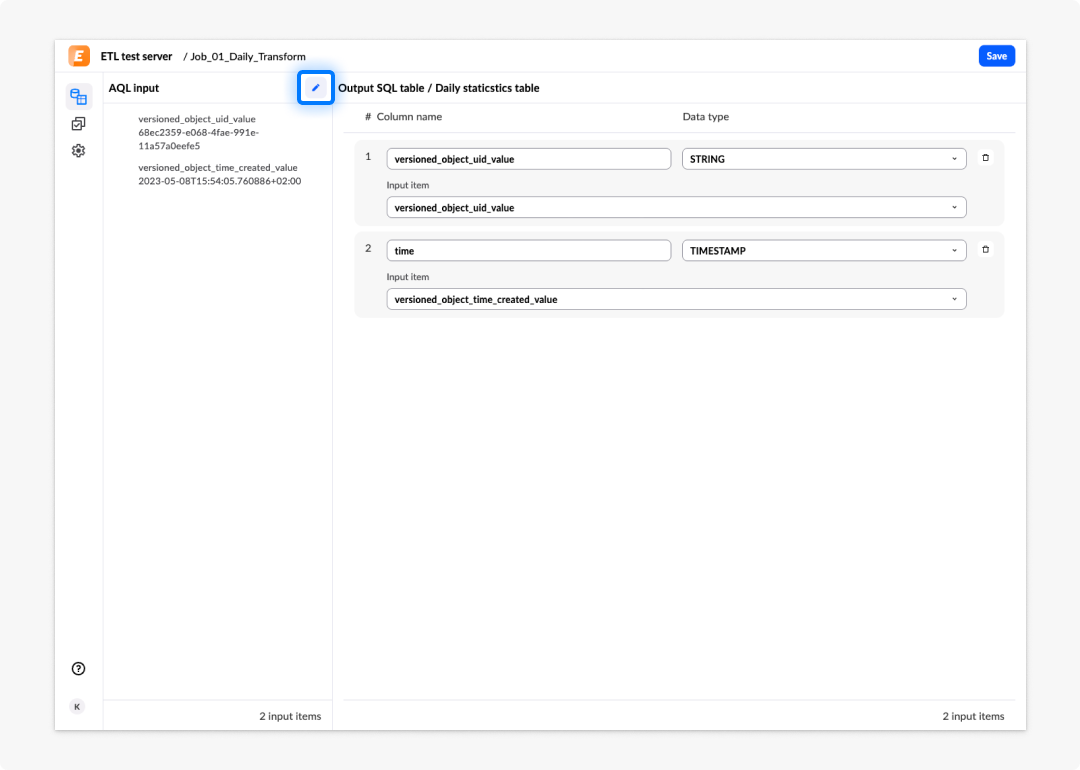
You can also delete columns from the mapping. Deleted data sets remain in the AQL input panel so you can add them back easily while editing the mapping.
Parameter sets
You can define and configure different parameter sets inside a job configuration.
Multiple parameter sets configuration is only supported for AQL input. For jobs configured with HFQL input a default parameter set is added to the configuration automatically.
Step 1: Open the AQL editor and enter parameters inside the AQL definition. Once parameters are set, run the query. If there are no errors, confirm to return to the Mapping.
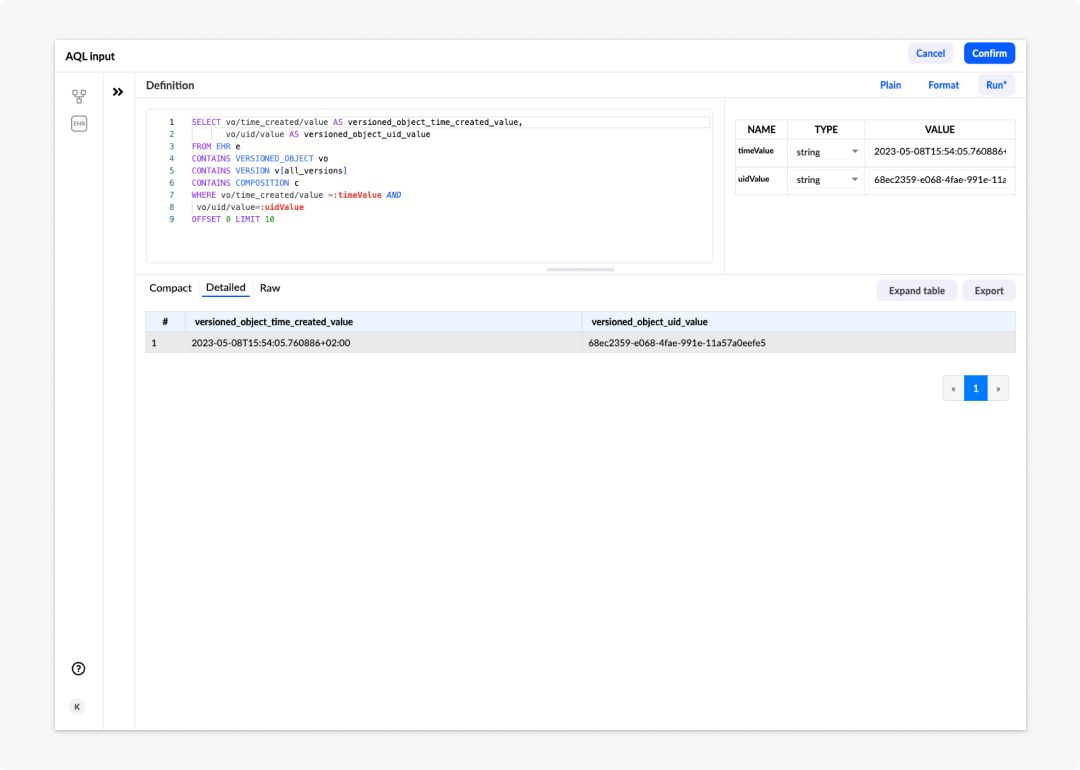
Step 2: Open the Parameter sets configuration from the left side navigation. Select Add set to add a parameter set.
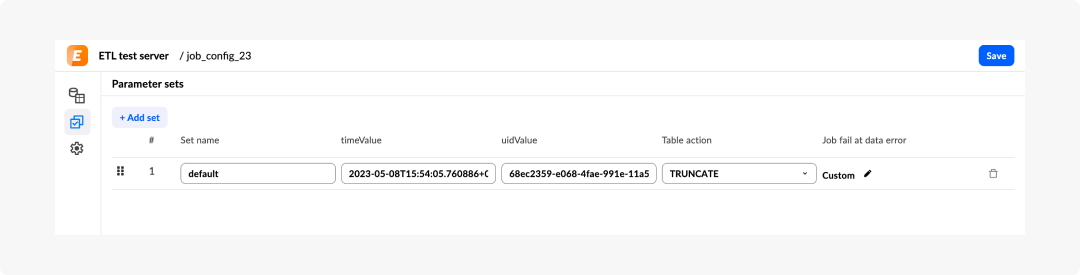
You must enter a set name and values for each parameter used in the AQL definition. You can add up to five different values for each set. However, this limitation does not apply if you are using API to create a job. In that case there is no limit to number of parameter sets you can add within a job configuration.
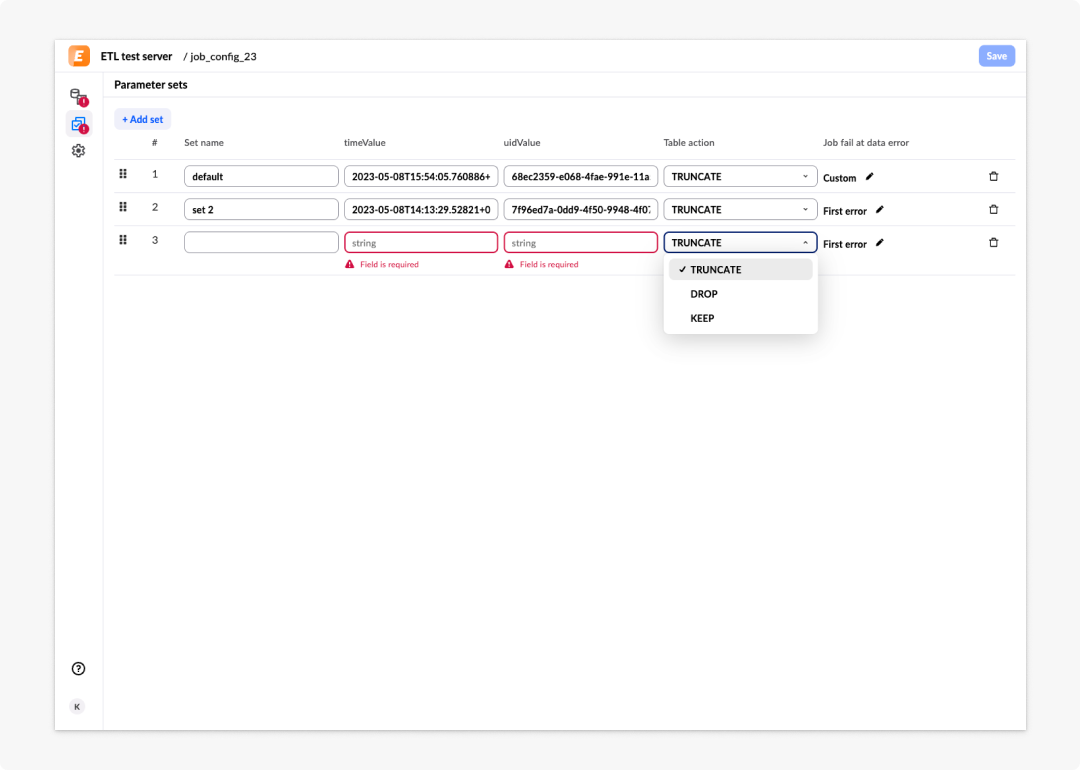
For each set value, you can also define an action for the output table:
- TRUNCATE — Remove all entries from the table without dropping it.
- DROP — Remove the table and recreate it before writing data.
- KEEP — Take no action; add data to the existing table.
If you do not define any parameter sets, a default one is added to the configuration automatically. Parameter sets are not required to create a job and can be added later.
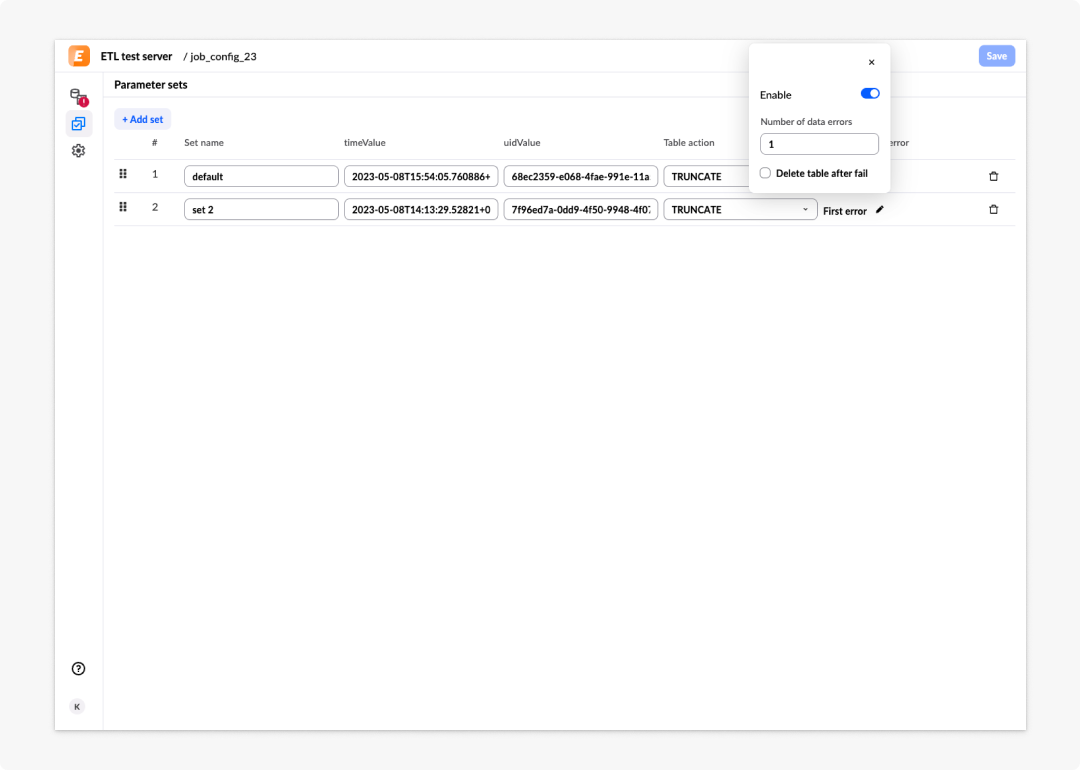
For each parameter set, you can configure behaviour on job failure. The default setting is First fail. You can also Disable the error limit — meaning the job runs even if that parameter set get some errors in individual rows — or set a Custom number of errors that are allowed before the job fails entirely. Parameter sets have a Delete table after fail checkbox, that removes entire target table in case the job fails.
General settings
You can change the source and target connections and the output table name within the General settings configuration, accessible from the left side navigation.
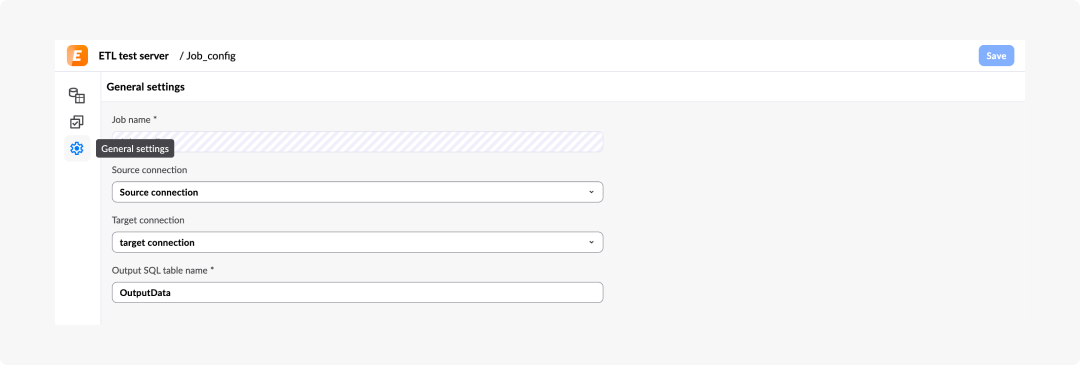
Once the job is configured, select Save. You are navigated to the Jobs page, where the newly created job appears in the list.
View jobs
All created job configurations are listed on the Jobs page. Each entry shows:
- Job name
- Job ID
- Source and target connection names
- Number of execution plans using this job configuration, with an option to view the exact plan names
- Any configuration errors, such as missing data or connection issues
- Username of the job creator
You can open and edit a job configuration, create an execution plan with this job included automatically, view job details with a quick overview of parameter sets, or delete the job configuration.
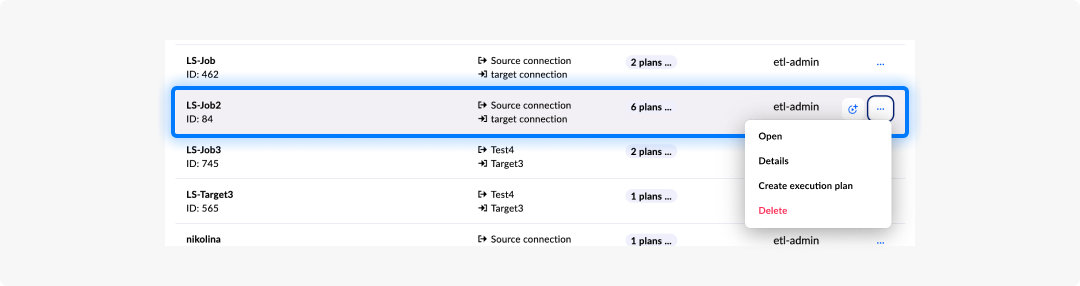
To find a job configuration, use the following filtering options:
- Search: Search jobs by name.
- Tabs: Filter by jobs used in execution plans or jobs not yet assigned to any execution plan.
- Filters: Filter by creator username or execution plan name.
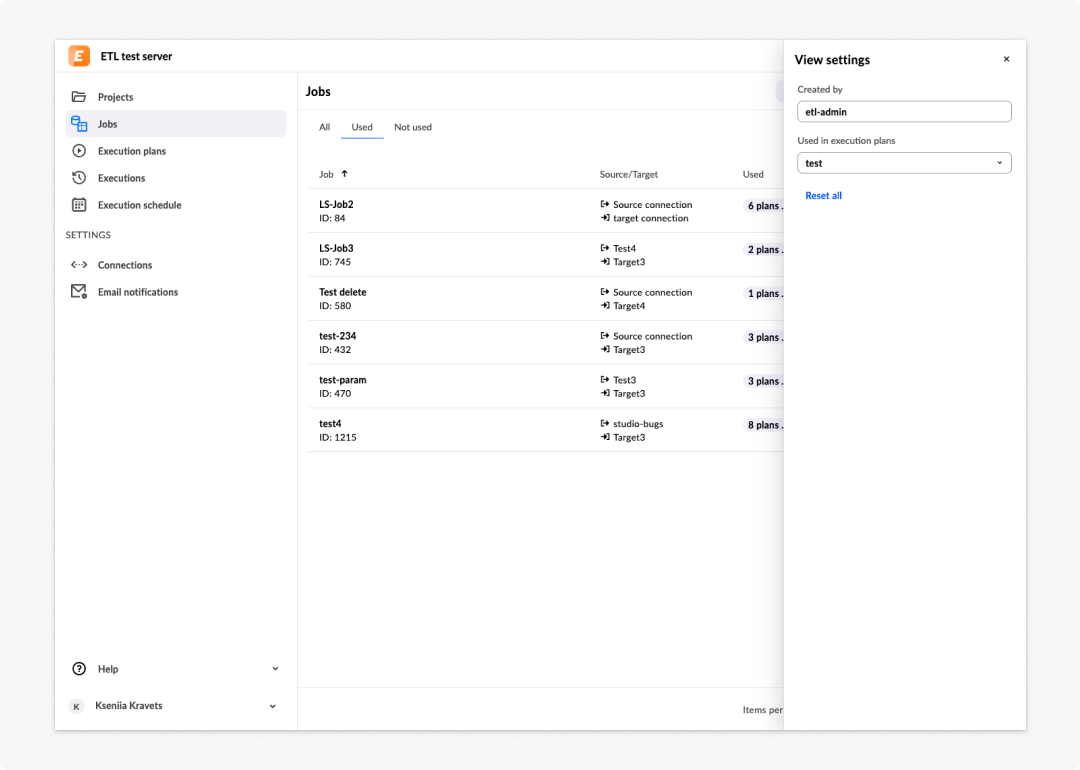
Edit a job
To edit a job configuration, open the job. Before editing, validate the AQL input state.
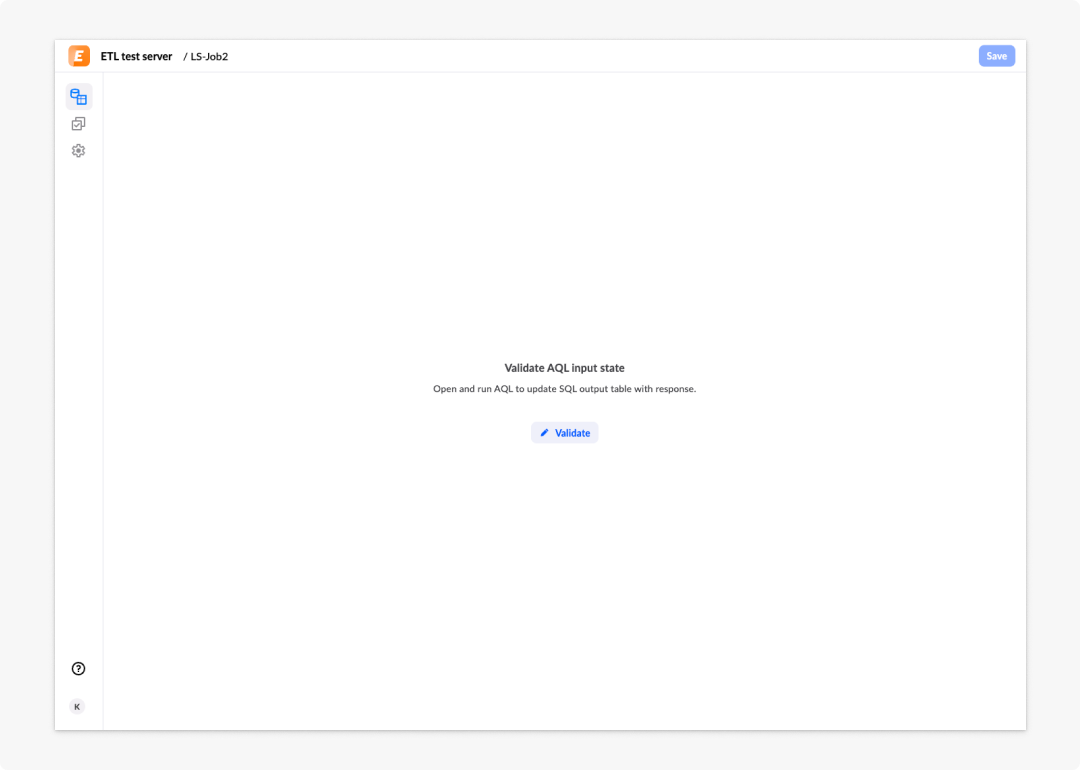
After the validation, you are redirected to the AQL editor and required to run the existing definition. You can also edit the definition, add or remove parameter sets, or keep it as is and proceed to the Mapping by pressing Confirm.
Once finished, select Save. You are navigated back to the Jobs page.
Run a job
Jobs cannot be run individually. They must be part of an execution plan. To run a job, create an execution plan and add the job to it. You can also quickly create an execution plan with a job automatically included from the available actions in the job list.
Execution plans
An execution plan allows you to run jobs. Jobs in an execution plan execute sequentially. Each job waits for the previous one to complete before starting. This is useful when jobs are interdependent.
Create an execution plan
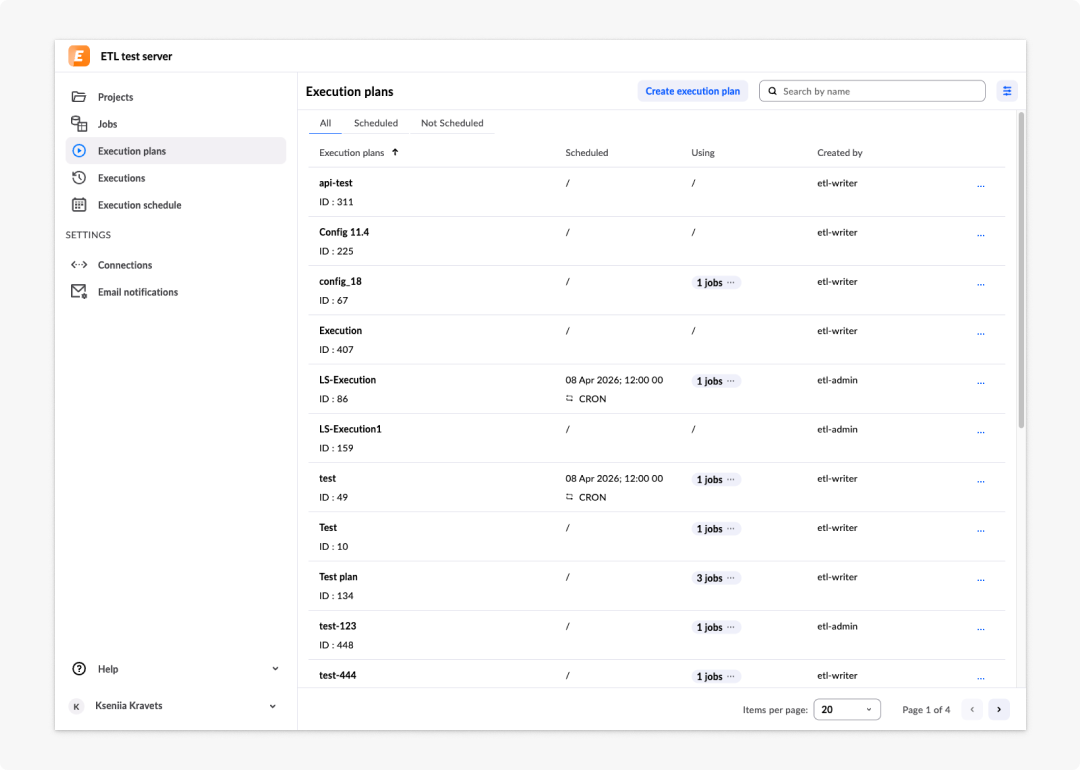
All configured execution plans are available on the Execution plans page. Select Create execution plan to open the configuration dialogue.
The following fields are required:
- Execution plan name: Must be unique.
- Job configuration: Select from the list of existing job configurations. The dropdown is limited to 20 items; enter the full or partial job name to find the desired job.
- Parameter set: A parameter set from the selected job configuration.
Once the required configuration is set, add the job and parameter set to the execution plan.
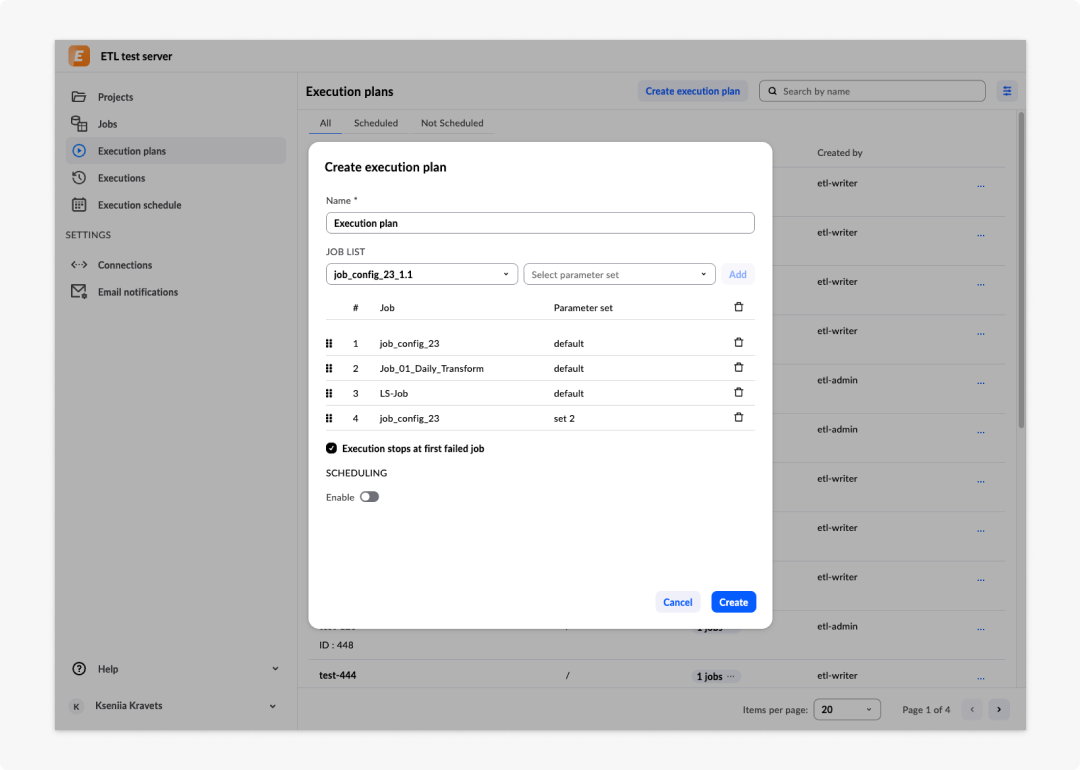
To add multiple jobs and parameter sets, continue selecting and adding configurations. Jobs are added in sequential order. You can change the order by dragging job configurations to different positions.
Selecting Execution stops at first failed job ensures execution stops as soon as one job fails. Although this option is not required, it is recommended for large data sets.
Scheduling an execution plan
You can set different scheduling types by enabling the Scheduling option.
Single execution runs the execution plan once at a specific date and time.
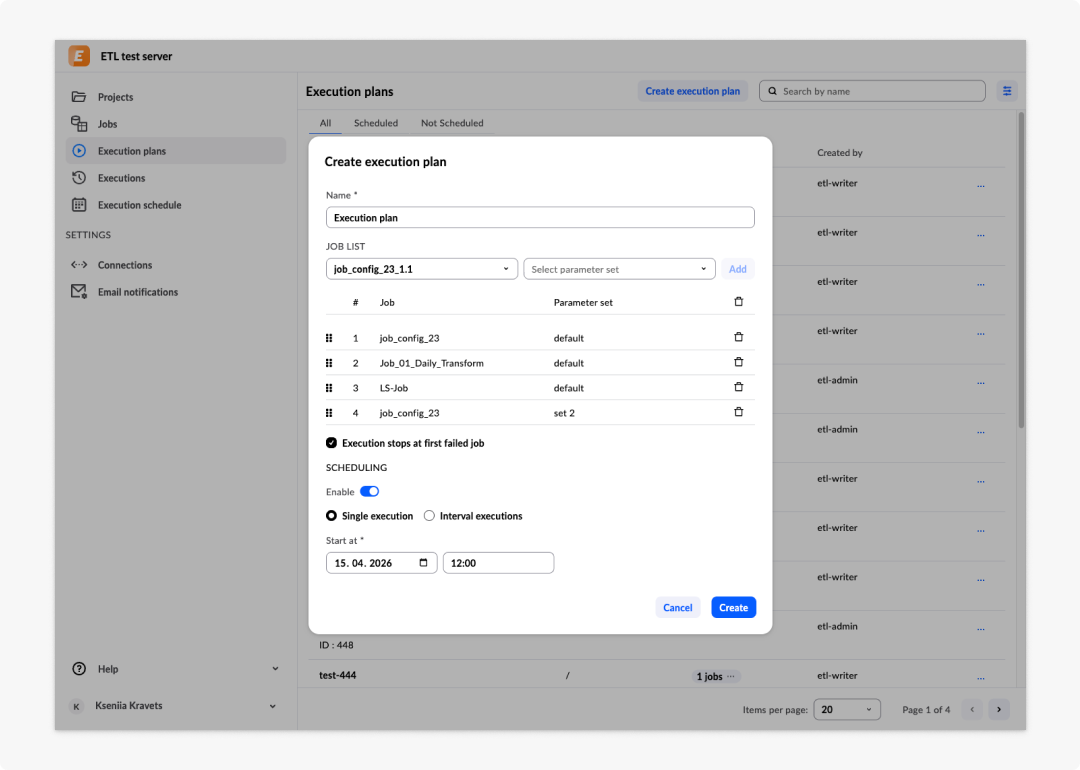
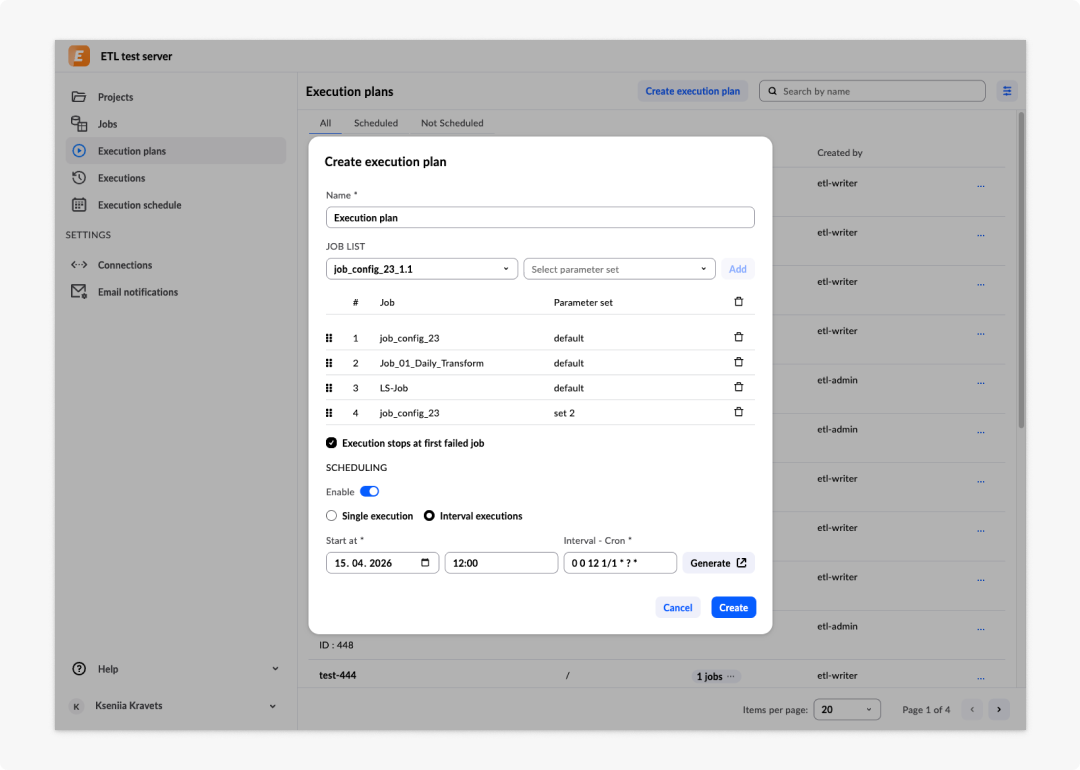
Interval execution sets a recurring execution with a specific start date and time and an interval defined by a CRON expression.
ETL editor only supports Quartz CRON format. The expression must contain 6 or 7 values separated by whitespace.
View execution plans
All created execution plan configurations are listed on the Execution plans page. Each entry shows:
- Execution plan name
- Execution plan ID
- Scheduling configuration, if configured
- Number of job configurations used in the execution plan, with an option to view the job names
- Username of the creator
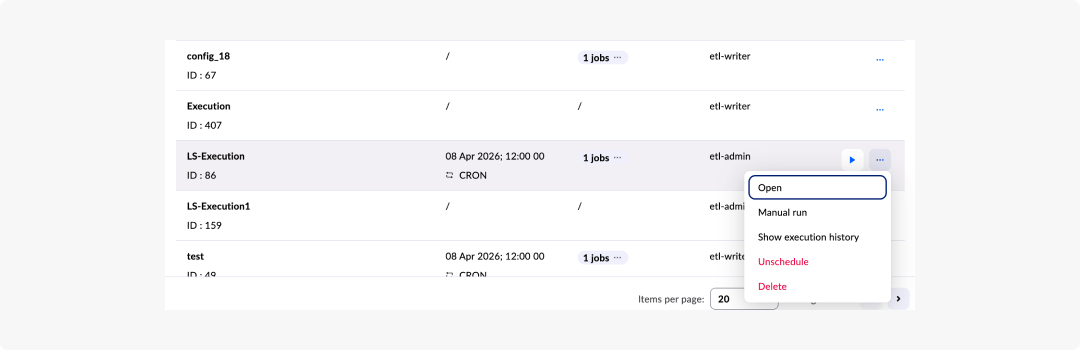
You can open and edit an execution plan configuration, run it manually, view execution history, remove the schedule configuration, or delete it entirely.
If an execution plan is in progress at the time of deletion, the execution continues until it completes or fails due to a data error.
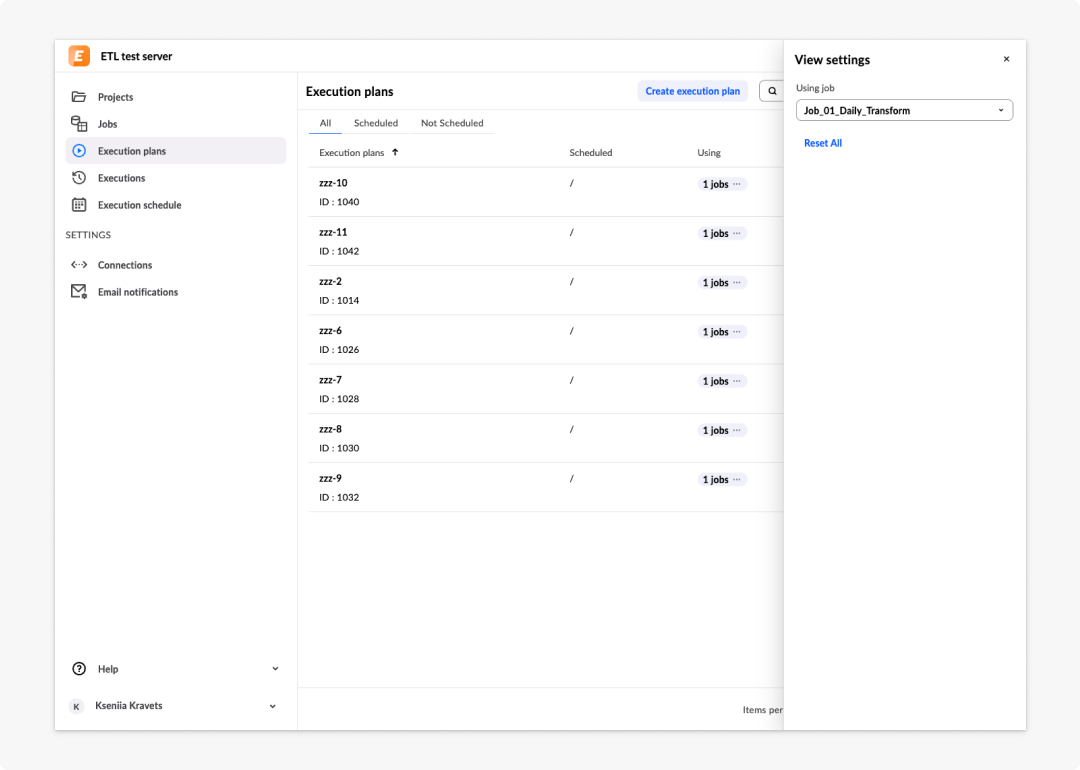
To find an execution plan, use the following filtering options:
- Search: Search execution plans by name.
- Tabs: Filter by scheduled or unscheduled execution plans.
- Filters: Filter by the name of the job used in the execution plan configuration.
Run an execution plan
You can run an execution plan by selecting Manual run from the available actions in the execution plan list. A manual run does not affect the existing schedule configuration.
Scheduled runs are performed based on the configured scheduling and are visible on the Execution schedule page once an execution plan with scheduling is saved.
Executions
Each specific run of an execution plan, whether manual or scheduled, is called an execution. Executions give you a clear view of what is planned or already in progress.
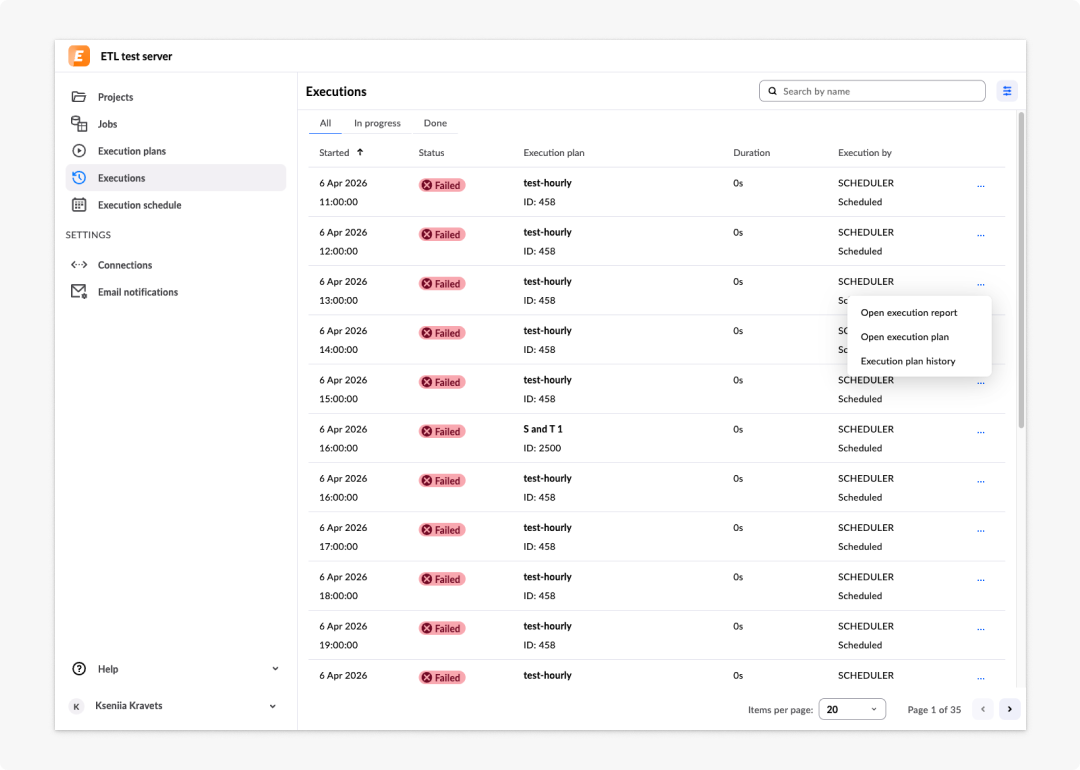
All executions are listed on the Executions page. Each entry shows:
- Execution start time and date
- Execution status
- Execution plan name
- Execution plan ID
- Duration of the execution in seconds
- Username of the user who triggered the execution. For scheduled executions, this value is Scheduler.
You can open an execution report, open the related execution plan, view execution history, or stop an execution that is currently in progress. Execution history allows you to filter all completed executions for a specific execution plan.
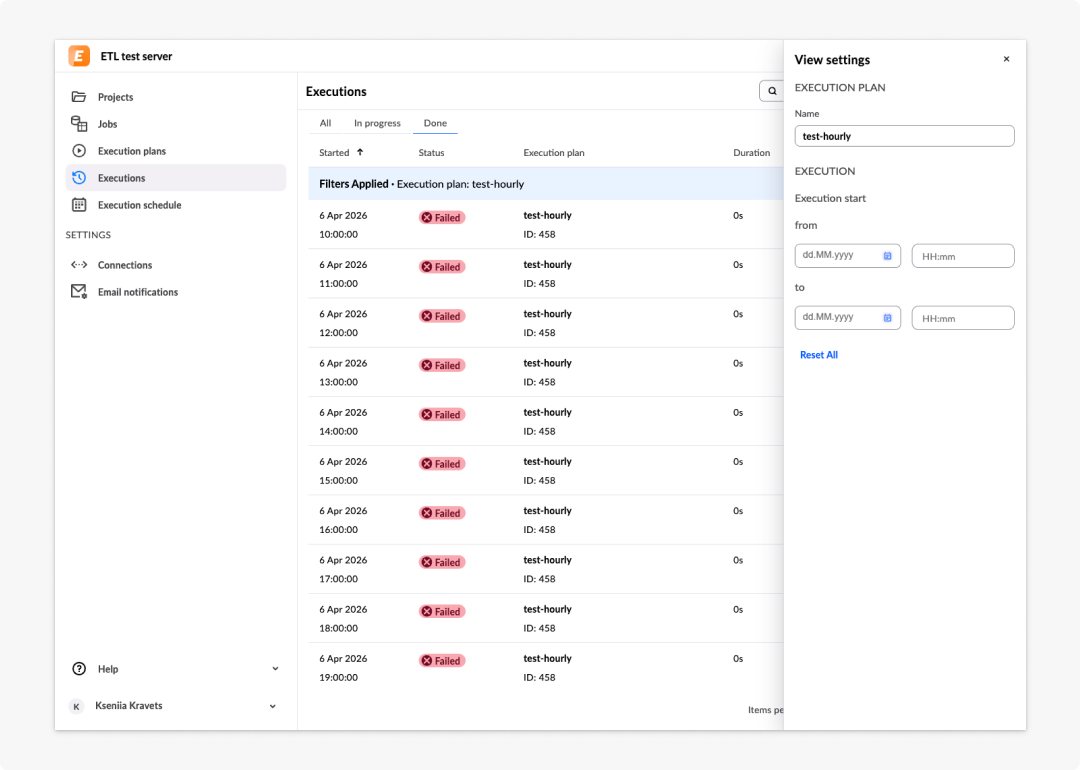
To find an execution, use the following filtering options:
- Search: Search executions by execution plan name.
- Tabs: Filter by executions in progress or already completed.
- Filters: Filter by execution plan name, start time, and end time.
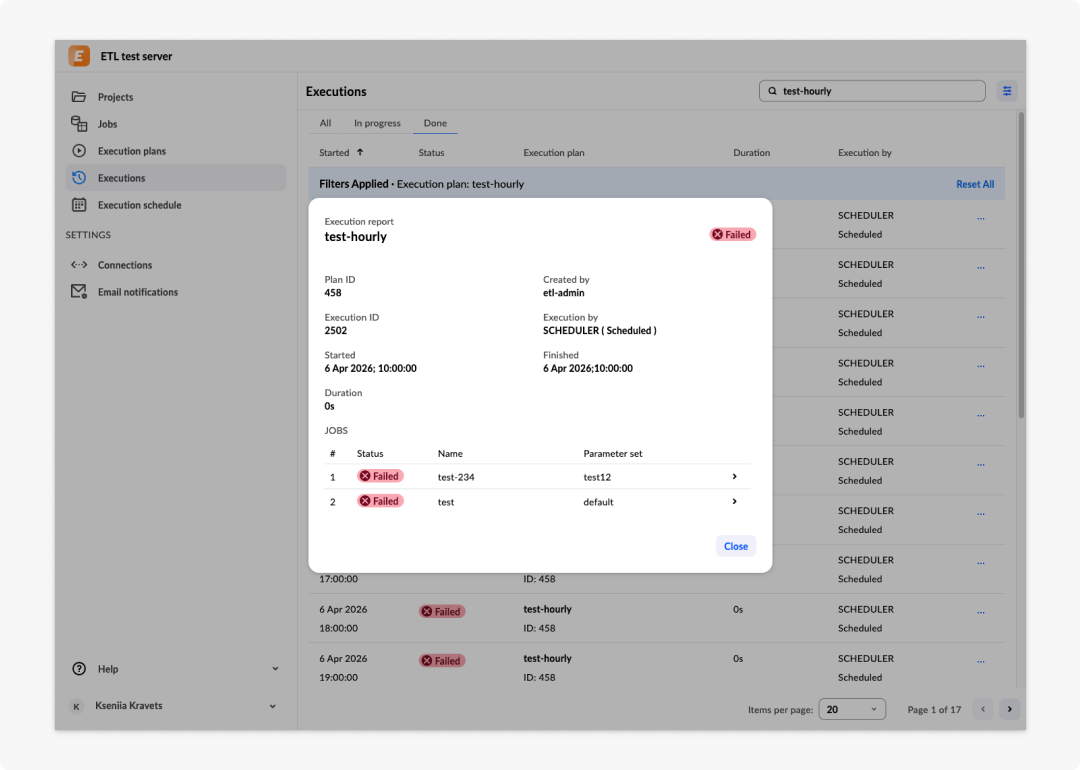
Execution report
An execution report shows the details of a specific execution and provides information on any errors that occurred if jobs or parameter sets did not execute successfully.
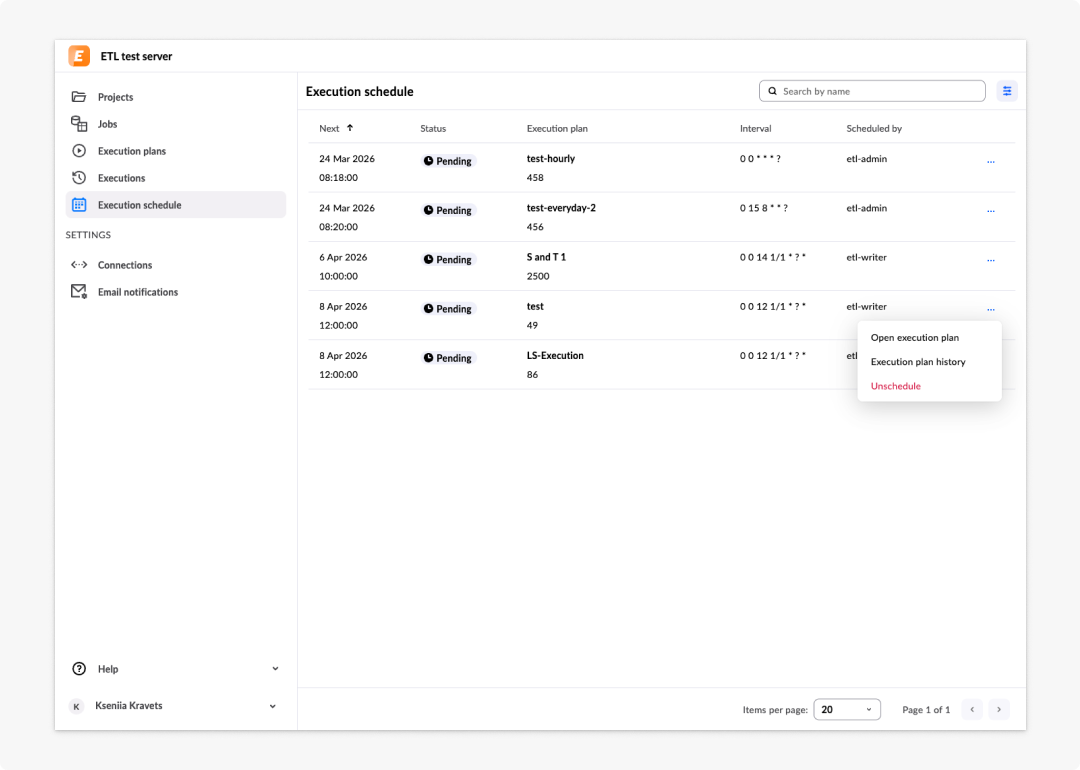
Execution schedule
The Execution schedule page shows a list of all planned executions based on their scheduling configuration. Each entry shows:
- Execution start time and date
- Execution status, which is always Pending
- Execution plan name
- Execution plan ID
- Execution interval, shown as a CRON expression
- Username of the user who scheduled the execution
You can open the execution plan, view execution history, or unschedule the execution — which removes the scheduling configuration from the execution plan.
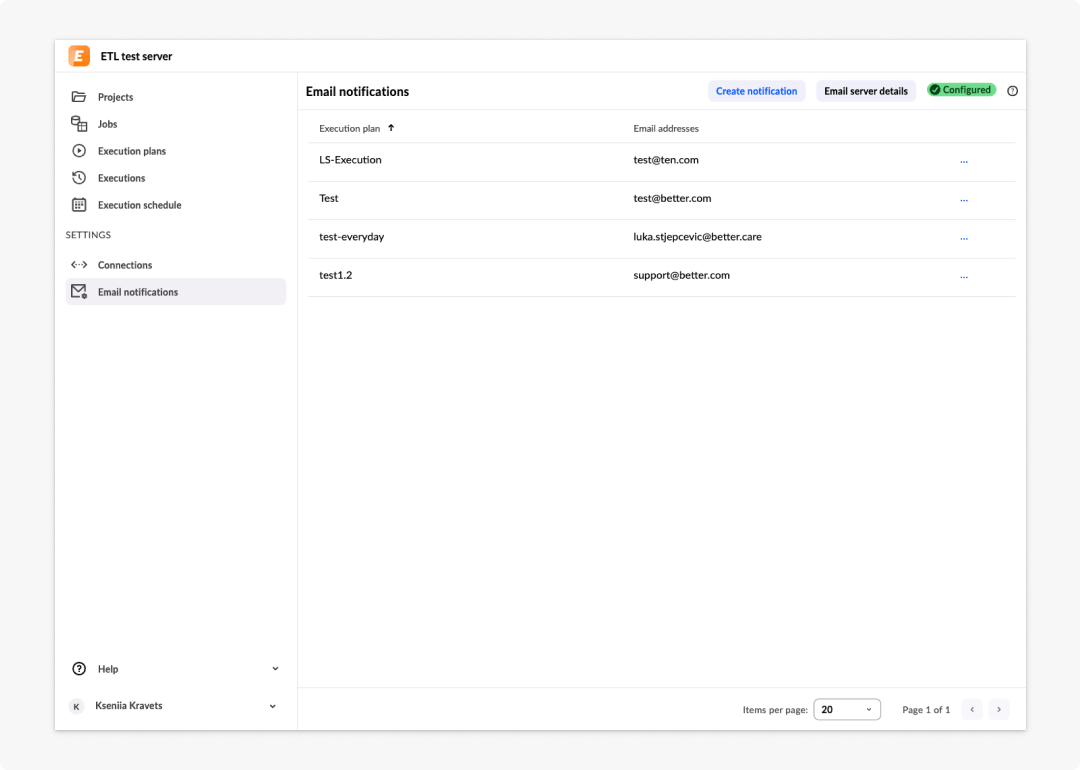
Email notifications
You can enable email notifications on job failure. When a job fails, a specified list of recipients receives an email containing details about what failed and why.
To enable notifications, first configure an SMTP server in the server-side ETL configuration, as explained in ETL mailing service configuration.
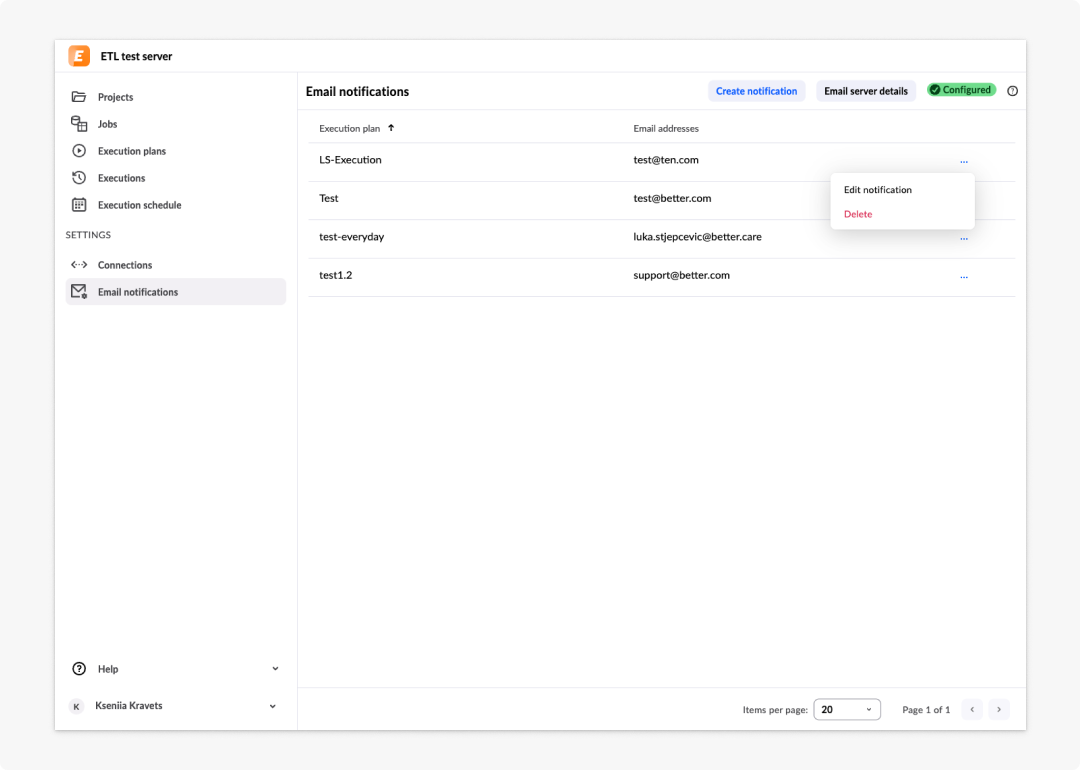
Once SMTP is configured server-side, the status of the server is shown as Configured in the top-right corner of the Email notifications page.
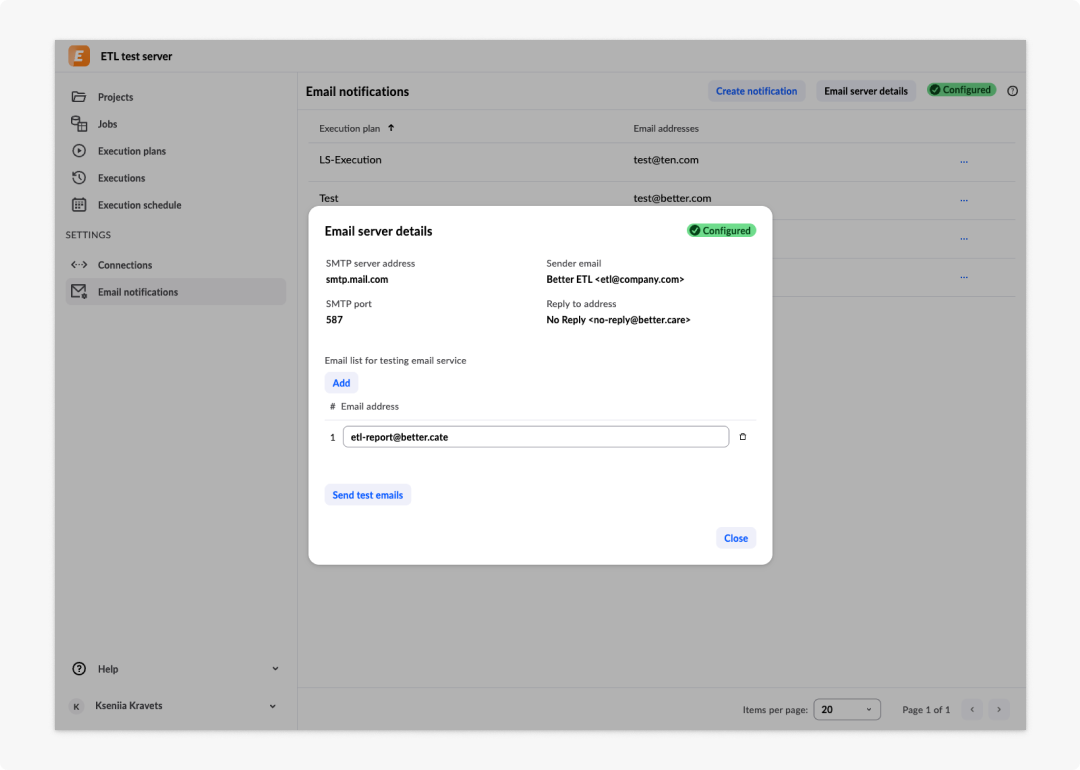
You can also check the email server details by selecting the relevant action in the top-left corner of the page. This also allows you to test the notifications by entering one or more test email addresses and pressing Send test emails, which triggers a test email from the server.
The Email notifications page lists all configured email notifications. Each entry shows:
- Execution plan name
- Configured email addresses receiving the notification
You can edit or delete an email notification.
Create an email notification
To create an email notification, click on the Create notification button in the top menu. In the dialogue that opens, first select an execution plan, then add at least one email address. Multiple addresses are supported.
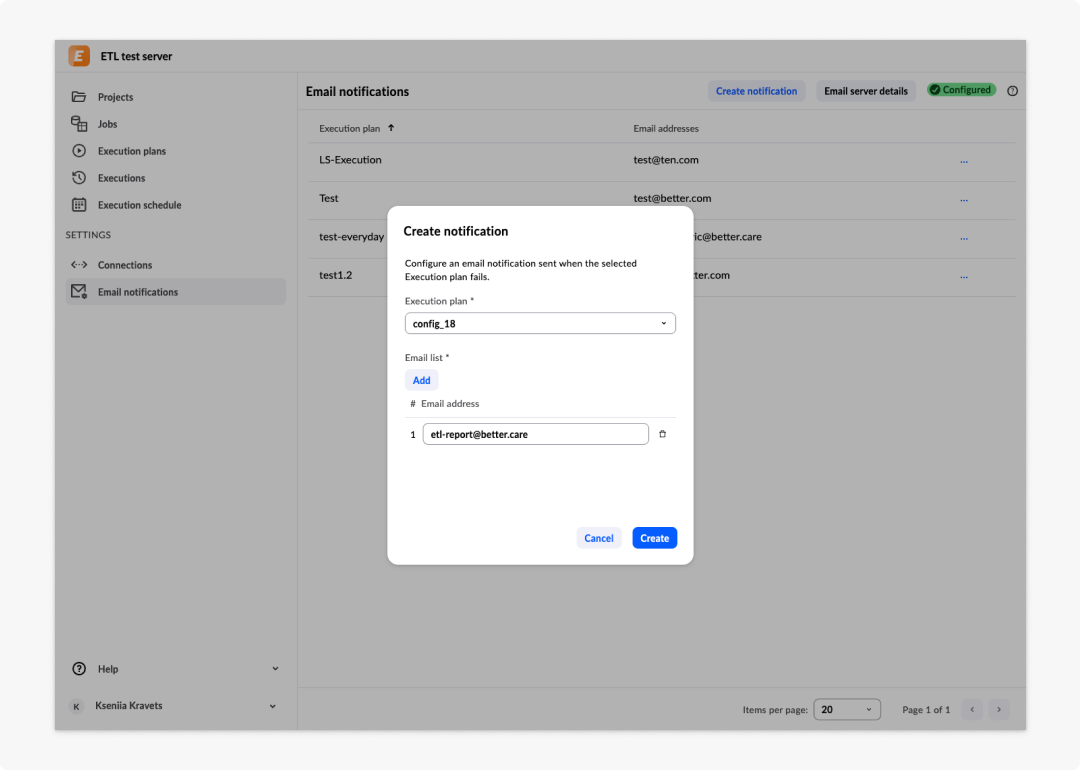
Once you save the configuration, it is activated immediately. If the selected execution plan produces an execution with errors, the error report is automatically sent to the configured email addresses.
Frequently asked questions (FAQs)
Can I run a job without an execution plan?
No. Jobs cannot be run individually. They must be added to an execution plan before they can be run, either manually or on a schedule. From the Jobs page, you can quickly create an execution plan with a job already included using the available actions in the job list.
What is the difference between a job and an execution plan?
A job defines what data to extract (the AQL query), the source and target connections, the relational output mapping, and any parameter sets. An execution plan groups one or more jobs and controls when and how they run — immediately, at a scheduled time, or on a recurring interval. Jobs in an execution plan execute sequentially.
What is a parameter set?
A parameter set defines specific values for the parameters used in a job's AQL query, along with an action for the output table: TRUNCATE (remove all rows), DROP (remove and recreate the table), or KEEP (append to existing data). A single job can have multiple parameter sets, allowing the same pipeline to run against different data ranges or filter conditions within one execution plan.
What databases are supported as a target connection?
ETL supports PostgreSQL 9.6 or higher, Oracle 12c or higher, MySQL 5.7, and Microsoft SQL Server 2012 or higher. The database must be configured outside the ETL editor before you can reference it as a target connection.
What authentication methods are supported for source connections?
Source connections support Basic and OAuth2 authentication. The fields required differ depending on the selected method. Note that the ETL editor itself only supports OAuth2 for project-level authorisation — contact your system administrator for the relevant credentials.
What CRON format does the scheduler use?
ETL only supports Quartz CRON format. The expression must contain 6 or 7 values separated by whitespace. Standard Unix CRON expressions with 5 values are not supported.
What happens if I delete an execution plan that is currently running?
The execution in progress continues until it completes or fails due to a data error. Deleting the execution plan only prevents future runs — it does not interrupt an active execution.