Terminology editor
This content is intended for advanced Studio users.
The Terminology editor is an application that allows you to manage FHIR-compliant terminology resources — Code Systems and Value Sets — used across your Studio applications for form bindings, queries and data validation. It connects to a FHIR terminology server and provides authoring, browsing and lookup capabilities through a unified UI.
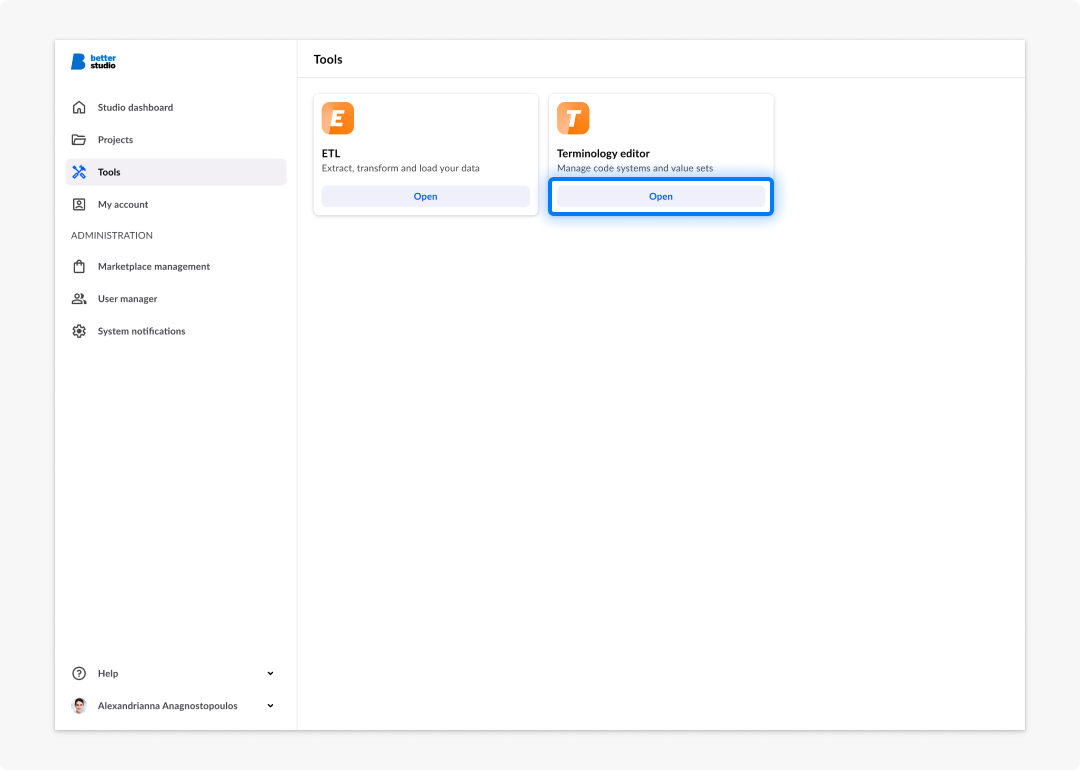
The integrated Terminology editor brings centralised, standards-based terminology management into the same project space where your Studio forms and queries are built. For example, a clinical informatics team can:
- Author new Code Systems and Value Sets directly against a FHIR terminology server.
- Curate concept lists with properties, multilingual designations and hierarchical relationships.
- Reuse the resulting terminologies across forms, AQL queries and ETL pipelines, ensuring consistent codes across your application lifecycle.
The Terminology editor implements the official HL7 FHIR Terminology Module. For the authoritative definitions of the resources, fields and operators referenced in this guide, refer to the FHIR specification:
- FHIR Terminology Module — Overview of FHIR terminology services.
- CodeSystem resource — Definition, properties, hierarchy and content modes.
- ValueSet resource — Composition rules, filter operators and expansion semantics.
- Using codes in resources — How Code Systems and Value Sets are referenced from other FHIR resources.
User roles and permissions
The Terminology editor module requires additional Studio permissions beyond the standard Studio access. Without these permissions, the Terminology editor is not visible in Studio. Contact your system administrator to have the required roles assigned to your account.
Access to the Terminology editor is controlled by two roles:
- ADMIN (DEMOGRAPHICS_ADMIN) — Full access. Create, read, update and delete Code Systems, Value Sets and project settings.
- READ (DEMOGRAPHICS_READ) — Read-only access. Browse and lookup terminologies without making changes.
Configuration guide
To use the Terminology editor, you need to configure a terminology project that points to a FHIR terminology server. The project is the main instance that stores the server configuration and credentials referenced by all subsequent terminology authoring operations.
Project configuration
The first step is to configure your terminology project. The Projects page is shown at the top of the Terminology editor main navigation.
The FHIR terminology server must be preconfigured outside of the Terminology editor. Get all configuration data from your system administrator or contact Support.
To configure a project:
- Select Add project.
- Fill in the configuration fields and select Add.
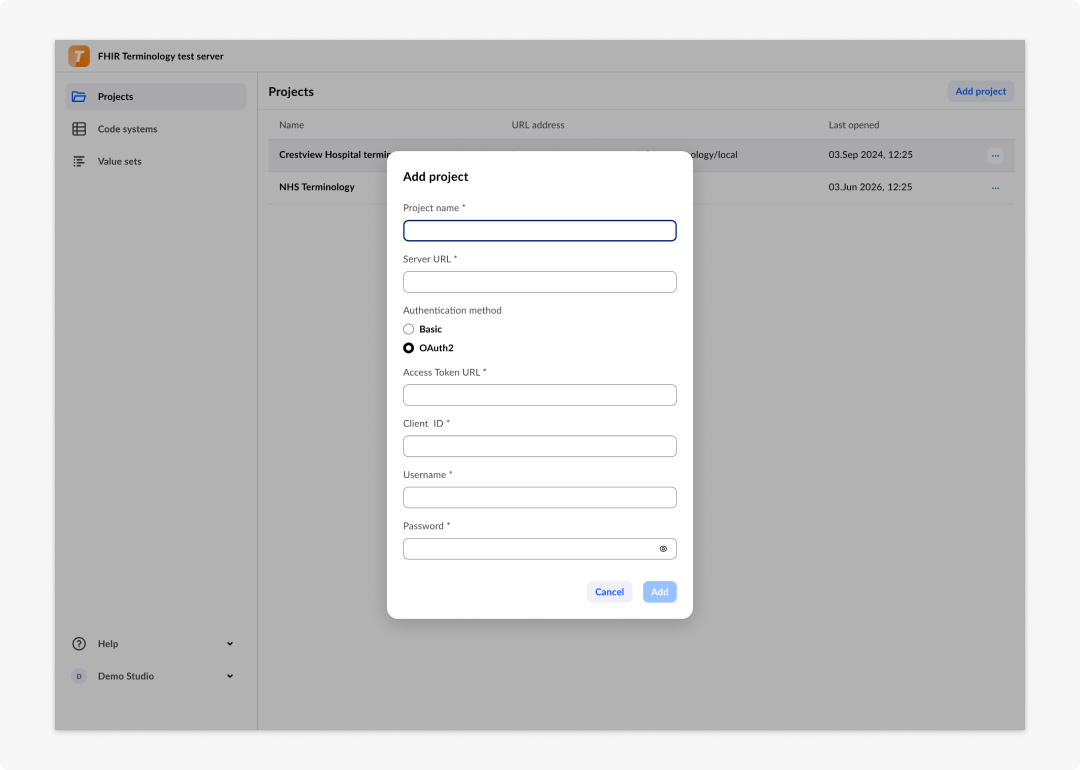
Example: Project configuration:
| Field | Example | Description |
|---|---|---|
| Project name | TerminologyDev | Must be unique. |
| Server URL | https://terminology.better.care/fhir/ | The URL of the FHIR terminology server. |
| Authorisation | Basic / OAuth2 | The fields required differ depending on the selected method. |
| Credentials | username / password / client ID / etc. | Authentication details required by the selected authorisation method. |
Once a project is created, the project name appears in the header of the tool to indicate which project you are currently working on. You can switch between projects when more than one is configured.
If you delete a terminology project, the Code Systems and Value Sets stored on the connected FHIR server are not deleted. Recreating a project configuration with the same server URL and credentials restores access to the same content.
First-time setup
If you open the Terminology editor for the first time and have no terminology projects, the Projects page is the only active page in the side navigation — Code Systems and Value Sets pages are disabled until a project is configured. Once a project is created, the configured server is selected by default and the other pages become available.
Browsing terminologies
Once a terminology project is selected, the side navigation exposes two list pages — Code Systems and Value Sets — each showing the corresponding resources stored on the connected FHIR terminology server. Both pages share the same layout, columns and actions; the only difference is the resource type they display.
Each entry in either list shows:
- Title and Name
- Last version
- Status
- Last change date
- Author of the last change (filled from the Publisher field)
Available actions
Users with the appropriate permissions can perform the following actions over each terminology in either list:
- Open — Opens the terminology in the Code system editor or Value set editor.
- Duplicate — Creates a copy of the terminology with a new unique URI.
- Export — Exports the terminology to a CSV file.
- Delete — Removes the terminology from the FHIR server.
Duplicate
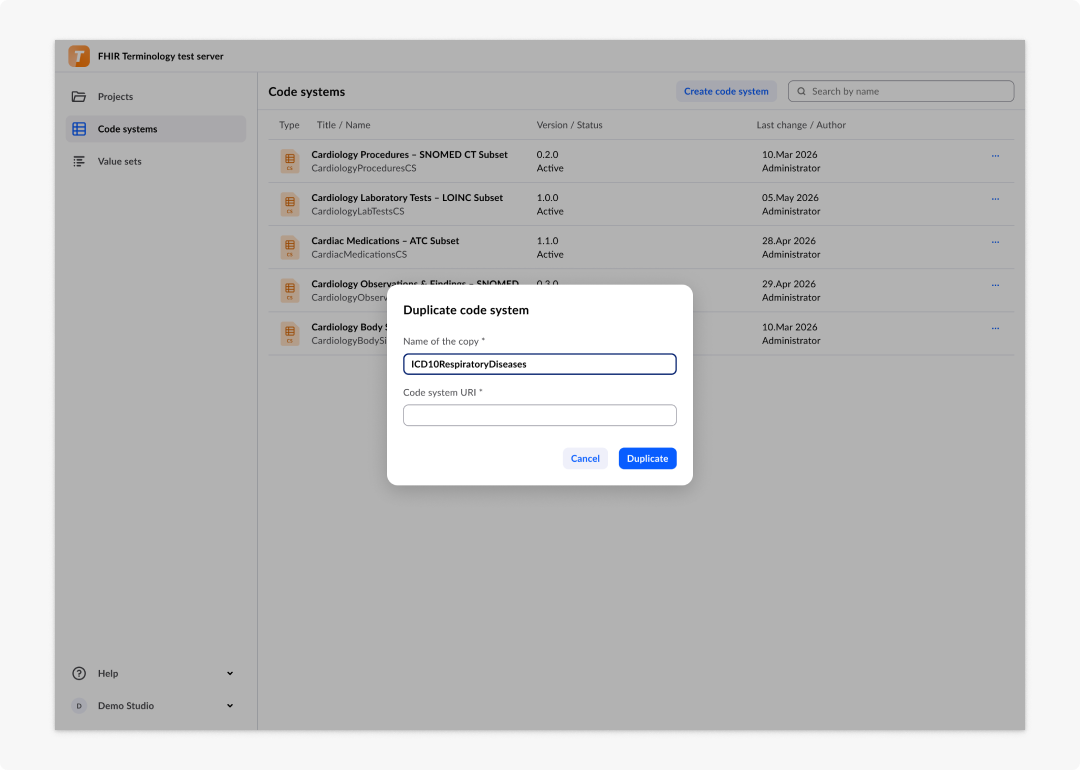
The Duplicate action creates a new Code System (or Value Set) with a new unique URI, preserving the source content.
- Select Duplicate to open the dialog.
- Define the Name of the copy. A proposed name is generated.
- Define the URI address.
- Select Confirm.
Export
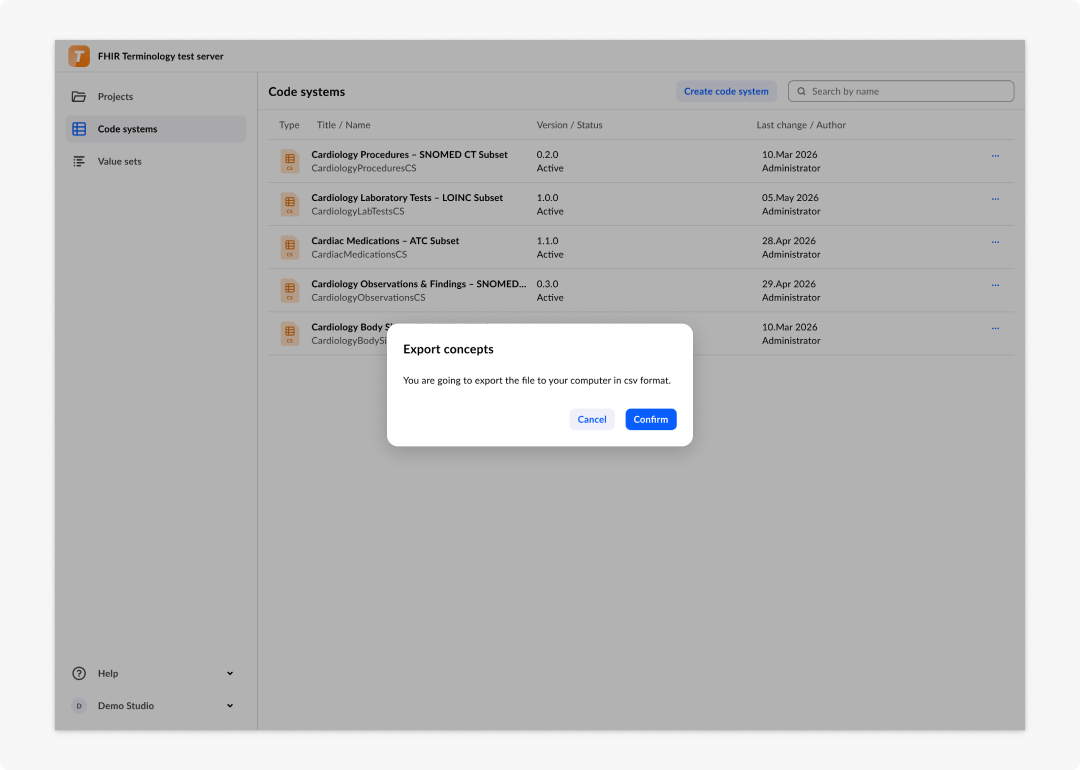
The Export action exports the selected terminology as a CSV file.
- Select Export to open the dialog.
- Select Continue. The exported file is downloaded by the browser.
Delete
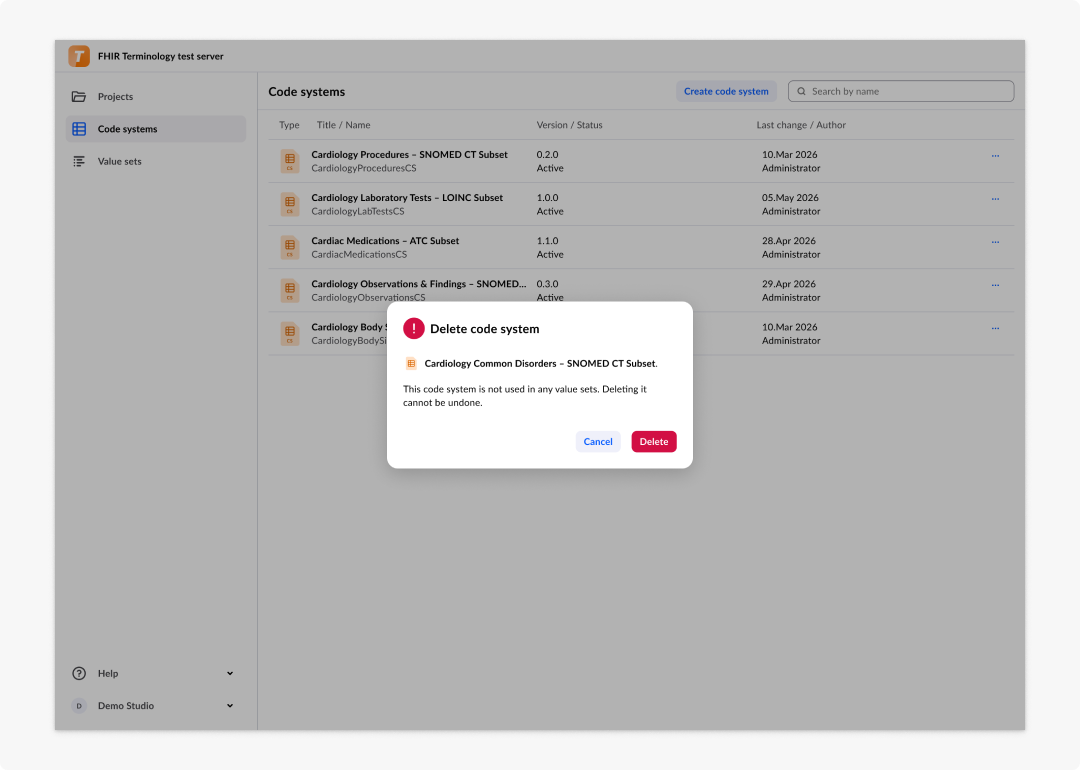
The Delete action removes the terminology — including all of its versions — from the FHIR terminology server. This action is not reversible.
- Select Delete. The confirmation dialog opens.
- Select Continue.
Find a terminology
To locate a terminology in either list, use the toolbar:
- Search field — Search by title or name.
Code Systems list
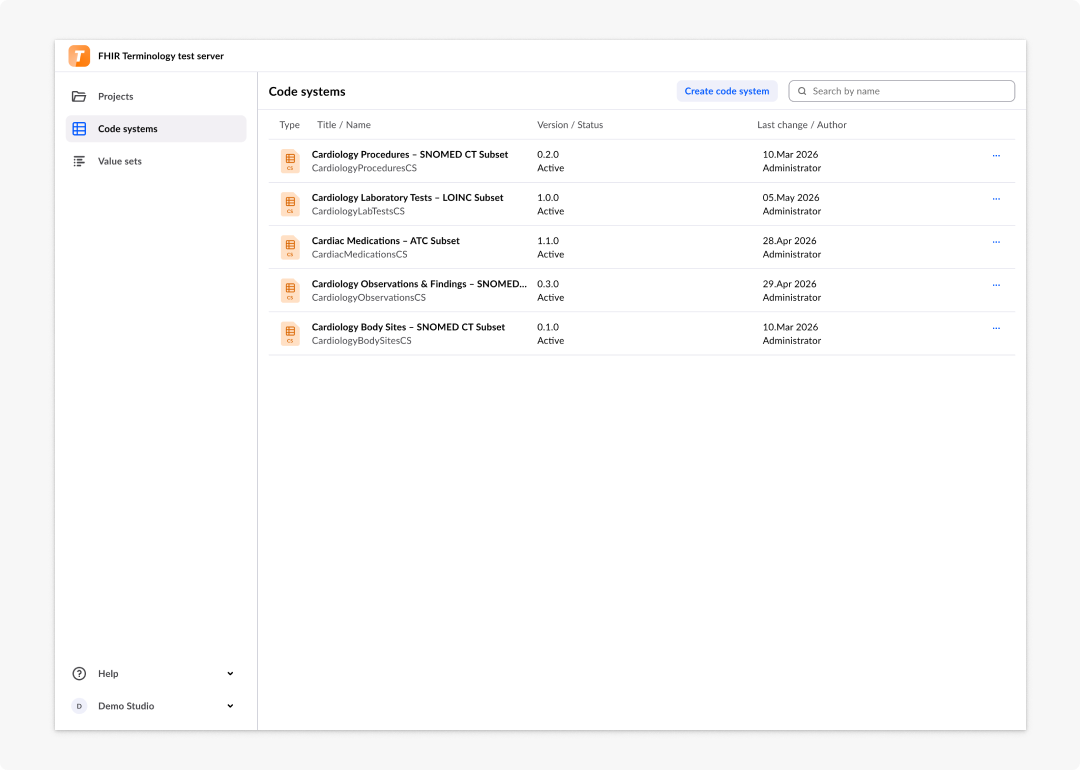
The Code Systems page lists every Code System stored on the connected FHIR terminology server. Use this page to browse, open or manage existing Code Systems, or to create a new one (see Create a Code System).
Value Sets list
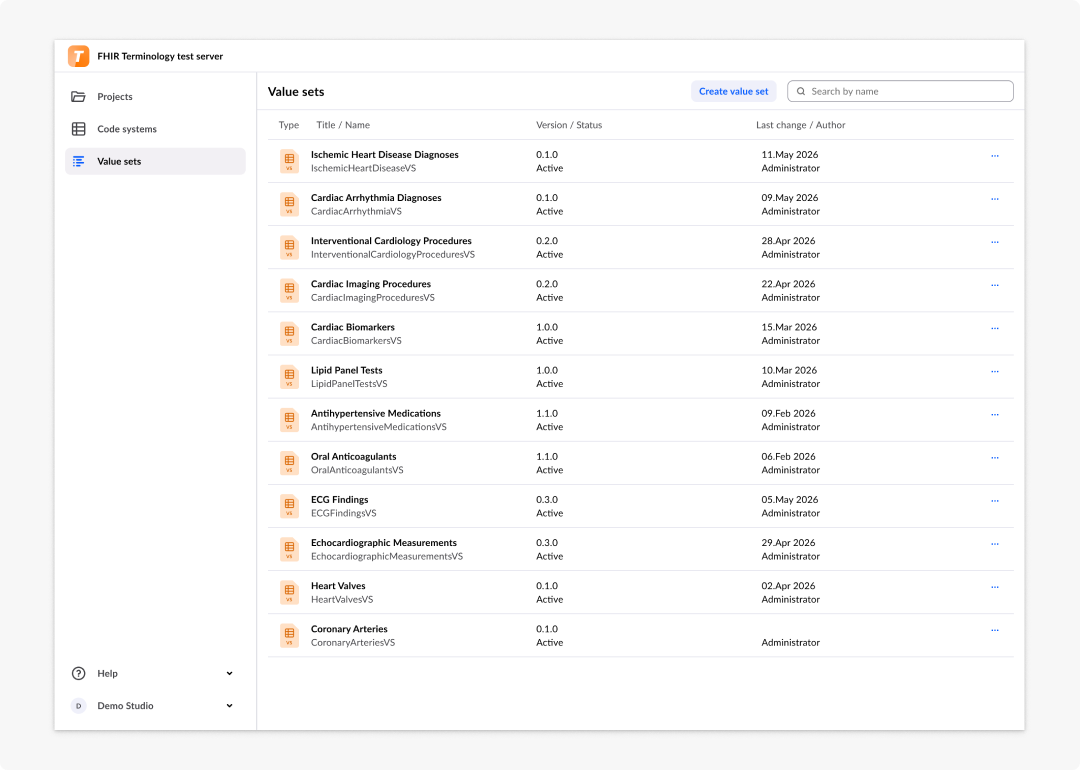
The Value Sets page lists every Value Set stored on the connected FHIR terminology server. Use this page to browse, open or manage existing Value Sets, or to create a new one (see Create a Value Set).
Code System management
A Code System defines a set of codes — for example SNOMED CT, ICD-10 or a locally curated list. The Terminology editor lets you create, view, edit and delete Code Systems.
Create a Code System
When connected to the FHIR server, users with permissions can create a new Code System.
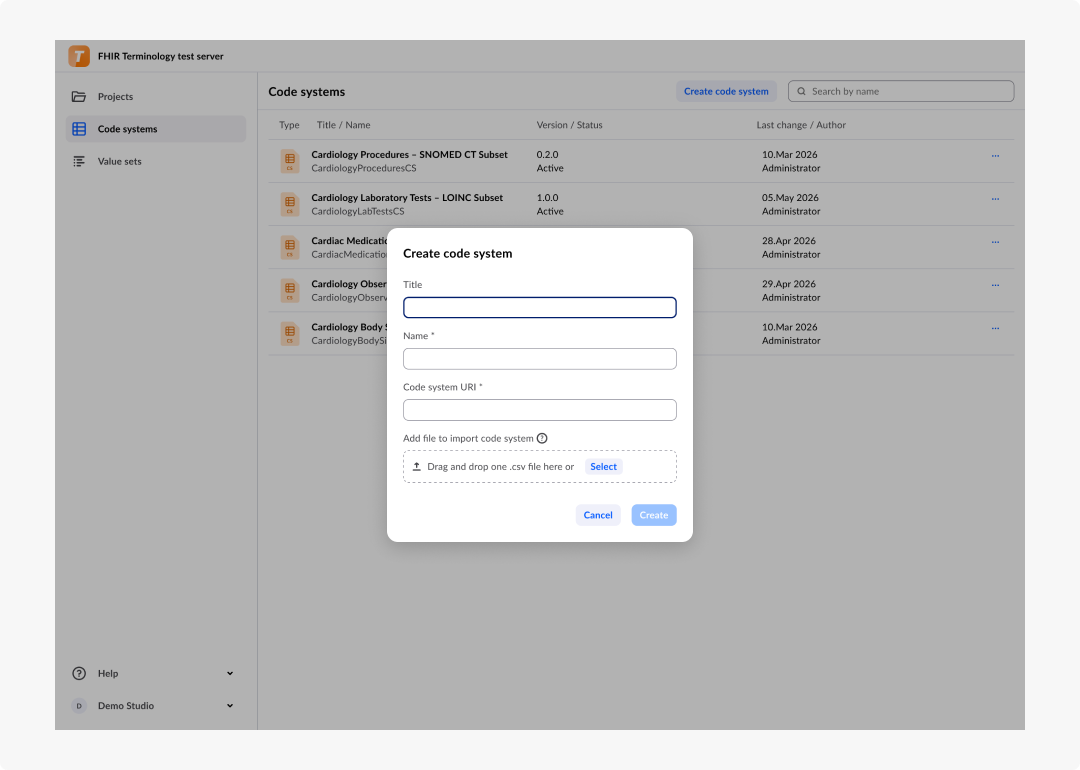
- From the Code Systems page, click Create code system button. The Create code system dialog opens.
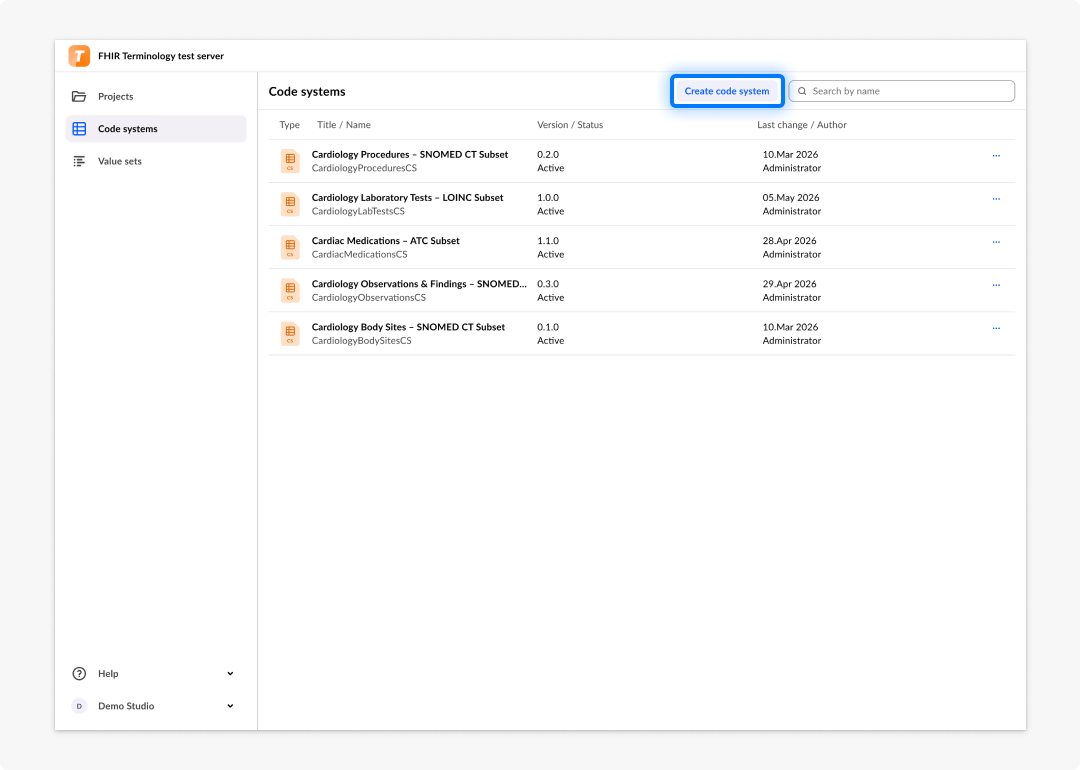
- Enter the parameters for the new Code System. Name and the Code System URI are required.
- Select Create. The dialog closes and the new Code System opens in the Code system editor.
Import from CSV
You can also pre-populate the new Code System with concepts from a CSV file.
- Browse or drag-and-drop a CSV file into the import area. Only CSV is supported.
- Select Create. The dialog closes and the new Code System opens with the imported concepts.
CSV format
The import file uses two header rows followed by one row per concept:
- Row 1 — column names.
codeanddisplayare the two built-in columns and are required. Every additional column becomes a property on the Code System, named exactly as it appears in this row. - Row 2 — property types. Defines the data type for each property column using the same set of types available in the editor (for example
CODE,STRING,INTEGER,BOOLEAN,CODING,DATETIME,DECIMAL). The cells undercodeanddisplayare left empty because their types are fixed. - Row 3 onwards — concept data. One concept per row. Empty cells are allowed for optional properties.
Example:
code,display,parent,kind,description
,,CODE,CODE,STRING
A01,Cholera,,,Infectious disease
A01.0,Cholera due to V. cholerae,A01,is-a,Caused by serogroup O1
In this example:
codeanddisplaycarry the required concept values.parentandkindare imported as properties of typeCODE—parentreferences another concept's code to build a hierarchy, andkindcarries the hierarchy relationship (for exampleis-a).descriptionis imported as aSTRINGproperty.
Any number of additional property columns can be added by repeating the same pattern — list the column name in row 1 and its data type in row 2.
The system validates the import and surfaces issues in inline banners. Examples include:
| Error | Banner message |
|---|---|
| Invalid file format | File must be in .csv format. |
| Invalid column header formatting | Invalid column header formatting. |
| Invalid encoding (not UTF-8) | Invalid encoding. |
| Missing code or display value | Missing code or display values. |
| Duplicated codes | Duplicated codes. |
| Self-parent, circular hierarchy or missing parent reference | Invalid hierarchy. |
| Property value does not match its data type | Invalid property value type. |
| Invalid language tag for designations | Invalid language value (BCP-47). |
If multiple issues are detected, an aggregated banner reports the total count and lets you expand all individual messages.
Edit a Code System
Open a Code System from the Code System list to edit it. The editor exposes five pages from the side navigation:
- Definition — Basic information and metadata of the Code System.
- List of Concepts — The concept table.
- Designations — Multilingual display designations for concepts.
- Hierarchy — Parent-child relationships between concepts.
- Preview — Read-only JSON preview of the FHIR resource.
Name and the Code System URI are required. All other values, parameters and settings define how the Code System is used.
Definition
The Definition page contains:
Basic information
- Title
- Name
- Code System URI
- Version
- Narrative
- Case sensitive
- Version needed
- Hierarchy meaning (
None,is-a,part-of,classified-with,grouped-by) - Content
Metadata
- Language
- Status
- Experimental
- Date of publish
- Publisher
- Copyright
- Description
- Contact
- Tags
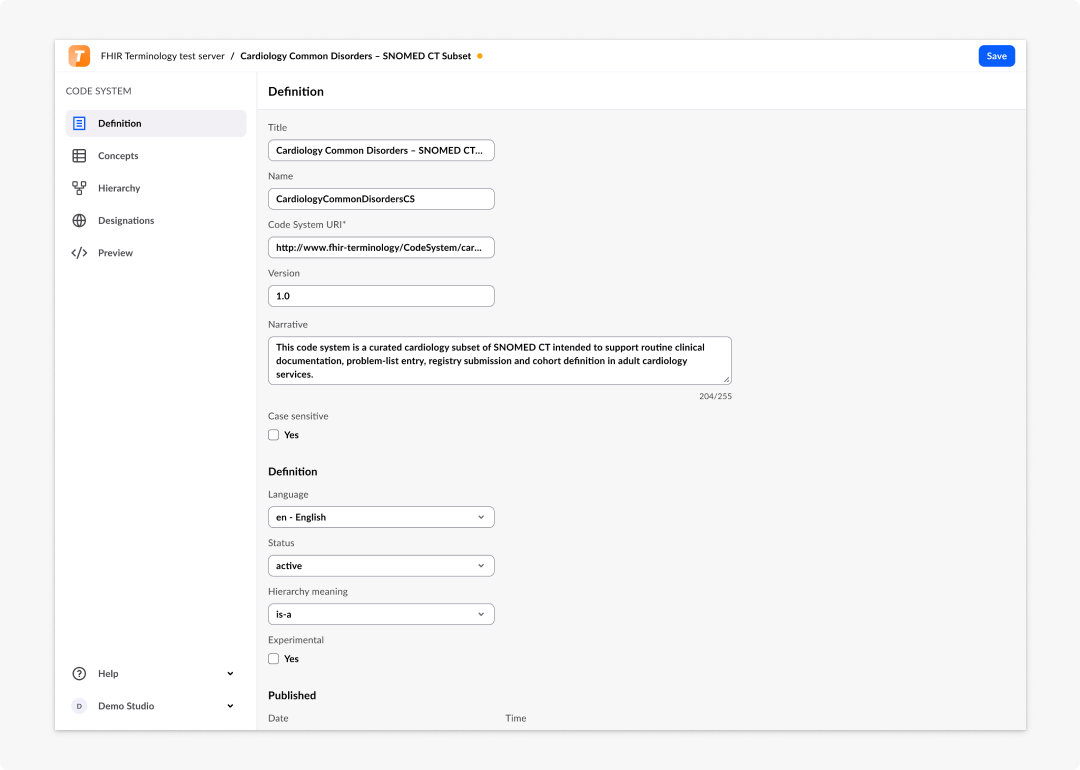
Hierarchy meaning can be set to None, is-a, part-of, classified-with or grouped-by. Set this value when the concepts in the Code System form a hierarchy and the relationship between parent and child concepts has a defined semantics.
List of Concepts
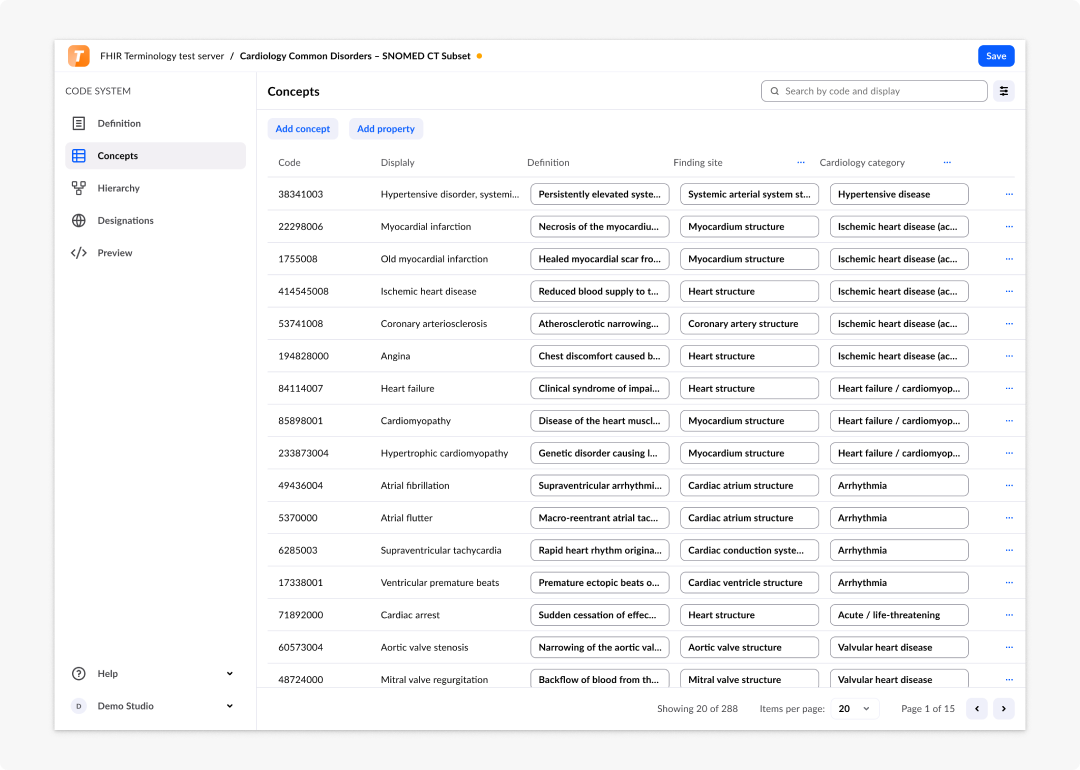
A concept is one row in the Code System. Every concept has two required values: Code and Display. The Code System can define additional values — properties — that appear as columns in the concepts table.
When the table is wider than the application window a horizontal scroll appears. The first two columns on the left and the action column on the right remain pinned.
Add a concept
- Select + Add concept in the concepts action bar. The Add concept dialog opens.
- Enter the Code and Display values. The system validates inputs as you type.
- Select Add. The dialog closes and the new concept appears at the top of the concepts table on the first page.
| Error | Field message |
|---|---|
| Code or Display empty | Value required. |
| Code is not unique | Value already exists. |
Edit a concept
Hover over a row and select Edit. The Edit concept dialog opens with all fields pre-filled. Confirm enables only when a valid change is made.
Duplicate a concept
Select Duplicate in the row actions. The Duplicate concept dialog opens with all fields pre-filled except the Code, which must be unique.
Delete a concept
Select Delete in the row actions. The Delete concept dialog opens. Confirming removes the concept from the table. If the concept has hierarchical dependencies, the dialog explains that the hierarchy must be removed first and the Delete button is not available until that is done.
Display settings
By default the concepts table shows all property columns. To focus on a subset:
- Select Display settings in the concepts action bar. The Display settings right panel opens.
- Check one or more columns. The table updates to show Code and Display plus the selected columns.
- Close the panel.
Properties
Columns in the concepts table are defined as properties. Code and Display are required for every Code System; additional properties extend each concept with structured attributes.
Each property has a type:
booleancodecodingdate timedecimalintegerstring
Add a property
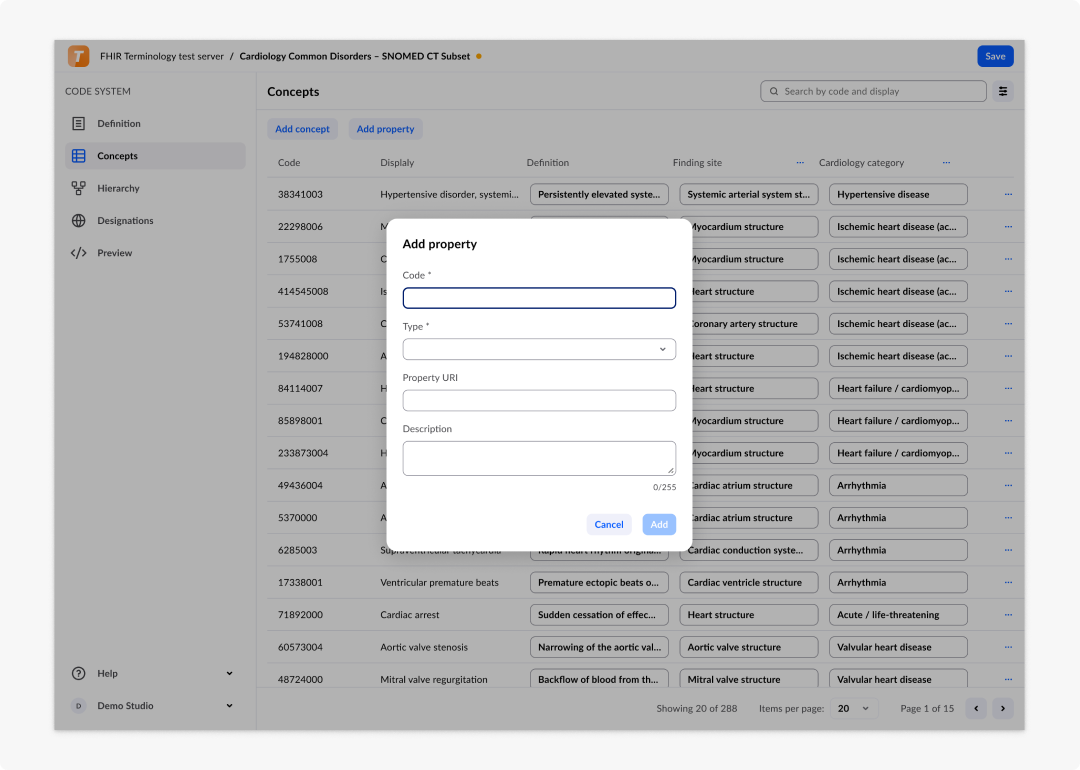
- Select Add Property. The Add Property to Code System dialog opens.
- Define the Property name. This is also the title of the column in the concepts table.
- Select the Type of the property.
- Optionally define the URI address of the Value Set to bind to the property.
- Optionally enter a Description.
- Select Confirm.
Coding property values
When a property is of type Coding, the value of each concept references a code from another terminology system.
- In an empty Coding property cell, select Edit. The Edit coding settings dialog opens.
- Enter the System URI and optionally the Version.
- Enter the Code.
- Enter the Display.
- Select Confirm. The dialog closes and the property cell shows the
Code — Displayvalue.
To clear the value, open the dialog and select Clear all before confirming.
| Error | Field notification |
|---|---|
| Required value missing | Value required. |
| Invalid URI format | Invalid value format. |
Delete a property
Deleting a property removes its column and all values stored in that column for every concept in the Code System.
Deleting a property is not reversible. All concept values stored in that property are permanently lost.
Select Delete a property, review the confirmation dialog and select Confirm.
Designations
A designation is an alternative display string for a concept, tagged with a language and an optional use code. Designations support multilingual interfaces, synonyms and alternative labels — for example, a SNOMED concept can carry an English preferred term, a Slovenian translation and a clinician-facing short name on the same row.
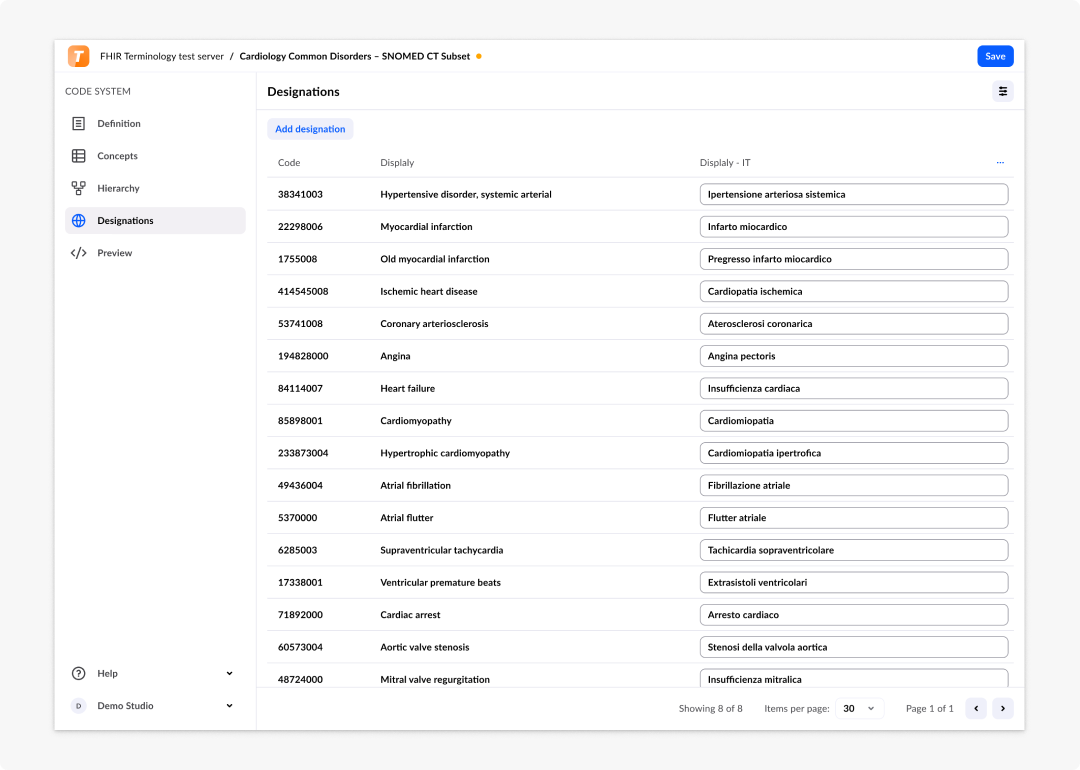
The Designations page shows a table where each row is a concept and additional columns expose the configured designations for that concept. Each designation captures:
- Value — The display text shown to the user.
- Language — The BCP-47 language tag for the value (for example
en,sl,de). - Use — An optional code identifying the purpose of the designation (for example a preferred term or synonym).
Add a designation language
- Select Add language. The dialog opens.
- Select the Language from the list. The list follows the BCP-47 standard.
- Select Add. A new column for the selected language is added to the table.
Edit a designation
Click on a designation cell to edit it inline — no additional dialog opens. Enter or update the value in the input field and confirm the change. Empty cells are allowed — only Code and Display on the List of Concepts page are required.
Delete a designation language
Removing a language column deletes the corresponding designation values from every concept in the Code System.
Deleting a designation language is not reversible. All values stored under that language are permanently lost.
Hierarchy
The Hierarchy page lets you organise concepts into parent-child relationships and review the resulting structure. Hierarchy is only available when the Code System is marked as hierarchical and a Hierarchy meaning has been selected on the Definition page (is-a, part-of, classified-with or grouped-by). When Hierarchy meaning is None, the page surfaces a notice instructing you to enable hierarchy in the Definition first.
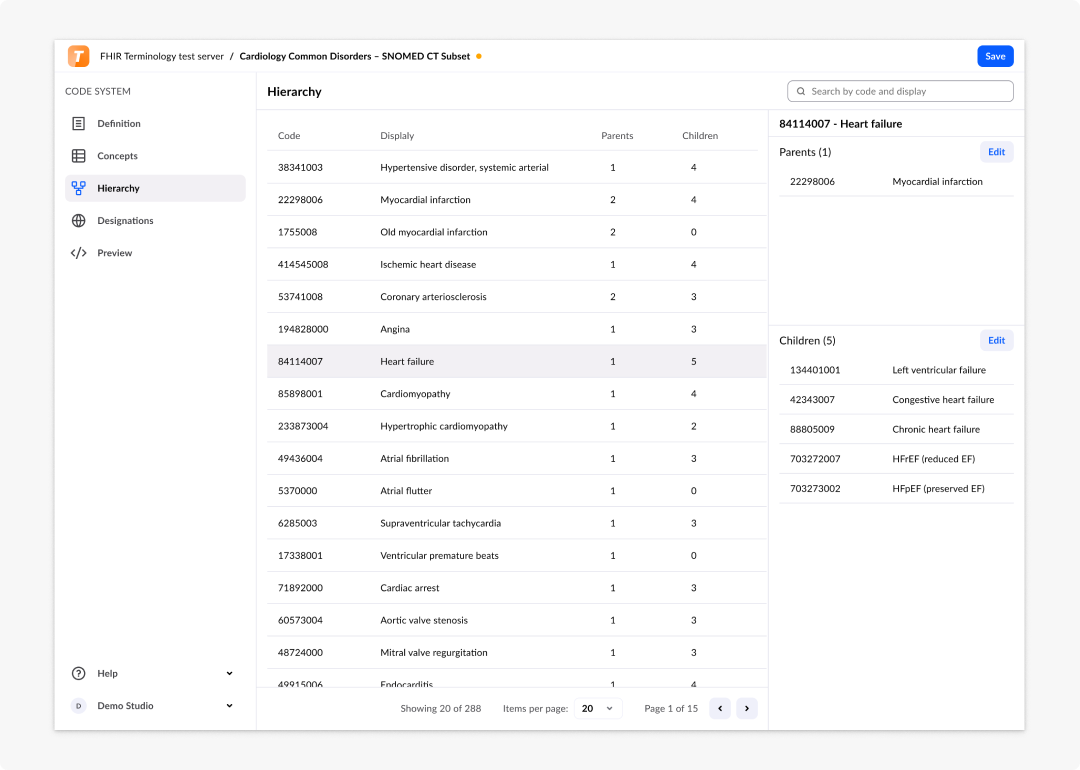
The page shows two coordinated views:
- Concept table — A table that reflects the current parent-child structure of every concept in the Code System.
- Concept details — The selected concept's code, display and direct parent.
Assign a parent concept
- Select a concept in the table or in the list of concepts without a parent.
- Open the Parent selector and choose the parent concept. The list is populated from the existing concepts in the Code System.
- Save the change. The table updates to reflect the new relationship.
Remove a parent concept
Clearing the Parent selector promotes the concept back to the root level.
The system prevents invalid hierarchy configurations such as a concept referencing itself as a parent, circular relationships and references to a parent that does not exist. These are reported as Invalid hierarchy validation errors.
Preview
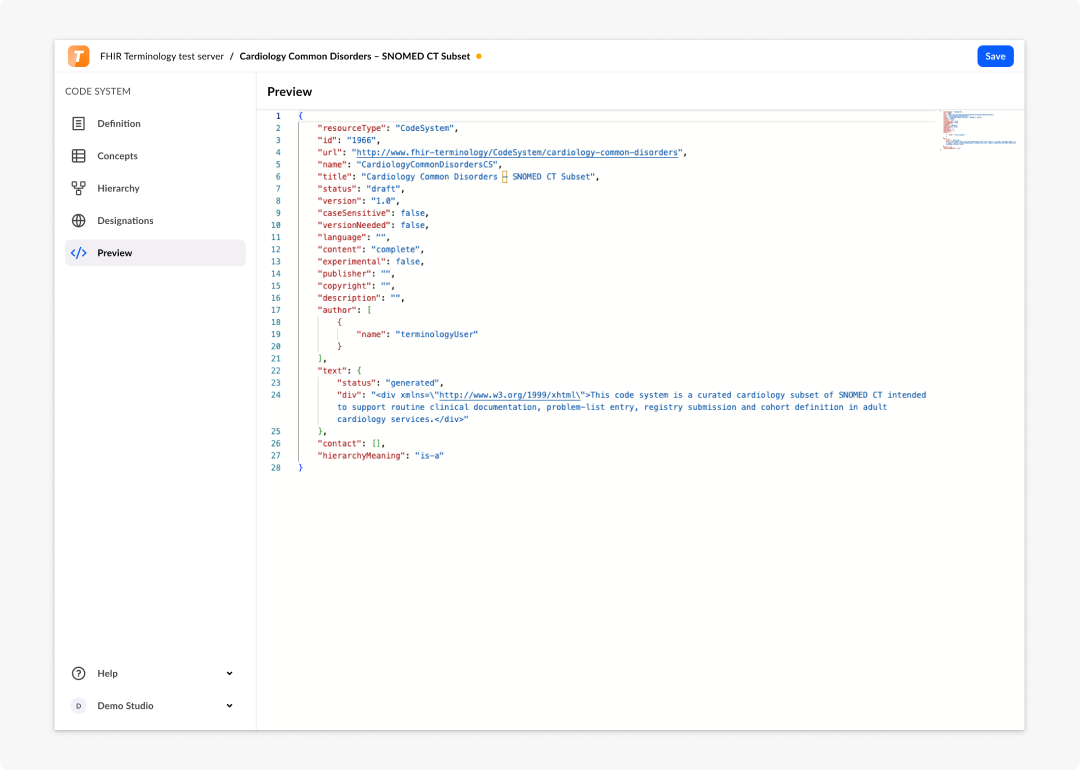
The Preview page shows the read-only JSON representation of the Code System, generated from the values configured on the Definition, List of Concepts, Designations and Hierarchy pages. The Code system ID assigned by the FHIR server when the resource is uploaded is also displayed.
Save and close a Code System
When you make a change, the editor enables the Save action and shows an unsaved indicator in the top bar. Selecting Save persists the changes and shows a success toast.
Closing the editor (selecting the Terminology editor icon) validates that all changes are saved. If unsaved changes exist, an Unsaved changes dialog offers to Save or Don't save before navigating away.
Value Set management
A Value Set defines a group of codes drawn from one or more Code Systems. Value Sets can be defined by composition rules, by hand-picked inline concepts or by any combination of the two.
Create a Value Set
When connected to a FHIR server, users with permissions can create a new Value Set.
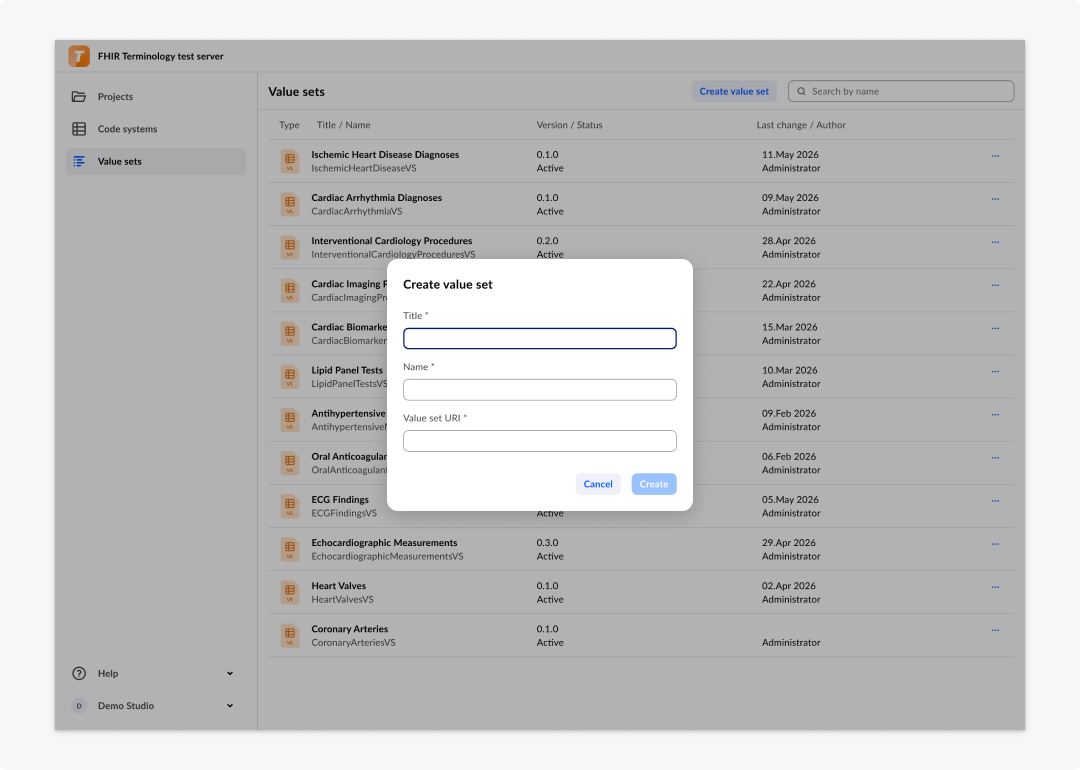
- From the Value sets page, click Create value set button. The Create value set dialog opens.
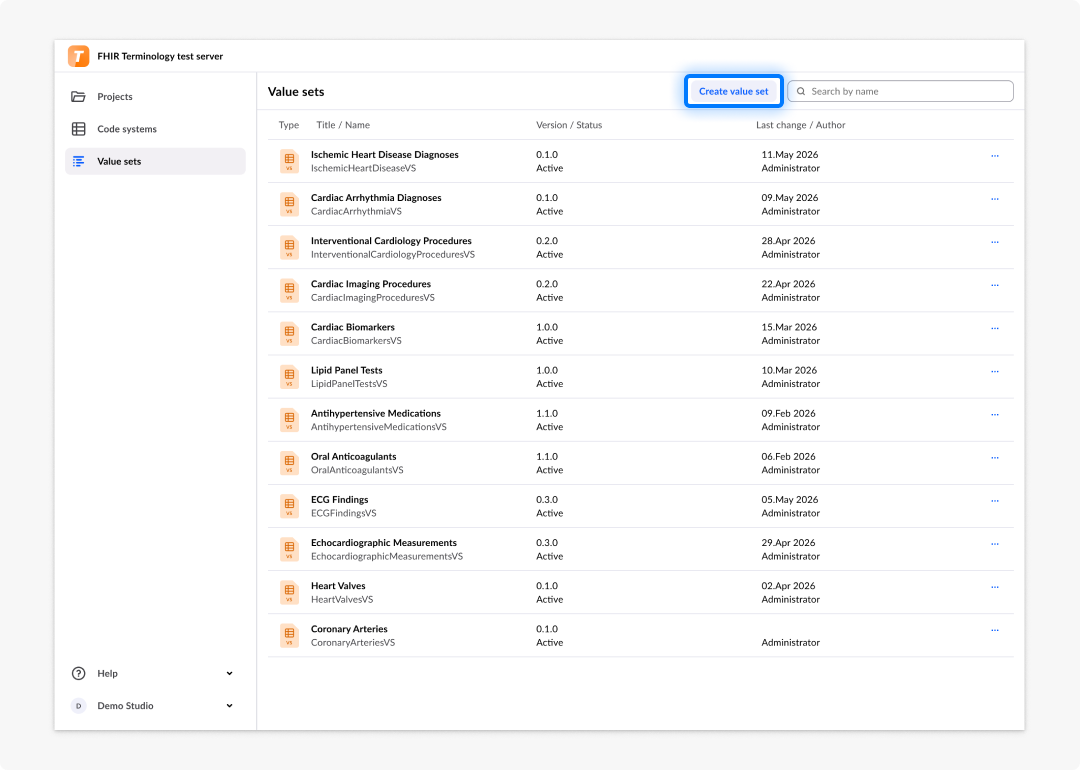
- Enter the parameters for the new Value Set. Title, Name and the Value set URI are required.
- Select Create. The dialog closes and the new Value Set opens in the Value set editor.
Edit a Value Set
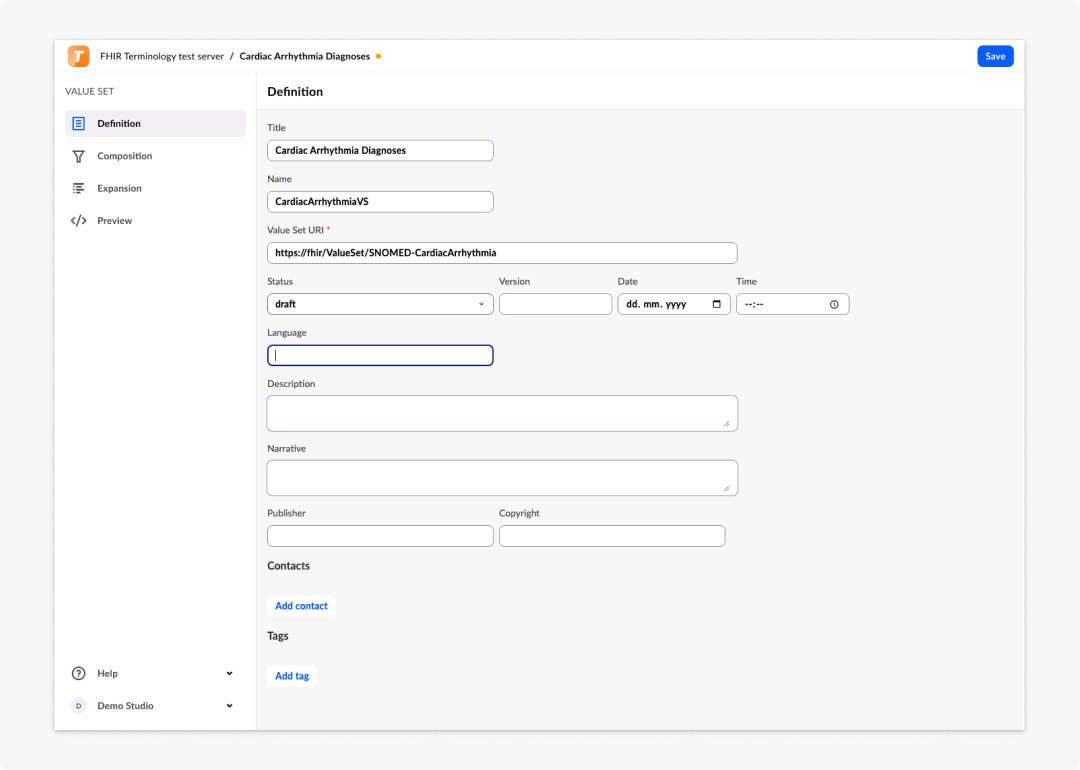
The Value set editor exposes four pages from the side navigation:
- Definition — Basic information and metadata of the Value Set.
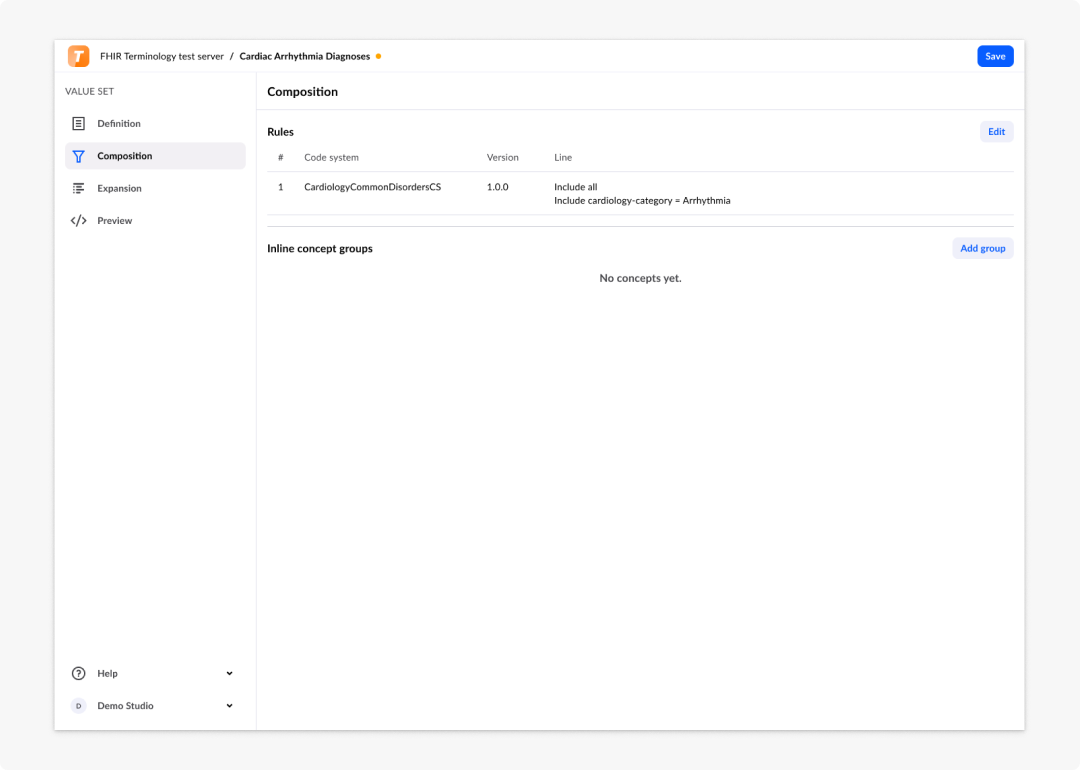
- Composition — Rules and inline concepts that define the Value Set content.
- Expansion — The list of all values that result from the composition.
- Preview — Read-only JSON preview of the FHIR resource.
Definition
The Definition page contains:
- Title
- Name
- Version
- Narrative
- Language
- Value Set URI
- Description
- Status
- Date of publish
- Publisher
- Copyright
- Contact
- Tags
Composition
In FHIR, every Value Set is based on one or more Code Systems. The Value Set is essentially a selection of values from those Code Systems, computed by the rule engine and optionally extended by inline concepts.
Add a Code System
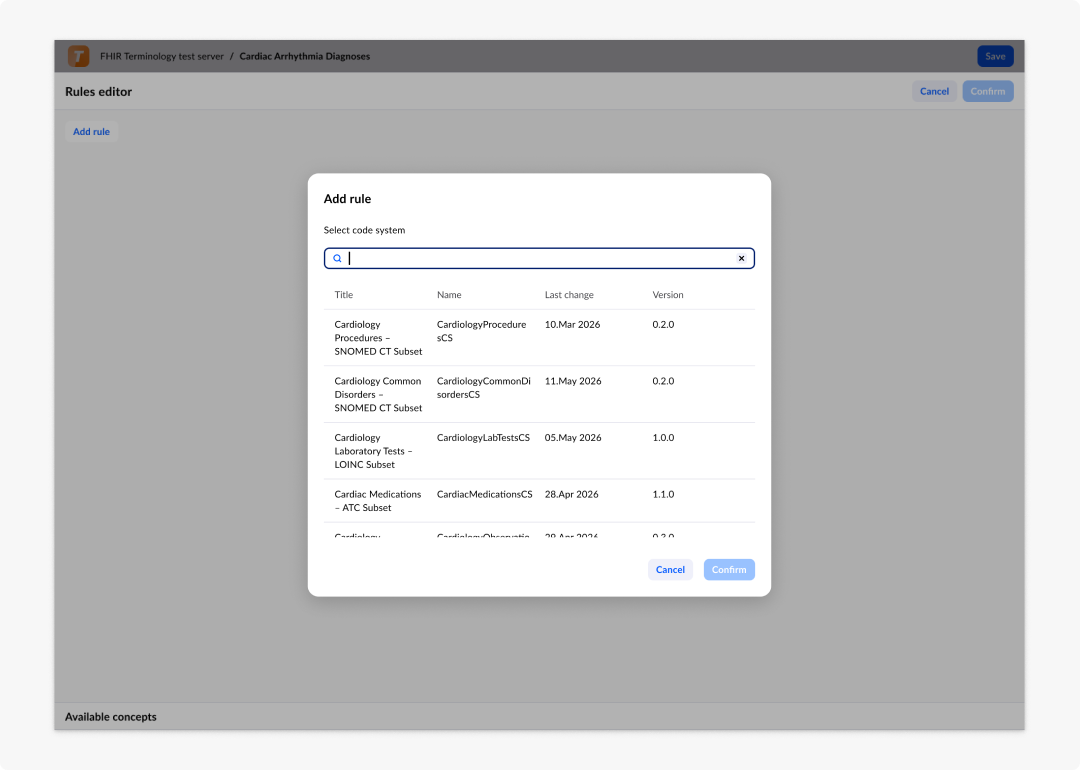
When creating a Value Set at least one Code System must be selected as a base. More than one Code System can be added.
- Select Add rule. The Add Code System dialog opens with the list of Code Systems on the connected FHIR server.
- Select one of the Code Systems.
- Select Confirm.
Create a rule
Each rule defines an operation over the concepts of the included Code System:
- Include all — Includes all values from the Code System. No further configuration is needed.
- Include — Includes values from the Code System using the configured logic.
- Exclude — Excludes specific values defined by the configured logic.
To configure a rule:
- Select a property from the Code System (for example Code or Display). The list is populated from the properties defined in the Code System.
- Select an operator:
=is ais descendant ofis not aregexinnot ingeneralizes
- Enter a value manually in the input field.
In theory it is possible to build very complex conditional clauses across several Code Systems and Value Sets, but in practice rules are kept simple.
Rule result preview
The right-hand Expansion preview panel shows the list of values produced by the rules currently configured on the Composition page.
Inline concepts
A Value Set can be extended manually with inline concepts, or built entirely from inline concepts with no rules at all.
To edit inline concepts, open the Inline concepts editor full-screen dialog from the Composition page. Inline concepts have a fixed Code column, a free-width Display column and additional designation columns when configured. The Save action becomes available once a change is made; closing with unsaved changes opens the Unsaved changes dialog.
Edit rules
To open the Rules editor full-screen dialog, select Edit rules in the Rules section of the Composition page. The editor lets you add, edit and remove rules.
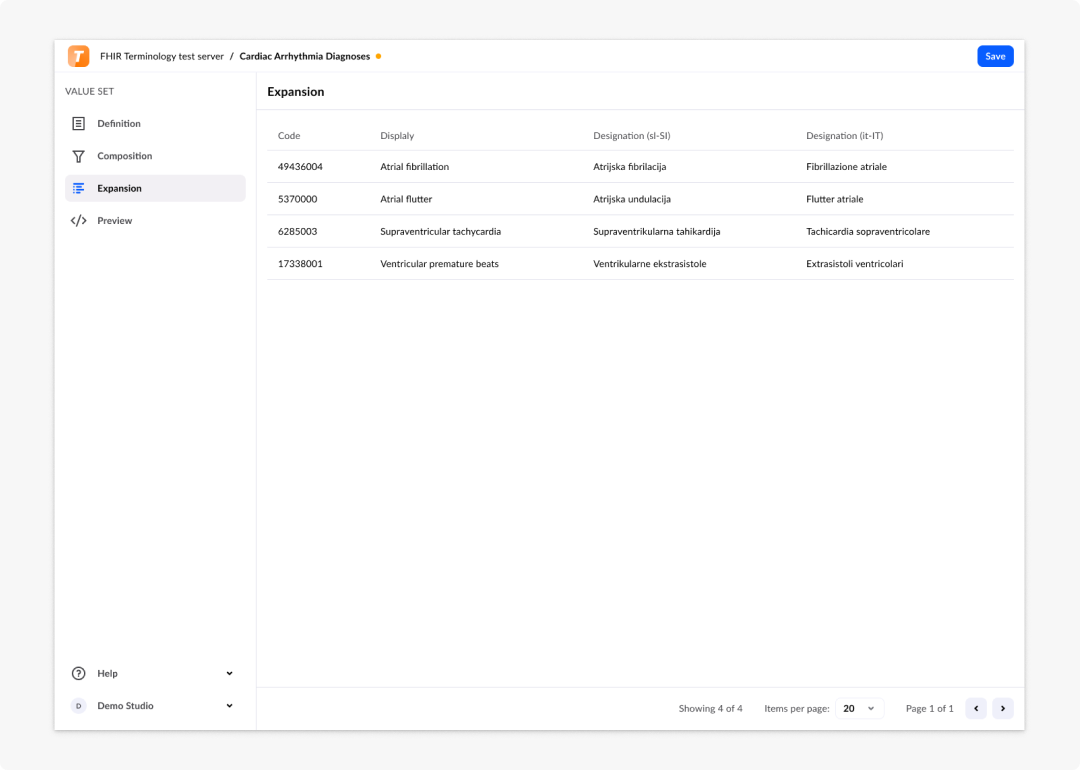
Expansion
The Expansion page shows the list of all values currently included in the Value Set. The list is the result of the rules configured on the Composition page plus any inline concepts.
The Expansion table shows Code, Display and all available designations.
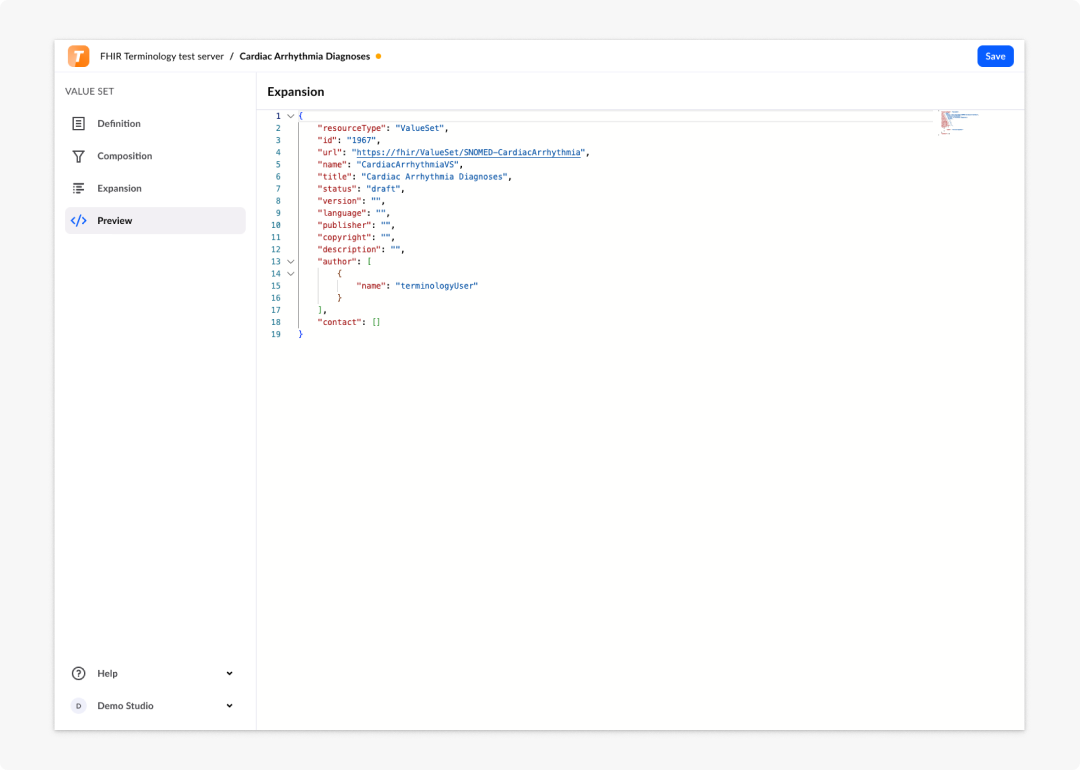
Preview
The Preview page shows the read-only JSON representation of the Value Set, generated from the values configured on the Definition, Composition and Expansion pages.
Value Set actions
From the Value set editor you can also export the Value set as a static set of concepts.
Save and close a Value Set
The save and close behaviour mirrors the Code System editor. Selecting the Tool icon validates that all changes (including changes inside the Rules editor and Inline concepts editor) are saved; the Unsaved changes dialog offers to Save or Don't save before navigating away.
Frequently asked questions (FAQs)
What FHIR resources can I manage in the Terminology editor?
The Terminology editor manages FHIR Code Systems and Value Sets. Both are exposed on dedicated tabs of the Terminology list and support create, view, edit, duplicate, export and delete actions. The New split-button menu also exposes a Browse FHIR resources entry for read-only browsing of additional resource types on the connected server.
Do I need a terminology project to use the editor?
Yes. A terminology project must be configured before any Code System or Value Set can be authored. The project stores the connection to the FHIR terminology server and the credentials used to access it. If no project exists, only the Projects page is available in the side navigation; the Code Systems and Value Sets pages are disabled until a project is added.
What file format is supported when importing a Code System?
Only CSV files are supported. The selected file is used to pre-populate the new Code System with concepts on creation. The system validates the file before import and reports issues such as invalid encoding, missing Code or Display values, duplicated codes, invalid hierarchy or invalid property value types in inline banners.
What property types can a concept have?
A concept property can be of type boolean, code, coding, date time, decimal, integer or string. Coding properties reference a code from another terminology system and are configured through the Edit coding settings dialog, which captures the System URI, optional version, code and display.
Can a Value Set contain manually entered concepts?
Yes. A Value Set can be built entirely from inline concepts, composed only of rules over one or more Code Systems, or any combination of the two. Inline concepts are managed in the full-screen Inline concepts editor opened from the Composition page.
What happens when I delete a property from a Code System?
Deleting a property removes the column and all values stored in that column for every concept in the Code System. The action is not reversible. The system displays a confirmation dialog explaining the impact before the deletion is committed.
What roles are required to use the Terminology editor?
Two roles control access: DEMOGRAPHICS_ADMIN grants full create, read, update, delete and settings access, while DEMOGRAPHICS_READ grants read-only access for browsing and lookups. The role is enforced both in the UI (action availability) and on the FHIR terminology server.