Connecting data
This content progresses from beginner to advanced Studio user knowledge.
Connecting data to your form means linking form components or fields to data sources so that what users enter is stored in the right place and what they see reflects the right information. In Better Studio, this connection can be simple (adding a template field that binds automatically) or more sophisticated (pulling existing patient data from the CDR or calling an external API).
This page covers the main methods for connecting data to a form.
Template field binding
This is the most common method. When you add a field from the Templates tab in the left panel, that field is automatically bound to the openEHR data path defined in the template.
This means:
- You do not need to configure a data path manually.
- Data entered by users is stored in a clinically structured way in the CDR.
- The data can be queried later using AQL.
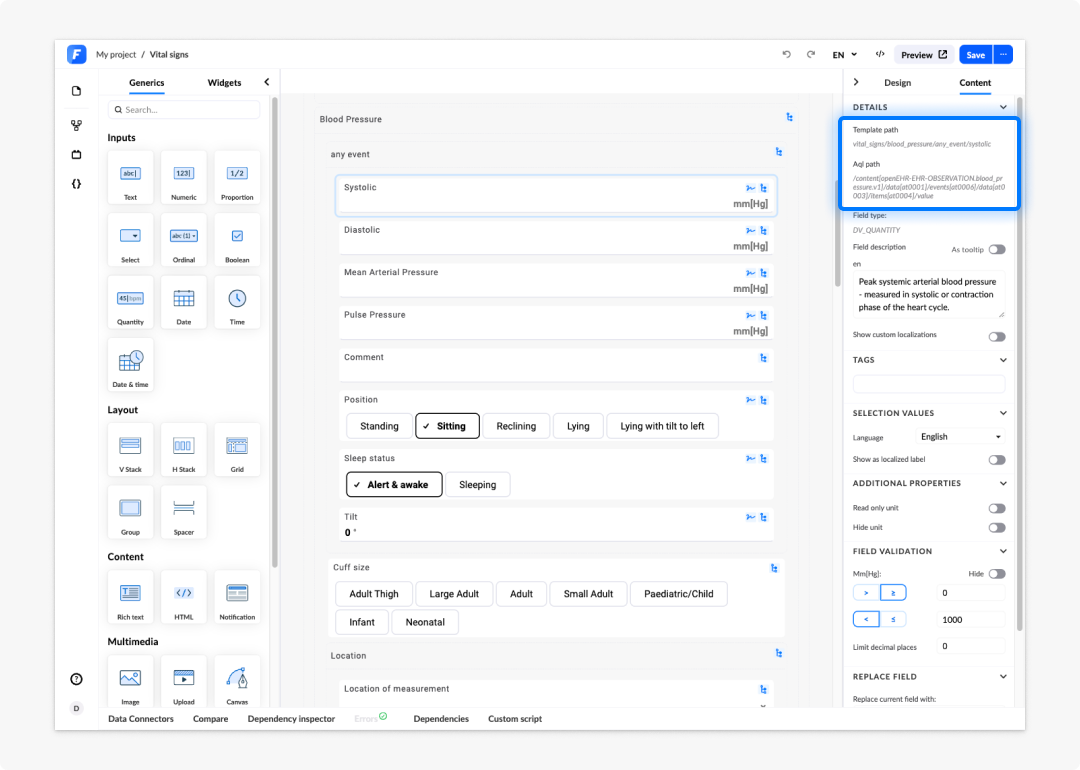
Checking a binding
Select a template field on the canvas and look for the Data path or Binding property in the property panel under Content tab. This shows the openEHR path the field is connected to.
Variables
In Form builder, a variable is a named slot that holds a value during a form session. Think of it like a temporary container. You give it a name and during the form session that name points to a specific value you can read or write.
We differentiate between:
- Internal variables
- External variables
- Static variables
Internal variables
An internal variable is a value that exists only within the form during a session. It is not stored in the CDR when the form is submitted.
Use internal variables to:
- Hold a calculated or derived value (for example, a BMI calculated from height and weight)
- Store a temporary flag that controls form behaviour (for example, "has the patient consented?")
- Pass a value between pages within a multi-page form
Adding internal variables
To add an internal variable:
- In the editor, open the Variables panel on the left-hand side menu.
- Select Internal and click on Create new.
- Give the variable a name and set its initial value if needed.
- Reference the variable in expressions or field bindings using its name.
External variables
External variables serve as read-only entities dedicated to transmitting data from parent applications to the form. Unlike internal variables, their values cannot be determined within the form itself. Instead, a parent application is responsible for setting their values and passing them to the Form renderer as inputs. These variables can be accessed in every form in your project, thereby simplifying their use within all forms.
There are three existing cases of externally defined variables:
- ehrID
- openEhrUrl
- terminologyURL
External variables are globally defined at the project level. Once created, they become accessible across all forms within the project. They can not be removed or changed, and we can only set the test value for them during the form building process.
Even though external variables can be created within the Form builder, it's crucial to note that their deletion is not performed within this interface. To remove external variables, navigate to the project Administration.
Adding external variables
Creating an external variable is similar to creating an internal variable, with the key distinction being that the value field for external variables is disabled during the creation process.
Some of the external variables have the "lock" icon next to them. They are defined by Studio and locked. You can only override their test value. Some examples of locked external variables include: ehrId, terminologyURL, and openEhrUrl.
- ehrId: Because passing the ehrId to a form is almost always necessary, the ehrId variable always exists. EhrId is integrated into the whole structure of the Form Renderer.
- terminologyUrl: The terminologyUrl variable is the URL of the terminology adapter that a form can use.
- openEhrUrl: The openEhrUrl variable holds the URL of the openEHR server that a form can use. If the parent application does not pass a value for openEhrUrl, the form renderer will automatically assign the openEHR server URL to the variable.
AQL variables
As of Better Studio 3.13, AQl variables are deprecated. Please use AQL views in combination with Data connectors instead.
Converting AQL variables
To convert AQL variables to custom Data connectors, please follow the steps below:
- Go to the AQL variables tab
- Find the AQL variable you want to convert.
- Click Convert.
- If the AQL variable was a value, you will be prompted to create a view from the AQL query. If the AQL variable was a view it will be automatically converted to a Data connector.
- Fill out the parameters in the Data connector and run the query to see the results.
- Rebind the form fields to the new Data connector.
Static variables
A static variable is a read-only variable calculated automatically by Form Builder at runtime. Static variables are defined by the Form renderer library and are available in every form. You cannot add, remove, or change their values.
Use static variables to:
- Reference the current date or date-time for setting default field values
- Check whether a form has been pre-filled with existing composition data
- Access form metadata such as the form name, version, or current page
Static variables are available in the Static tab of the Variables panel. Select any variable to read its description.
Data connectors
A data connector is a form-level integration point that connects a form to an API call. Data connectors allow a form to:
-
Fetch data from external systems
-
Send data on submission or on a user action
-
Display the response in form fields or variables
-
Data connectors are configured in the Data connectors tab in the bottom panel of the editor. Each connector defines the API call, its authentication method, request parameters, and how the response maps to the form variables or fields.
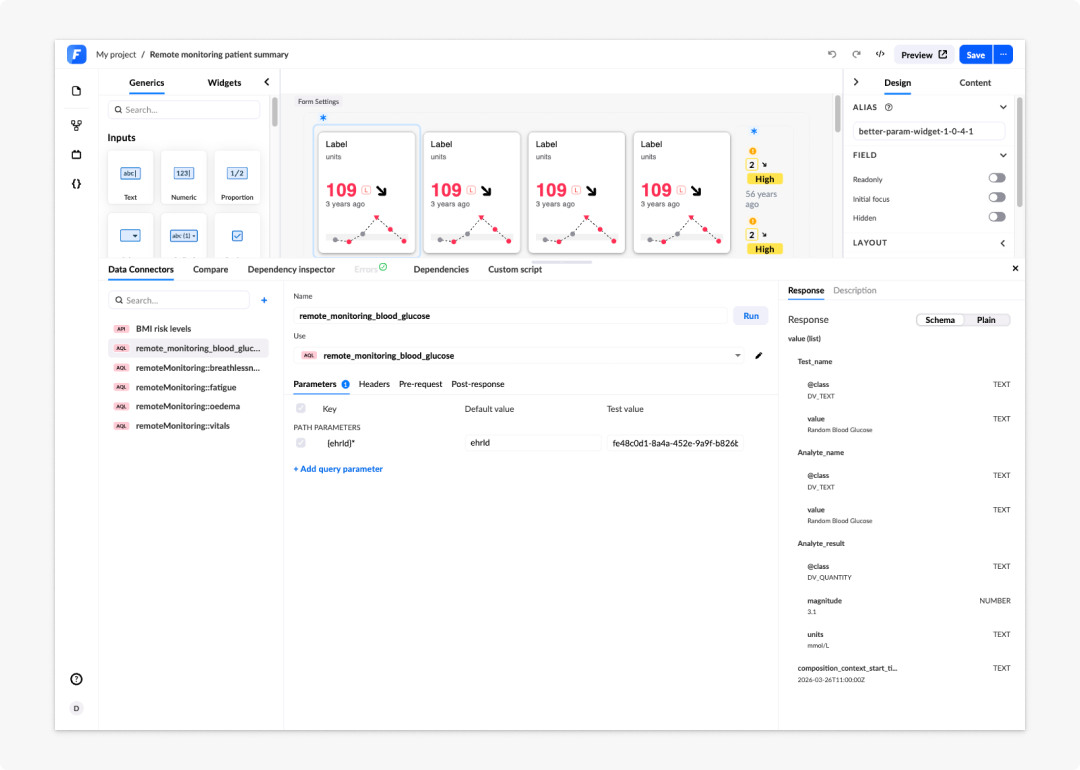
Data connectors created in Studio 3.13 or later will not function with Form Renderer version 3.12 or earlier.
Converting API connectors to data connectors
As of Better Studio 3.13, API connectors are deprecated. Please use Data connectors instead.
To convert APIs created in Studio versions 3.12 or older into data connectors, open the Data Connectors tab at the bottom of the panel. There, you will see a list of APIs from previous versions that are currently being used.
Clicking on an API will present a message stating that the API is being used by the form and that it must be converted to a data connector before it can be edited. After creating the data connector, you will need to rebind the data in the components that used the API.
Local APIs will be converted into custom data connectors. Global APIs will be converted into data connectors that are added from the project's API connectors.
Important considerations before converting
When converting an API connector to a Data Connector, keep in mind the following considerations:
Rebinding requirements
If your form uses complex components such as image maps, converting the API connector will require rebinding the data source for each coded text field. For large image maps (for example, 30 or more areas), this process can be time-consuming because you will lose the existing image map connections during conversion.
Handling script references
If the API connector you want to convert is used in scripts, you will need to update those scripts after conversion. This is because Data connectors only have one field called “Data connector name”, whereas API connectors have two fields: “API connector name” and “API call name”. For your converted Data connector to work correctly, you must:
- Open the scripts that reference the old API connector and API Call names.
- Replace these references with the new Data connector name.
- Test the scripts to ensure they function as expected after the update.
Do you need to convert?
Not all API connectors must be converted. If your changes are limited to the API connector itself (for example, updating global settings such as authorisation), you can make those changes directly in the API connector without converting it. This approach helps avoid unnecessary rebinding work for minor updates.
When does conversion makes sense?
Convert only if you need to use Data connector features or make structural changes that require rebinding.
Types of data connectors
There are three ways to add a data connector to a form.
- Resources from project: Use an existing API connector or AQL view that has already been set up at the project level. This is the recommended approach when the same API call is used across multiple forms in a project.
- AQL views: A specific variant of project resources. If you have AQL views stored in your EHR Server, you can connect them to your form directly as a data connector. The view runs at the time the form calls it and returns structured clinical data.
- Custom API call: A self-contained connector defined entirely within the form. Use this when you need a one-off integration that does not need to be shared across the project.
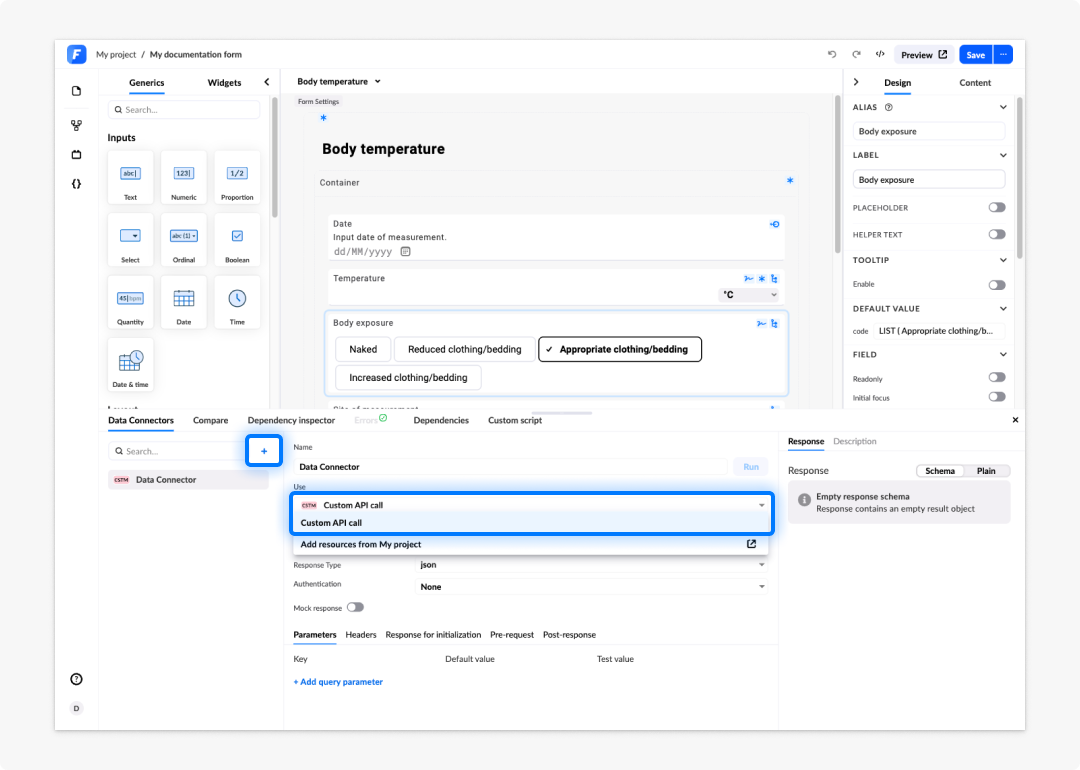
Data connectors require API knowledge and a correctly configured external endpoint. Test connectors in the Form playground before deploying to production.
Adding a data connector from project resources
To add a data connector using an existing project API connector or AQL view:
- In the editor, open the Data connectors tab in the bottom panel.
- Click the + button and select Add resources from "project name".
- To use an API connector: Expand the API connector in the list and select the API call you want to use. Review the details in the right-hand panel, then click Add.
- To use an AQL view: Select the AQL Views tab, select the view, click Add, and set up its parameters. Run the view to confirm the response.
- Configure any parameter or header overrides as needed.
- Rename the data connector if needed.
Adding a custom data connector
To create a custom data connector with a single, form-specific API call:
- In the Data connectors tab, click the + button and select Custom API call.
- Give the connector a name.
- Select the HTTP method: GET (read), POST (create), PUT (replace), PATCH (modify), or DELETE.
- Enter the endpoint URL.
- Select the expected response type.
- Select the authentication type: None, Basic, Bearer, or EHR Platform credentials.
- Add any parameters and headers (optional).
- Click Run to test the connector and confirm the response.
For POST, PUT, and PATCH methods, you must provide a response for initialisation before the connector can be run. This tells Form builder what response structure to expect so you can bind its fields before calling the API with real data.
Custom data connectors are embedded in the form itself and are not shared with other forms in the project.
Binding data from a data connector
After creating a data connector, you can bind its response to a form field:
- Select the form field you want to populate.
- In the Properties panel, select the data connector.
- Select the data source type: list or single item.
- Select which field from the response you want to display.
The endpoint must return a list if the form component expects a list, for example a column list or a dropdown with dynamically loaded options.
Mock response
When using the mock response in an API call, you replace the data that the API call would return with your own mock data. These mock responses simulate, or 'mock', the behaviour of real responses and have similar characteristics to the authentic responses.
This allows you to quickly create prototypes or demos of complex forms that would otherwise rely on external API response data, which can sometimes be unpredictable and perhaps out of your control.
However useful, once you have created forms for actual production, you will most likely want to replace them with real data.
In the video below, we show you how to create and use a mock response.
Response for initialisation
Response for initialisation is used to tell Studio what to expect when the call is made. It allows you to bind values to fields without depending on a test call response.
This can either be an object with real data that has all of your parameters or you can use it as a mock template on which to bind all of your necessary fields. In run-time, this will be replaced with actual data from the API call. A common use case is when you need to bind values while configuring a multimedia field.
When creating or configuring a POST API call, most of the time you can't post anything to the resource server since you can't provide all the necessary data for posting.
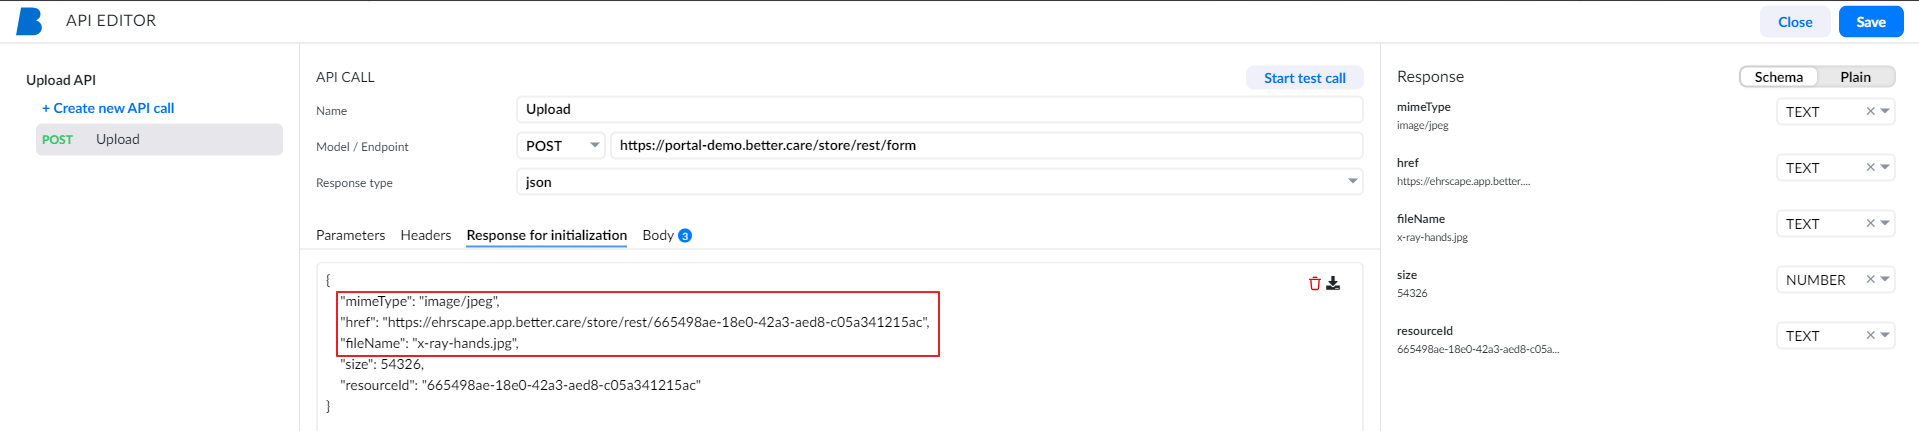
When configuring a multimedia field, you still need to know which fields the POST call accepts and what response it returns so you can properly bind it to the field.
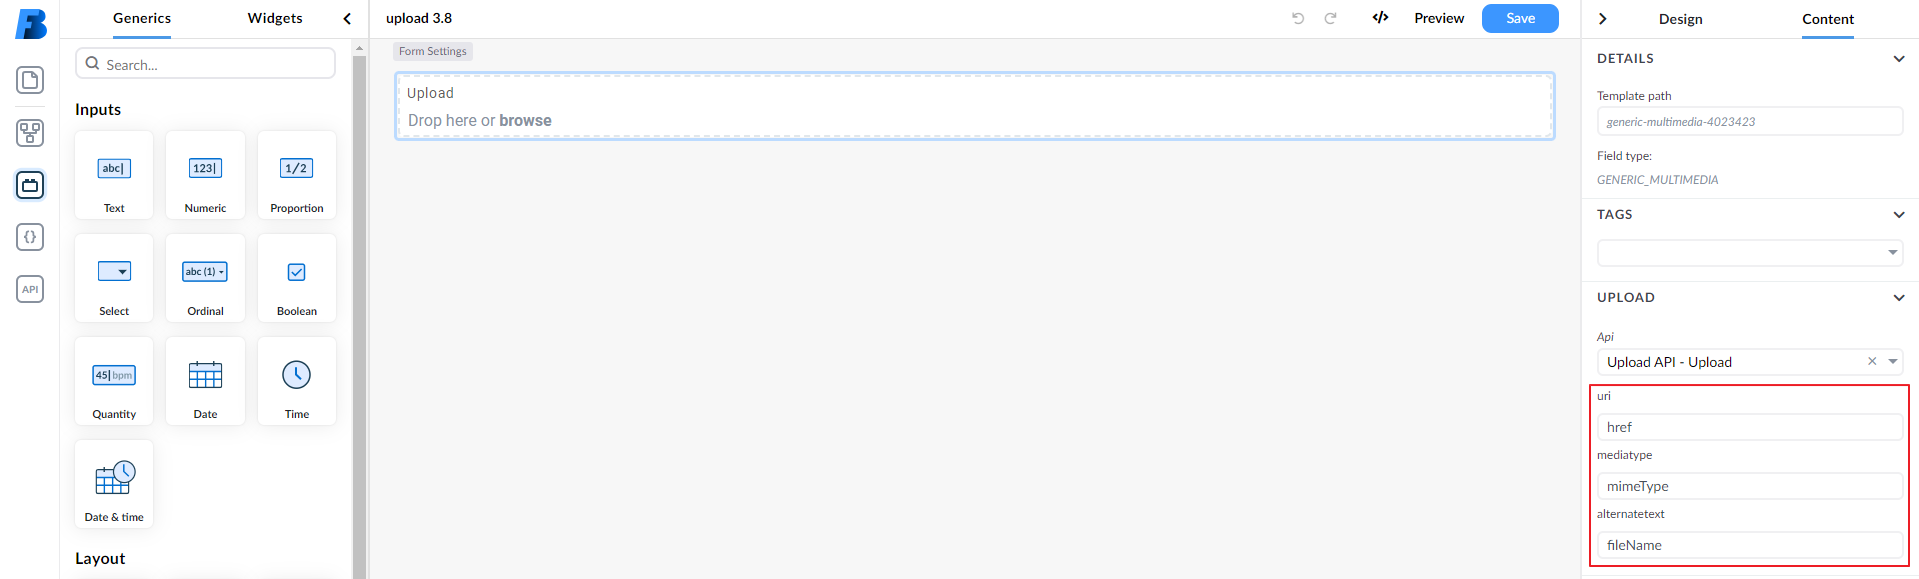
Another example is when you know that every call will not have all the values, but you still need an example with all key-value pairs, so you can bind them to the fields:
Request body types
For requests that send a body (POST, PUT, PATCH), the connector supports the following body types:
- json – a JSON object. Use
<placeholder>tokens in the body to insert dynamic parameters. - form-data – a
multipart/form-databody built from key/value parameters. - x-www-form-urlencoded – a URL-encoded body built from key/value parameters.
- File/Binary – the raw bytes of an uploaded file are sent as the request body, with no wrapping or encoding.
Dynamic parameters in the request body
For json bodies, insert a placeholder anywhere a value is expected by wrapping a name in angle brackets, for example <userId>:
{
  "title": "testpost",
  "body": "<mypost>",
  "userId": 1
}
As soon as you leave the body field, each placeholder appears as a row below the editor, with its Key matching the placeholder name. Click the Default value field to bind it to a form field, static value, variable, or expression. At runtime, every <placeholder> token in the body is replaced with its bound value before the request is sent.
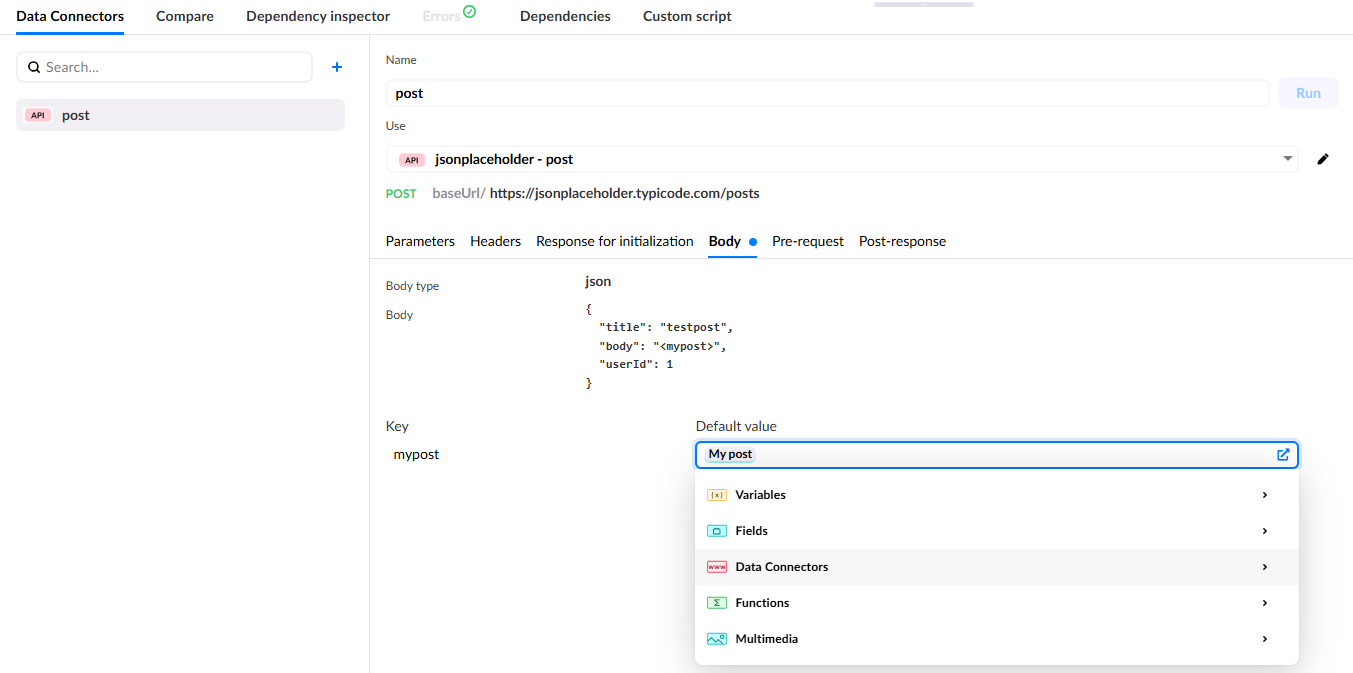
A placeholder must be quoted, for example "userId": "<userId>" — unquoted, it's not valid JSON and the body won't save. This means its value is always sent as a string.
You can also set the whole request payload from a script, instead of using placeholders, with setApiRequestPayload.
File/Binary body
The File/Binary body type sends a file uploaded in the form (through a file-upload / multimedia component) as the unwrapped request body. This is the body type to use when a target API expects the raw file itself rather than a JSON- or form-wrapped payload.
- Payload source – the file uploaded in the form component that triggers the connector. The file's bytes become the request body verbatim.
- Content-Type – set the
Content-Typefield to the MIME type the target expects (for exampleapplication/pdf,image/png,image/jpeg, orapplication/octet-stream). The field accepts free text and offers common presets. Leave it empty to automatically use the uploaded file's own MIME type. An explicitContent-Typeheader added under the connector's headers always takes precedence.
Example: uploading a document to a FHIR repository
To store a document in a FHIR document repository (IHE MHD / XDS-on-FHIR):
- Configure a
POSTconnector to the repository's/Binaryendpoint with the File/Binary body type. LeaveContent-Typeempty to use the uploaded file's type, or set it explicitly (for exampleapplication/pdf). - Wire the connector to a file-upload component so the uploaded document is sent as the body. The response contains the created
Binaryresource id. - Use that id in a second connector that creates a
/DocumentReferencepointing at the storedBinary.
Pre-request and post-response scripts
Data connectors support optional scripts that run before or after an API call is executed. Scripts are written in JavaScript and have access to two objects: api and processor.
The api object lets you call other API connectors (api.callApi()) and set variable values (api.setVariableValue()). The processor object controls the flow of the script and must be called at the end of every script to signal completion or failure.
Pre-request scripts
A pre-request script runs before the API call is made. Use it to prepare data the call depends on. An example would be retrieving an authentication token and setting it as a request header.
Pre-request scripts can be defined at the connector level (running before every call in that connector) or at the individual call level. If a pre-request is defined at both levels, the connector-level script runs first, followed by the call-level script.
Every pre-request script must end with one of the following:
processor.done()— continues to the next script or the original API callprocessor.error()— stops execution and surfaces an error
If neither is called, the script will not complete.
api.callApi('myApi', 'myApiCall', false)
    .then((result) => {
        api.setVariableValue('myVariable', result);
        processor.done();
    })
    .catch((e) => processor.error(e));
Post-response scripts
A post-response script runs after the API call returns. Use it to reshape the response before it is passed to the form. Common use cases include:
- Combining properties into one (example: Merging
firstNameandlastNameinto a singlenamefield). - Flattening nested data structures into a simpler, flat structure.
- Filtering response items and mapping them to a new data model.
Use processor.responseData to access the raw API response. Once you have reshaped the data, pass it back to the form with processor.done(result).
let result = {
  property1: processor.responseData.firstProperty,
  property2: processor.responseData.secondProperty
};

processor.done(result);
Frequently asked questions (FAQs)
Do I need to manually configure a data path when adding a field from a template?
No. When you add a field from the Templates tab in the left panel, it is automatically bound to the openEHR data path defined in the template. You can verify the binding by selecting the field on the canvas and checking the Data path or Binding property in the Content tab of the property panel.
What is the difference between an internal variable and an external variable?
An internal variable exists only within the form during a session and is not stored in the CDR on submission. It is used for calculated values, temporary flags, or passing values between pages. An external variable fetches existing data from the CDR and makes it available within the form, for example displaying a previously recorded value while the user completes a new form.
What are the three ways to add a data connector to a form?
You can add a data connector from project resources, using an existing API connector, or AQL view already set up at the project level. You can do that from AQL views, connecting AQL views stored in your EHR server directly to the form, or as a custom API call, a self-contained connector defined entirely within the form for one-off integrations that do not need to be shared across the project.
What is the purpose of pre-request and post-response scripts in data connectors?
A pre-request script runs before the API call is made and is used to prepare data the call depends on, such as retrieving an authentication token. A post-response script runs after the API call returns and is used to reshape the response before it is passed to the form, for example combining separate fields or flattening a nested data structure.
What happens to unbound fields when a form is submitted?
Unbound fields will not write to the CDR on submission. You should only unbind a field if you are certain the data does not need to be stored in a structured way.