Previewing and saving
This content is intended for all Studio users.
Before testing a form in Form playground or deploying it, use the Preview screen to check how it looks and behaves. This page covers the Preview screen, how to save and export forms, and (for advanced users) the Compare tool for reviewing changes between versions.
We've touched on some of this in the Start here section, but let's expand on how to preview and save your work in Form builder.
Preview screen
The Preview screen gives you a live render of your form within the Form builder environment. It shows how the form will appear to end users and lets you test basic interactions without leaving the editor.
To open the Preview screen, click the Preview tab at the top of the canvas area.
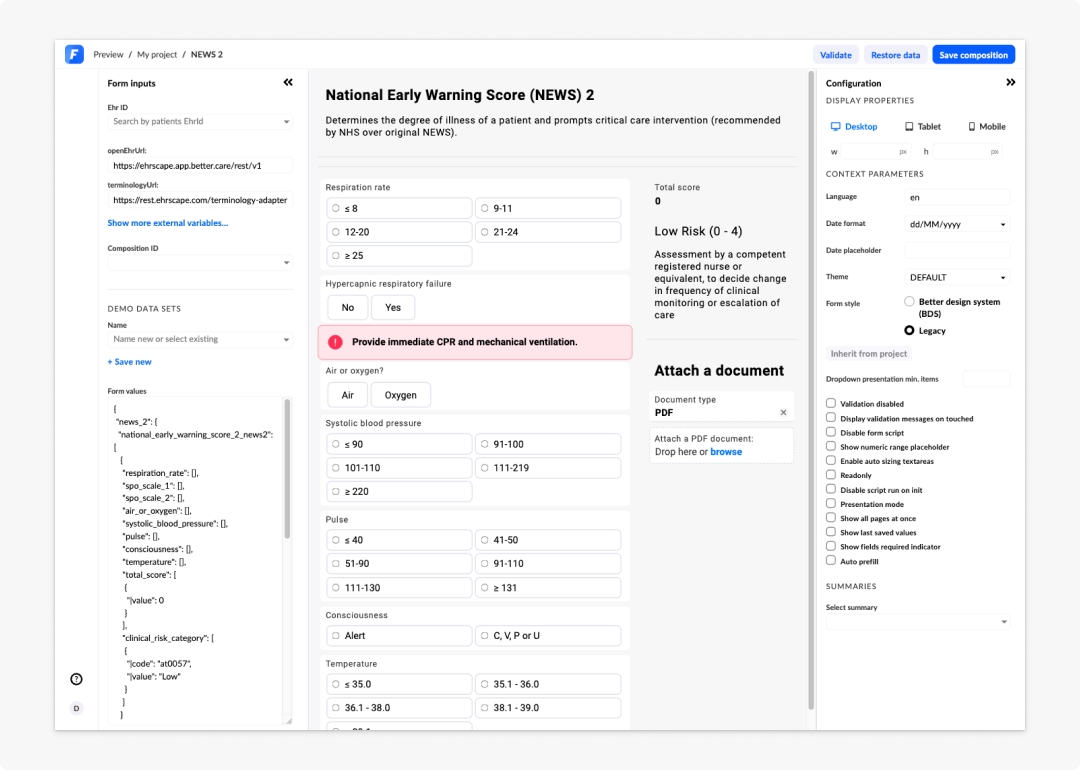
Device preview
The Preview screen includes a device switcher that lets you view the form as it would appear on:
- Desktop: Full-width view
- Tablet: Medium-width view
- Mobile: Narrow view
Check your form on all three sizes to ensure that the layout adapts correctly. Pay particular attention to multi-column containers. These may stack to a single column on mobile depending on your layout settings.
Entering test data
In the Preview screen, you can interact with the form as a user would — typing into text fields, selecting options, navigating between pages, and triggering dependencies.
This helps you verify:
- That conditional logic works as expected (fields show and hide correctly)
- That required field validation triggers at the right time
- That multi-page navigation works correctly
- That the layout looks right with data in it
The Preview screen does not connect to the CDR and does not submit any data. It is for visual and interaction checking only. For testing with real data, use Form playground.
Saving forms
Form builder saves forms manually. There is no auto-save.
To save a form:
- Select Save in the editor toolbar.
- Each save creates a new version in the form's version history. If you close the editor without saving, your changes will be lost.
Save frequently, especially before making significant structural changes or testing in Form playground.
Form versioning
Every saved state of a form is stored as a numbered version. Versions are structured as major.minor.patch, which should help you differentiating between major and minor changes within a form or summary.
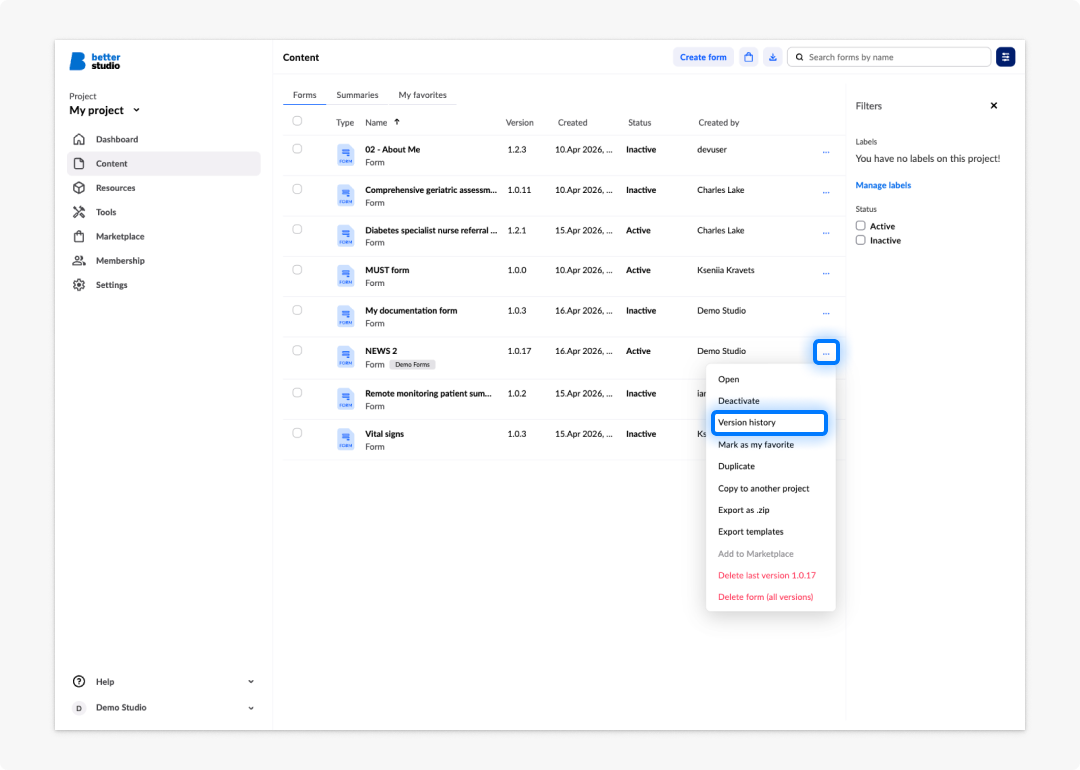
You can access the version history from your project:
- From your project, go to Content.
- A list of forms and summaries will appear on the screen. On the right, you will see a version history icon and an ellipsis icon (...).
- Click on the ellipsis and select Version history.
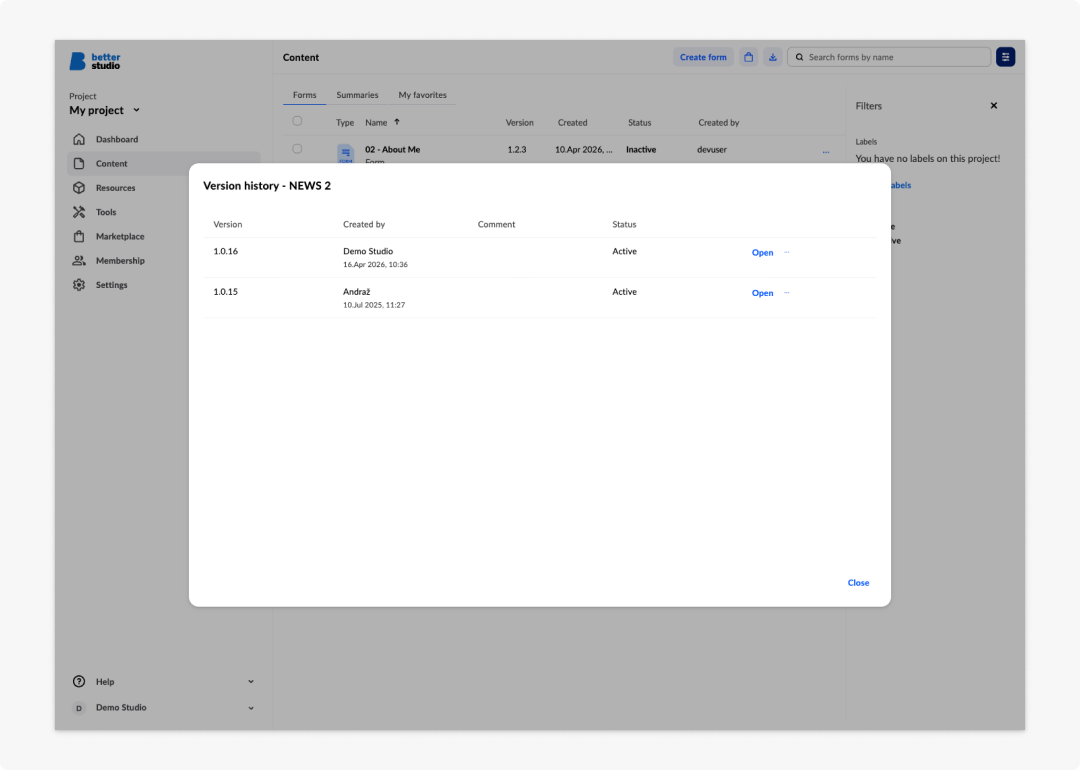
- A modal window will appear, showcasing the form version history.
If your form has only one version, a message will appear, saying: "No previous versions available."
- If there are multiple versions to a form, you will be able to see who created them, if they left a comment, the form's status (active or inactive), the open button with a couple action options.
You can retrieve previous versions of a form by clicking on Open next to the desired version. We suggest you use the Compare tool (see below) to identify the changes and differences first, as reverting back to a previous version and saving it may cause issues. You can also export a previous version and re-import it under a different name.
Exporting forms
Exporting a form saves it as a file (.zip with JSON or template format) that can be imported into another project or environment.
To export a form:
- Go to the select screen.
- Open the options menu for the form (three dots or right-click).
- Select Export as .zip or Export template.
- Save the exported file.
To import a form:
- Go to the project dashboard.
- Select Import from the top right corner.
- Drag or browse to upload your .zip folder or template folder.
- Upload the exported file.
A modal window will open, showing you what files are contained within your folder. You can select or unselect the specific elements you want to import from the folder. If you already have an existing template that matches the one you're importing, the modal will not let you select it.
Exporting and importing is the standard method for moving forms between environments — for example, from a development project to a production project. It is also used when sharing form templates between organisations.
Frequently asked questions (FAQs)
What is the difference between the Preview screen and Form playground?
The Preview screen is built into Form builder and provides a quick visual and functional check of your form during the build process. It does not connect to the CDR and does not submit any data. Form playground is a dedicated testing environment for more thorough testing with real CDR connections, submission testing, and validation. Use Preview to check layout and basic interactions; use Form playground for full pre-deployment testing.
Does Form builder save automatically?
No. Form Builder saves forms manually only. Each save creates a new version in the form's version history. If you close the editor without saving, your changes will be lost. It is recommended to save frequently, especially before making significant structural changes or testing in Form playground.
How do I access the version history of a form?
From your project, go to Content. In the list of forms and summaries, click the ellipsis icon next to the form and select Version history. A modal window will appear showing all saved versions, including who created them, any comments left, and the form's active or inactive status.
Can I revert to a previous version of a form?
You can retrieve a previous version by clicking Open next to the desired version in the version history. However, it is recommended to use the Compare tool to review the differences first, as reverting and saving may cause issues. You can also export a previous version and re-import it under a different name.
How do I move a form between projects or environments?
Export the form from the select screen by opening the options menu and selecting Export as .zip or Export template. To import it into another project, go to the project dashboard, select Import, and upload the exported file. A modal window will show the contents of the folder and allow you to select which elements to import.